
Leaderboard


Popular Content
Showing content with the highest reputation on 24/06/14 in all areas
-
Hello, I've just recently finished this poor detailed and annoying kit. It comes with a brilliant set of decals thou. On the model, there are 157 all together. Three days of work just on decals:) Anyways, there it is: Thanks for any opinions. Bart.14 points
-
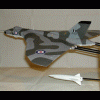
From the new Mark 1 kit. Just a couple of pics of the finished model. A full build article will appear in the August Scale Aviation Modeller International (SAM Publications). Great kit!7 points
-
Hello! This is my latest finished build, a Fleet Air Arm Martlet which was based in North Africa in 1942 with 805 Sqn. I used the lovely Tamiya 1/48 Wildcat and built it mostly OOB. The only add ons were the Aeromaster decals and a set harness from the spares box, the base was homemade and the figures were from Hekler and Garros. I enjoyed this build very much and the Tamiya wildcat is a fantastic little kit-a good fun build! Here are the pics, would love to hear your thoughts!6 points
-
I've had this kit in my stash for over 30 years, now with some detail items and a plan it was time to build. The cockpits and radio/gunners position were made up from an Airwaves detail set. Wheel wells from a WEM detail set, which also gave me a back up wing fold set. Airwaves' seemed stronger. The interior was painted flat aluminum, but mixed with a tad of black to darken is slightly, but not steel color. several areas needed supports add and backing up to keep the cockpit in line. When the major construction was done, I had to go back over many of the corrugations to repair them from the sanding damage.. The upper wing was painted with MM Chrome Yellow. but a bit more red was added to match a paint chip I have for this color. Yellow wings decals also give this advise in it's instructions. All other paints were Tamyia. except the Blue on the Chevrons and the cowling. Decals came from Yellow wings and help from a fellow modeler for the national insignia's. Thanks for looking in Comments welcomed Glen6 points
-
Well this one has been a real struggle. See here for details. A few silly little problems that took a long time to sort out and were nothing to do with the model and all to do with the modeller! A striking aeroplane, that the model does justice too. The only thing missing from the kit is a beaching trolley, but it won’t take long to knock one of those up. Any and all comments welcome Cheers Grant5 points
-
I've wanted to do the aircraft from the film since I saw it as a kid. I have a small "Hollywood Air Force" here and this would be the perfect addition. I also felt that a classic British kit, a movie about a British squadron, a fantastic British aircraft all filmed at well known British locations really should be posted at Britmodeller.com. This build came about because after years of having numb, tinkly hands and fingers I have had the "Bilateral Carpal Tunnel Release" surgery. One hand at a time, two weeks recovery each. My "normal" scale is 1/72 but I thought something bigger would be easier to work on while at home. This needs no introduction as I'm sure you're all familiar with it... Nor does this movie... Everything needed to build a replica from the movie is in the box except for the markings. The aircraft used are target tugs with fake machine guns added and then repainted in fictitious markings. Let's go... Leave out the radios, none appear in the cockpit shots. The only modification we have to do is put machine guns in the clear nose as they did in the film aircraft. The barrels are separated and I will glue them in at the end. I assembled the canopy, polished and Futured. Attached with the 5 minute epoxy and wet finger method. I added a landing light to the starboard wing. This will get a packing tape cover over the two sequins. Everything else went together quickly. 5 minute epoxy used for some alignment time. I know the bomb bay bulge is the wrong shape but I can live with it. Some putty here and there and especially those legendary wing gaps and then some Tamiya Fine Primer all over. I chose to do Wing Commander Grants aircraft, HT-G, serial HJ 898. This is the aircraft he flies until it's crashed after his "Murder Mission". Neither the colors, the pattern or the sizes of the markings and camouflage are correct for a WWII Mosquito, except for the fuselage roundels. This shot is used as Grant's a/c several times so I went with this as my "average truth" for the camouflage pattern and markings. A coat of Future then the decals. The markings all came from the stash and are all mixed sizes picked to come as close as possible. I had to slice the code letters to make them more narrow. The serial numbers are press-type on clear decal film. I wish I could have come closer on the code letters but that's as good as it's going to get. That's all for now, I will post completed pics when we're done. How long before that rousing theme music in my head goes away?5 points
-
Hi guys,heres this mornings progress.After glossing yesterday morning got a bit of decalling done and U/C doors added etc.Tamiya supply silver backgrounds to the upper stars and bars which due to the fact that I used tamiya silver look superb,sadly and surprisingly the upper wing one was way out of scale for the decal so I have not used it.one other thing I noticed was that photographs of the actual aircraft show the grill under the engine cowling seems to be painted black as opposed to models and profiles on the net which show them as NM or yellow.5 points
-
My first 'what if?' project and I actually really enjoyed it. I know B29s did eventually end up in RAF service anyway as Washington B.1s, but I thought it would be interesting to see what they might have looked like if a small detachment of Super Fortresses were given to the RAF as part of an extended lend/lease agreement to continue the bombing of long range European targets late in 1945 / early 1946. Being the tip of the sword of bomber technology at the time, it seemed only logical that 617 squadron should get them. Hence the 'KC' squadron codes. I used the Minicraft B-29A kit, scratchbuilt a basic cockpit and exhaust outlets, and opened up the radiator intakes. I added an H2S like bulge under the fuselage between the bombays using something from the spares box. Paints were Humbrol / Revell / Tamiya acrylics. Also added G-H bombing leader tail markings, wire whip antennas, and 1/144 decals sourced from eBay. The 'Big Bruiser' nose art came from an old Revell armour kit.4 points
-
Hi, Continuing the trend for floatplanes at present, here are some images of my completed Special Hobby 1/48 Heinkel He115. The full build can be seen on Hyperscale.com under 'Plastic Pixs' section - just search for the thread title 'Special Hobby 1/48 Heinkel He115 - Part1' (and Part 2, immediately following). A bit of a tough nut to crack, but well worth the effort. The beaching trolley does not come with the kit, it's homemade. The rear machine-gun mount may not have been used on this particular aircraft, but it was used on aircraft of 1./Küstenfliegergruppe 506 and as I rather like it, I employed artistic licence. There is a slight colour difference with some photos as they were taken in natural light, and others not. The paints used are from the new Humbrol WW2 Luftwaffe range and although needing thinned out a lot if brush painting, as they are here, they build up to a good final result. They spray well too, if you're using your airbrush. The unit insignia and I/D letter 'C' on the fuselage sides are hand-painted on a blank transfer sheet (white-coated for the insignia and clear for the letter 'C'), varnished and then applied as any other waterslide marking. Additionally, the horseshoe-shaped ammunition feed for the ventral cannon is fashioned from scrap plastic card, very carefully heated to facilitate bending into shape and once cooled, painted dark grey and inserted into the fuselage. This item is very prominent in photos of the aircraft and consequently, can't really be ignored in the kit if choosing that weapon option. It sits tilted slightly forward when viewed in profile through the lateral nose transparencies. The aircraft is finished in the markings of 1./Küstenfliegergruppe 906, believed operational in Norway in 1942/43. Hope you like the results and thanks for looking in. Regards Paul4 points
-
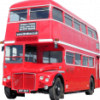
Finished this morning. Not 100% happy with it, mainly as the door windows decided to fight back as I installed them, so much so that I resorted to cutting the right hand one, and posing it as if the window has been wound-down. Tried to pose the drivers door open but it refused to co-operate aswell, so I've simply pushed it in to place fore the benefit of the camera... - I'll keep working on it tho'. As mentioned with previous projects always happy to take any comment, question or criticism. Kit - 1:35 Italeri/Max-Peerless Paint - All acylics (mainly Tamiya). Washes & pigments for weathering. Decals - Tamiya & Kit Extras - None. AFN Ian4 points
-
As requested by some kind fellow, i have attached some pictures of my Stratocruiser. The bottom two are of the finished model complete with antennae. The legend Cpt.Ron Sears is a small tribute to one of our best modelling friends who is sadly no longer with us.4 points
-
Tamiya Challenger 1 from the way back when! After a trip to the BAOR back in 1991, myself and a few club members got the build bug - for me it was all Gulf stuff which was popular at the time with the guys having just returned. Concord Publications were around at the time and cranking out books on all-sorts and the BAOR was one of them. I saw a Chally 1 with Grass/Turf as a camouflage sceme and did this version. At the time I was quite chuffed with myself but has it stood the test of time??? Over to you! The kit Ferret bin was rubbish - to small and misshaped Yuk! - so I scratched a new one which I cast in resin, also the smokies box too. The Cheiftain bin on the turret left is also a resin copy Weathering was Naples Yellow and a dirt slurry with a brushed (pin) wash over a Mid Bronze Green & Black Base The Aerials aer some fuse-wire which desperately need changing at some stage. I think that with todays weathering powders and gadets I can bring this vehicle up to date. What do you think Guys?4 points
-
Some more pics.............................4 points
-
Small update. I worked on the main gear doors some more and lathered on some future on the topside of this kit. I did, what I hope, is the last round of filling, sanding, priming on these gear doors to blend in the hump for the larger wheels on Italian F-104s. So, after a final sand down of the Mr. Surfacer . . . I then primed them to await their last coat of aluminum paint. While waiting for the primer to dry, I gave the top side decals a protective coat of future. I think this will help protect them from the light weathering on the starboard side and final finishing top coats. Next up, gear doors and weathering. As always, all comments welcome.4 points
-
Some close up of the engine :4 points
-
Built this several years ago, Took better pictures . So, posting them here. Hope you all like it. Regards Vivek3 points
-
Just to prove that I have put a finished model onto a base he's one I made earlier. Tamiya Cromwell IV with the Crew from the Churchill for effect The base came in at a phenomenal cost of about £1.50 admittedly, a few years ago, but the sea-foam moss was the biggest expense. Ah! those were the days......3 points
-
Hello everyone, Greeting from Viet Nam, this is my Zvezda La-5FN with Eduard photoetch and Karaya resin engine. This model was built for an local online contest, you can see other build here : http://www.mohinhvn.org/forum/forumdisplay.php?f=173 Thanks for watching !3 points
-
A few years ago a Buran Russian shuttle was transported by barge from Rotterdam to the museum of technik in Speyer Germany. And how often do you get the chance te see a shuttle....so I got up early, it was an very cold and windy day, the barge was said to pass the city of Tiel at around 8.30 - 9.00 in the morning, but when I got there at 8.00 it had already passed Ran back to the car and raced to Nijmegen, parked the car and made another sprint up the bridge so I could see it pass underneath. And as it came under the first bridge about 5 kilometres from my bridge, it reduced speed , and coming to a hold at the quay. So a third sprint had to be made, how close can you get..... Worth all the frustrations and freezing cold temperatures, not many can actually say they've toutched a shuttle! Thanks for watching. Dave3 points
-
Finished.. Not quite how I wanted it but learning with each build.. Kept underwings clean as did not want to ruin the beautiful lines of the plane. Weathered it a little to much perhaps. .. Sorry for the poor photos..3 points
-
Hendie, I feel your pain regarding the current budget crunch and familial obligations. They sometimes infringe on modeling time and purchases, but can't be helped. New update. Before I begin to put all of the miscellaneous doo dads and hangy down things necessary to complete this kit, thought it might be best to finish with the remaining decals. What is left are the national insignias and stencils. First up are the decals for the missiles. I will have two Magic 2 and two Mica missiles underwing. There are miniscule decals for each missile. The bottom photo has the edge of a scalpel blade for scale reference. Next up I finished decaling the bottom of the plane. Other than the national markings are there other decals you query? Yes there is! In an exercise of futility, I placed each and every stencil in its appropriate place. All you have to do is get your magnifying glass out to see them. Here are two examples. In the last picture there are actually 5 decals that were placed on or near the wingtip. I chalk these up to all the work I do on cockpits and interiors that once closed up, are never seen again. I then proceeded to do the top side decals with these results. I am impressed with the fit of Hobby Boss kits, as this is my first to put together. However, they really need a better decal manufacturer. These things are hard to work with as they are thick and do not like to be moved once put down. They also have a very bad tendency to curl up, no matter how small they may be. Their only saving grace is they will react and behave if copious amounts of Micro Sol is applied. And, they can be moved/adjusted for about 30 seconds before the Micro Sol starts to react with them. For some, once placed, I could not move them for love or money and had to apply to Micro Sol just to ease them into place. I normally do not go through a half bottle of Sol for a 1/72 kit. Enough being a grouch, on with the show. Decals are dry, so I begin to apply the final bits and bobs. I start with the underwing stores and pylons. First up the main fuel tank. Next are the rails for the Micas. The outer wing vanes are applied And each underwing fuel tank So, I am going to let these dry a bit before I proceed with the Apache missiles, the Micas and the Magics. After that, up top is the refueling probe and some various antennae and this baby is ready for the final finishing coat and inspection. All comments are welcome.3 points
-
Hi and thank you giemme. I don't really have a lot of space spare - I know I'm probably going to make a few more planes so thought I'd better have somewhere to put them. I'm going to have to find a spare bit of wall to fix the shelf to! Hi sdk_uk and thank you. Are you suggesting I might be a little too obsessed with Spitfires?.................because I think you may be right! (....and I've got ideas for a couple more Spitfire projects!!) I am, however, going to do a second D-Day build which isn't a Spitfire!!! I've already bought an Airfix 1/72 Mk.1B Typhoon and am going to get a German tank to try my first ever diorama. I don't think I've built a tank since I was a child so it could be interesting....... Hope you have a good day too. Hi Stew and thank you. Hi Miggers and thank you. A lot of how this turned out is down to your's and Pascal's help and support. With regards the test flight......... they've got the engine cowlings off at the moment but as soon as they've figured out how to get them on I'm sure she'll be ready to go! Kind regards, Stix3 points
-
I did an experimental attempt at a Dunlop tyre. It looks much better after I sanded the logo down a LOT.3 points
-
Modest progress tonight, here is the update. The resin in the tanks was solid but in that slightly tacky condition, this stuff does take well over 24 hours to fully cure: Out of interest I weighed the tanks, they were 21g so a useful increase has been achieved and they no longer rattle of course: I drilled out some of the soft resin from the location holes and checked they still fitted OK: There is some surface contamination to sand off but if I do that now it will clog my sanding sticks so will leave that until tomorrow. I cleaned up the filler here: and here: Those were mounted for primer, as was this: Note I am still putting off the wheels, maybe I will be in the mood tomorrow. Instead I think I will check all the instructions and sprues to make sure I haven't missed anything vital.3 points
-
oh dear off we go again...this whole eduard 109 thing has been done to death already on here...please no more, its simple if you want one buy one, if you dont want one because of the companys mistake then dont buy one....eduard make some (not all) damn fine stuff but they are not infalible just like every other manufactuer out there!please get over it people its not the end of the world:-)3 points
-
Hiya Folks, After a bit of a break, here is my latest model and another one which I`ve been researching for years! This Dakota Mk.IV is KP222 which was on loan from the BAFO Comms Sqn to the Fleet Air Arms 781X NAS to provide transport for senior naval officers during the Nuremberg War Trials during 1945/46, 781X NAS was responsible for naval air comms on mainland Europe. Using photos from the FAA Museum archives as reference this aircraft was found to have 2nd TAF style yellow ringed roundels on the fuselage and upper wings, a White Ensign on the tail, an Admirals Pennant on the nose and a Blue 5 Star rank marking,....so these were all `bodged together' from the spares box, the blue cheat line was from Xtradecal and the serials were mostly from Aviaology and Freightdogs Valiant serials sheet! The White Ensign on the tail came from a ship model and was altered to best match the real one on the aircraft. Here it is; [/url] I have just realised that I`ve forgotten to modify the Admirals pennant, so I`ll do that now! The rank stars should probably be gold but the white ones were so hard to find (cut from the SAC Band of a KC-135!) that I can live with them! I began this model before the Airfix model was available so chose the Esci kit as it was the best one at the time and many of the panel lines were filled in and slightly rescribed. I do however have an Airfix kit on the go as an RAF SEAC based aircraft,...watch this space! Hope you like it, Cheers Tony2 points
-
Double fantastic today. 1/Got home from work and My Airfix Blenheim was on the mat! 2/ My local shop has had a delivery of pontefract cakes! Mission for tonight- not to get liquorice stains on the sprues.....................................! V happy Selwyn PS love the fact that they have given you two turret glazings, lowered and raised, definite plus point on the first glance.2 points
-
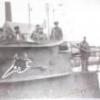
I came across this picture a couple of days ago, of myself and the other members of FRG7 (Forward Repair Group 7 Armoured Bde, for those that don't speak Army!), taken near Hildesheim in the Autumn of 1984. We are stood in front of one of the three very early Chieftain ARRV's (note the frame for the CV12 powerpack at the very top left corner of the picture) that we used when supporting the Royal Hussars with their then new Challenger 1's. I'm at the left of the front row, and dammit I used to have a full head of dark hair! However the picture is notable in one other respect - at the right end of the back row is Mick Dowling MM, the only REME soldier KIA in the first Gulf War The nickname on the ARRV's bin, seen between Mick and Mark Bowman stood next to him, was "Old Snakehips"...and note the old Centurian ARV in the background. Note the bright silver colour of the inside of the tracks and the guidehorns. Oh, and god knows what the other two herberts in the front row were doing...2 points
-
I've been on bit of a roll with these 1/48th scale kits. Still learning to weather them, but as this one was in France in 1944 I reckon it would be dirty but not grubby. The kit is very nice though the cab should have a rear window but it would be pretty invisible . I plan to put it into a diorama with a P-47 so I left the hose unit open and there is a figure to add as well. Thanks for looking.2 points
-
And here is the semi finished ip... Yours aye Iain2 points
-
Evening all I've decided to use the resin ip rather than the photo etch version and I'm not sure it was the right decision (I can still use the photo etch if I choose)... The Airscale instrument decals are great but I think that some of them are a little over size? I dunno what do you guys think? Cheers Iain Cheers mate Yours is coming along very nicely...it will be interesting to do a comparison between the stock cockpit and the resin item - is the resin worth the money? Yours aye Iain2 points
-
You'll need some serious balance weights there!2 points
-
A quick update on a couple of afternoons work.......................... The control box beside the Pilots leg I really enjoyed building this!...3/4s of an inch square roughly....although my eyes took a bit of a toll!! Here's the control box prior to painting............................. usual materials were used to put this together(Plastic and wire).............. here it is painted....................... ...and here it is placed in the cockpit................. I have yet to wire it up and of course add all the other boxes/wires.switches etc on this side of the cockpit. So until then...thanks for looking in Fozzy2 points
-
im in same boat as you stix, my painting is definatly getting there am almost always happy with it..but my weathering skills do let me down somewhat.I am getting better though so practice practice practice .....not sure swmbo agrees with the amount of practice i need tho!:-)2 points
-
The personal mount of Col. Paul Douglas, commander of 388 TFW, "Arkansas Traveller II", complete with his 8 kills from WWII. This is the Tamiya 1/32nd F-4E Early, with Rhinomodel Seamless intakes, Avionix Cockpit, Eduard Placards and Stencil Masks, Master Pitot tubes, Quickboost FOD covers and finally the CAM Decals. Homemade RBF Tags (thanks Mish!) I have to say this is one of the few builds with Aftermarket where everything was worth while - I especially liked the stencil masks rather than using decals for the stencils as they look better, and are way more fun to do than decals. The Avionix pit is also very nice, and unlike a Aires resin actually gives good fitting instructions too. The only negative is the fuselage had a slight twist, probably from the hacking about to get the seamless intakes to fit, but it throws off the stabilators slightly. Painted with Gunze throughout apart from the metalwork which is just about every shade of Alclad. Weathered lightly with oils, as the photo looks pretty clean. Build thread is available here for those who are interested Peter2 points
-
Yes please!!!! High and low back.2 points
-
And now we just need to convince Eduard to do a Mk.XIV Spit2 points
-
I built that kit when it was new, 18 years ago (how time flies ! Incidentally th elast kit I finished...), so my recollections are somewhat dim. The replacement canopy is a must, besides it having a cross section too narrow and therefore notcoming down to its rails, I think it had an uneven surface on the inside. I don't really quite recall the way I took when building her with wings extended, but I think I did the outer sections separately, and one thing I'm rather sure about is that the "ribs" were not a great fit, to put it euphemistically. In the end I think I managed to obtain compatible sections both in- and outboard.2 points
-
Like many my first kit was Airfix and it was bought in Woolworths. The Grumman Wildcat. The original bagged version. I didn't assemble it though. I just hovered excitedly around my Father while he built it. I chose the RN markings because they were more colourful but later changed my mind and decided to replace them with the USN marking but not being able to read I simply cut out and glued on the stars and bars from the decal sheet. My second kit was, uniquely in this thread, a Frog Percival Proctor which I won in a newspaper competition of all things. It was all yellow and again I didn't build it. An adult cousin built it for me. We made an attempt to paint it though but watercolours don't work on plastic we discovered. But the first kit I built and constructed was of course a Spitfire. The Frog Mk1 or mk5A. The local corner shop got in a stock of bagged Frog models which went on display in the window. I remember the Sea Fury, the Thunderbolt, Morane Saulnier, Hurricane an of course the Spitfire. I begged three bob off my Mother so it must have been prior to 1971. The shop also sold a set of enamel paint in little pots similar to the ones attached to current Airfix gift sets. I built and painted it in an afternoon. Mixing up the green and brown from the paint set. At first I painted diagonal stripes until I realised there was a pattern but I also painted the underside green/brown. That Spitfire rapidly became a favourite. The following day it we went to the seaside sitting on the parcel shelf of my friend's father's car. Suffering only the loss of the radio mast. It was decalled in Douglas Bader's D-B markings and everywhere with me for a while. One day in the school yard I was 'flying' it in near the railings when a man passed. He stopped and said: 'That's a Spitfire isn't it?' I nodded. 'I used to fly those.' He paused for a moment staring with I would now describe as a wistful look then he walked away. If only I'd asked a few more questions. In Dublin around that time you'd hardly ever know anyone who fought in the war even though they were only in their forties at that point. I have fond memories of that model.2 points
-
The first WWII aeroplane I built, which was also the first model I ever built, was Airfix's Me 262. It was a series 1 kit in a plastic bag with paper header, and it was light blue plastic. I was 5 years old. I used a whole tube of Airfix cement, and melted the canopy! It was painted Humbrol gloss green and I don't think I bothered with any decals. The model was purchased from the local Iron Mongers who had a large selection of Airfix and Revell kits. Happy days2 points
-
And I suspect every single other model kit they design and produce in the future, which is perhaps one good thing that will come from this episode.2 points
-
@Stew : Thank you so much ! @Miggers : She's pre-flight checked and warmed up Sir. Every things is OK - 85 Gallons available in fuel tanks. The weather is reported as "Good" this morning. Wind 11Kt from 330° - scattered clouds at 3000ft Just have to sign the form. Please, try to avoid to push the Boost over +9 lb/sq.in. at take off, she's an old Lady ! Have a nice flight Sir ! Oh, one last thing : As the plane is "Winchester" (no ammunition available), might i recommand you to keep away from any 109 or 190 spotted over the channel ? Enjoy your flight !2 points
-
To get a clean fit of the lower wing will take some shimming, shoring, and some stip styrene. Use some CA with talc on the wing root leading edges and a clean fit without putty can be obtained, just a little Gunze MS. Adding missing details and improving existing surface details now, still have to fabricate new wing fences then on to the "Elephant Ears".2 points
-
I love the work on the exhaust troughs they look amazing, and the cockpit looks great too. Coming together very nicely. Definitely worth the effort scratchbuilding the cockpit rear, makes me wanna buy another one and have a crack myself!2 points
-
Please don't read it if it bothers you...2 points
-
Yours and Pascal's are two of the very nicest Spits to have graced these pages for a while Stix. Can you also ask your groundies to get her sorted,I'll air-test yours right after Pascal's Grand job.2 points
-
Today, finally some fun , Painting the cammo Then painted all the wheel rims and added the tracks - the DS tracks were really nice, glued with no problems and took a coat of paint nicely. Then finally for the weekend, a coat of klear over the top Peter2 points
-
I've been distracted with the World Cup, enjoying all the entertaining football being played by every other country except England!! Moan over.... Painted up the cockpit in preparation for fitting. Neomega kit didn't have ejector pull cords so I made some from black and yellow cotton (many thanks to the wife!!). Got this idea off the internet.... Twist the two cotton threads..then glue along the thread with CA to bind. Need to get the twist as tight as possible. This photo is for example I made another one later which was much tighter. Then somehow by trial and error loop the ends around and CA glue. I made about 20 until I was happy. Pretty pleased with the result. All painted up and grubbed up. Wheel wells next.....still a way off from actually putting the fuselage together.....and that's when the fun starts!!! Thanks for looking......2 points
-
You just can't have only one Spitfire in your collection!! That's impossible. :D2 points
-
Never in a million years did I think that I would be reading a thread about the specific tyre that was fitted to a Sea Venom! What is astounding is the amount of knowledge that is available to us on this site. An absolutely incredible depth of knowledge exists here.2 points


This leaderboard is set to London/GMT+01:00