
Leaderboard


Popular Content
Showing content with the highest reputation on 02/06/14 in all areas
-
I have to say many thanks to my youngest daughter, who found this started kit under the sofa and asked me why this plane has not connected wings to the fuselage yet? So I have started to continue ...glue, fill and sand this old but nice Revell Monogram kit. Used Revell enamels (only 90 and 99 for aluminium finish). All windows were replaced and two small were added due to civilian conversion. Cowlings are home made, It has raised panel lines (which I think is better for this plane) with added raised rivets.14 points
-
I have always liked the small Hasegawa Spitfire (and i really KNOW all the drawbacks) and the Clostermann’s Big Show - however it was Ian Blair who flew this Spitfire in that dogfight. Anyway the Hasegawa AP136 "Long Wing" kit, Hasegawa and Kopro decals, Humbrol 230 for the PRU blue, Tamiya XF-83 for Sea Grey Medium. Quickboost prop and exhausts, Eduar ZOOM. Thank you for looking.11 points
-
Hello, and thanks for your interest in this topic. This is the third Bf-109 I've built in a row, this time it's AZ Model's new Bf-109 G-14. In my opinion, this kit is on par with the Fine Molds kit in terms of accuracy and detailling, but sells for less than half the price. Assembly is easy, with good engineering and flawless surfaces. Only a little filler was used for the wing/fuselage joint and on the fuslage halves. I added Brengun photo-etch set, Rob Taurus vacu canopy (designed for Revell's Bf-109 G-10, but suitable for this model as well) and Eagle Cals decals from "Messerschmitt Bf 109 G-14s (EC72-43)". The model was painted RLM74/RLM75/RLM76 with Gunze/Mr.Hobby acrylics, sealed with Alclad matt varnish, and weathered with artist's oils. The markings represent "Yellow 10" from 3./JG77, Euskirchen (North Rhine-Westphalia), Germany, 1945. I have not found any photographic reference for this machine, relying on the decal sheet instructions only. The spinner spiral comes from that decal sheet, too. The pitot tube is a metal item from Fine Molds accessories, and seems to be a little bit too long! All rudders have been re-positioned to add interest. Photographs by Wolfgang Rabel of IGM Cars & Bikes. Hope you like it! With kind regards from Vienna, Austria Roman Schilhart8 points
-
Hi All, This is Tamiya's 1/72 version of the Bell X-1 and it's a fine kit to build, with enough work for the modelmaker to do to keep it interesting. My aim with this build was to finish with something that I could use as a desk ornament and I wanted to pose the model in-flight, which meant coming up with some sort of display solution. I had some 4mm acrylic rod in the drawer so that bit was easy enough, and I decided to use acrylic for the base too. After a little head scratching, I decided on 10mm black acrylic sheet. It's pretty easy to cut (with a normal handsaw and then I used an electric planer to get smooth, square edges - various grades of micromesh brought the edges back to a glassy finish) and it has an interesting, highly reflective surface. The acrylic rod was bent into shape around a template using an adjustable 2000W heat gun set to about 1/3 power. It did take a few goes but it wasn't too taxing. Holes drilled in model and base, Araldite applied and here are the results - Cheers all, Roger8 points
-
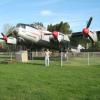
In 1973, Vulcan XH562 went on a goodwill visit to RNZAF Ohakea. Late one night, the aircraft was well and truly Zapped. Here is the result:8 points
-
Built this over on the Under a tenner group build but thought id show it here as well. Built OOB with a bit of scratch building on the inside to show a bit of interest. Built in the Canadian Forces scheme but not sure of the unit. Covered in Model master acrylics sprayed on with decals from an IPMS Canada sheet I picked up at the Halifax Model show for a couple of bucks. A very enjoyable build, sometimes its nice to go back to simples! Cheers now Bob8 points
-
All, Built this kit some time ago. Kit is zvezda 1/72 Mi-26 and IAF decal from Begemot and the truck is ICM Zil-131. Took better pictures in natural light .Hope you all like the model. Regards Vivek7 points
-
Hi folks,picked up this boxing yesterday at the Northern model show,not my scale at all but for £30 I could not let this one pass. I have never built this kit it has always had legendary status for me as a kit I could not afford growing up and a scale that did not interest me when I could afford it,as you can see it,s big but maybe because it,s a few years old the mouldings are crisp and the decals look very usable,as soon as I finish my Canberra I will be making a start but it might be a long build,so hope a few of you will come on the journey with me!somewhere on the table is one of my 1/72 hurricanes just to show the size of the beast.5 points
-
Good day all This is my version of the SR-71 Blackbird. It is the Italeri kit, I finished it sometime ago but just not got round to putting it up. Built OOB with a couple extras such as blanks and harnesses. I tried a bit of negative highlighting with the grills, it shows them up but not too sure, what do you guys think? I first built this version many years ago but tried to glue decals onto a matt surface and just ruined the whole thing. Did it properly this time with copious amounts of Micro sol to get them to conform to the corrugation. I rescribed the RAM detail on the trailing edges which was very laborious. Model master acrylics sprayed on with my airbrush. Overall i'm quite happy with it. Cheers now Bob5 points
-
Hi all, A few pic of my latest OOB builds. I don't normally build modern(ish) jets but bought both of these on a whim at club meets. The Tamiya Meteor is finished in the prototype colours although I'm not sure that the yellow is the correct shade! The Trumpeter F9F Panther is a pretty good kit and, I think, a lovely looking aircraft. The decoration on the nose was a decal which just didn't fit so I hand painted it. I'm afraid my hand wasn't too steady when it came to the white outline! I didn't want to spend too much time on either of them as I hadn't managed to finish anything for some time! Just realised I forgot the bombs!5 points
-
Hi All, Here's my rendition of Accurate Miniatures' superb 1/48 Grumman F3F-1. There are reviews all over the Internet saying what a gem this kit is and I won't be claiming any different. There are a few niggles (that undercarriage!!) but this was a bit like building an Eduard kit - the quality of fit and build is entirely proportional to the time spent dry fitting and familiarising oneself with instructions and research material. Tamigawa, it isn't. The PE rigging that comes with the kit looks great once it's in but it will bend easily in the installation process and it's hard to get it straight again so thorough prep is the order of the day here too. There's very little in the way of weathering here as these aeroplanes were kept spotless by their crews and, as far as I'm aware, never saw action although they built themselves a very fine reputation for being a pilot's fighter plane. I really enjoyed painting this colour scheme and am pretty pleased with the way it's come out. Having said that, I used Citadel's new (-ish) silver - Runefang Steel, IIRC - and I don't know if new name equals new formula but I much preferred it when it was Mithril Silver. My next Yellow Wing bird that needs silver lacquer will get Tamiya Chrome Silver, instead. I used that on the canopy frame to get a little variety and far preferred the finish. Other than that, it was Tamiya acrylics everywhere except for Mr Hobby H329, a fine version of FS13538 for the top wings. I had a decal disaster when using some Tamiya tape to gently clamp the wings together when gluing the struts - even after 4 coats of Klear the National Insignia on the tops wings came off with the tape. Mal at Miracle Masks came to the rescue and after a Mayday email, I had masks to paint the insignia three days later. How about that for service?! Apart from the top wings then, the decals are from the kit everywhere else and they performed very nicely indeed. Enough chat and on with the pictures. I hope you enjoy looking and comments are always welcome. Cheers all, Roger5 points
-
First finished model of the year and it's only half way through Based on the Revell Hawker Hunter F.6 kit modified to represent a Swedish Air Force J34 late in their service.5 points
-
Hi everybody ! The model represent an I-15 in the front North in basque Country in 1937. This was the situation i 1937: North Part of Spain who remained with the legal government was isolated in front of the condor legion, basque government try to build an air force who was quickly called "the kronn circus". seeing what planes it was, you will easily inderstand this name: 11 Bristol Bulldog II 8 Gourdou-Leseurre GL-32 8 Potez 25 7 cazas Letov S-231 acheté à l'Estonie. 5 Caudron de divers types. quelques Breguet Br-XIX, et un Nieuport Ni-52 . 3 Fokker VII B 2 Monospart ST-4 1 De Havilland Dh-84 Dragon Rapide 1 Farman 231 de turismo 1 Vickers Vildebeest 1 Miles M-3 Falcon 1 Miles M-2 Hawk first I615 came directly from USSR in the port of Bilbao in november of 1936. un may of 37 25 went from the center zone to the northern zone but it wasn't enough: un summer ther was 15 I-15 able to fly, end when Northern front felt on ly twa I-15 escape to France with an I-16... The plane is paint according to VVS use in 1936. it's the rest model resin model, wich is a very beautifull kit. I build the kit with a friend of mine who made an 1938 I-15 produced in Spain, and paint with 1938 VVS standart Xan5 points
-
This is a replacement for one I donated to a museum last year. I will be building at least one more. A member of Britmodeler has generously donated decals to do a British version. The decals are enroute, as is the new kit. In the mean time I hope you enjoy this one. Built OOB utilizing kit decals. Painted with Humbrol and MM enamels.5 points
-
Another OOB Build4 points
-
Built this OOB several years ago .Took better pics .So sharing them Thanks4 points
-
This is the machine being modeled: The photograph was taken at the Ma'Gil field, near Basra, after a bit of a pranging. The Type 827 was built as a float-plane, but at least two of the type operated by the R.N.A.S. in Mesopotamia in 1915 were had their floats swapped for wheels. Here is the 'scratch-builder's kit' shot.... References are awfully thin on the ground for this, and for some reason, there are fuller drawings of the Type 830 (the same aeroplane but with a radial motor), even though that was the secondary type, with the 827 being made in much greater number. I have, in an old issue of Cross and Cockade Journal, pretty much the whole photographic record of No. 822 in Mesopotamia, and have managed to track down a couple of profile drawings of the 827 at least (and the plane view is the same, except for a notch in the center-section leading edge of the 830 where the radiator is accommodated, the radiator is mounter more forward, and clears the wing entirely, on the 827). The wing blanks are made of 2mm sheet, sanded to an airfoil section, with heavy-grit sand-paper taped to a large pill-bottle being employed to get the curved camber of the under-surfaces. The fuselage pieces are the bottom and sides, and extend only to the fire-wall --- most of the nose panels were removed to improve cooling, so her there will only pretty much naked frame and the motor, an early Sunbeam side-valve V-8 (which I will have to contrive one way or another).... Here is a picture of the earliest fuselage assembly I have since decided that, however convenient for a modeler, the raised wood floor is likely not accurate (all of this is conjectural and speculative), and I pulled it out. I then went to a bare skeleton for the floor (no picture), and finally decided on a thin, metal floor, riding right above the fuselage bottom's structural members, as seems to have been the case with the Short 184.... Here is the fuselage interior more or less completed: Shorts used a distinctive five-spoked Depperdussin wheel stick control, which has been scratch-built. Instruments and such are a simplified version of the arrangements for a Short 184 (it was being built at about the same time, so I think a 'family resemblance' not unreasonable). Bezels are 34 gauge brass beading wire wrapped around styrene rod, to make a short coil, cut into links with a razor knife, and lightly flattened in a pliers. Instrument faces are disc shaved off styrene rod, pressing into the bazals after these are glued to the panel. Seats are left-overs from various Eduard kits, trimmed down a bit (they probably should have some holes, but I figured I could skip that). The observer's seat is perched on a fuel tank: there was a gravity tank at the front of his cockpit, but it does not seem large enough to have been the only fuel store, and the observer's cockpit is about the only place a main tank could be put in this). Here is the fuselage closed up.... Forward decking is a piece of 0.015" sheet, bent into a curve and glued down, with cockpit openings cut in after attachment. The turtleback is put on in two pieces: first, a piece of 1mm sheet, shaped to plan and sanded down in a taper to the rear, then a piece of 3mm sheet. The whole is sanded to plan, then to profile, and finally to section. Nose is left unfinished; there will be adjustments when the engine assembly is dealt with, but that is still a ways off. Here are a couple of looks into the cockpit.... In my first run at the forward decking, the instrument panel dislodged, which I did not notice till I had the thing all shaped and trimmed. Only way to fix it was to strip off the decking, and by the time this was done, a fair amount of reconstruction had to be done in the pilot's office, and with the formers. All is secure now. Here are the wing blanks trimmed pretty close to their final shapes: The ailerons will be made separately. They were rigged in the early manner, in which both drooped when the machine was at rest, and though I am not a fan of articulated control surfaces, I may make an exception here, I have not yet decided.... I used a new technique for putting in taped ribs, rather than the application of striping tape I have been using for a while on Great War scratch-builds. After lining in the ribs with pencil, as usual, I scribed in on both sides of the line with a needle in a pin-vise, using a flexible piece of half millimeter sheet for a straight-edge guide. Then the area between the tapes is made to sag, using first a heavy grit 'swizzle stick' sanding stick, and then by scraping with the curved edge of a #10 blade, and final touches with a folded bit of medium grit sand-paper. I went fairly deep doing this, as this machine saw long service in tropic and desert conditions with sketchy maintenance, and its fabric must have been in pretty poor shape by the latter stages of its career. Just 'breaking the plane' a bit with the sanding stick and smoothing down the result would suffice for a newer machine. After this, the scribed lines are gone over again. Here is the lower wing, mid-way through the process of putting in the ribs and fabric effects: Here is the upper surface of the upper wing, painted and decalled: Basic color is PollyScale 'Old Concrete', hit after application with dark brown wash, and lightened base color painted over the tapes. This machine was marked with the old 'red ring' marking of the R.N.A.S. (it was shipped out from England probably in March of 1915). I have never seen a picture from the early days of an English machine serving in the Middle East where the white paint of markings was not in very bad condition, and I have roughed up the decals accordingly. They began as Italian markings for a SPAD XIII, and after application I hit them very hard with a polishing pad, and chipped away some bits, too, with the point of a knife. Remaining areas were then painted over with a slightly greyed white. I left the ribs themselves white, as I think the flaking would be concentrated where the fabric flexed in flight. I added various shades of darker red to the ring to allow for the deterioration of the pigment under sun. Aftre work on the decals was done, the whole thing got another dark brown wash treatment.4 points
-
Finally finished one, my first resin kit. Went together well but had forgotten how much super glue prefers sticking to skin above anything else. The figure is from ICM (a dearth of WW1 figures at present) & the barbed wire is Eduard & nearly as sharp as the real thing. One thing I've learn is that:- if you take soil from the garden, sieve it, dry it gently in the oven in the wife's best baking tray, grind it to a fine powder & sprinkle it on your dio it looks nothing like soil! Any comments welcome. Pete4 points
-
Hi Everyone, just took advantage of the sun and dusted off a build from a little while back, Academys 1/48 scale Seversky P-35A Completed as an aircraft of the 17th Pursuit Squadron and flown by the Commanding Officer Lt Boyd Wagner, at Nichol Field, Philippines, 1941 Built 99% OOB with just some seat belts and a few bits of wire here and there Painted in Humbrol Enamels as usual Hope you enjoy, Thanks for looking, Russ4 points
-
Ok I built these two funnys some time ago but being as June 6th is almost here I thought you all might like a look. The bridge layer is a back dated Tamiya Churchill VII using (yes you guessed it) the resicast back dating kit and the AVRE turret kit then adding the SBG bridge. it was one hell of a build. and the hull is full of wall filler to counter the weight of the bridge its very heavy The flail was converted from the Dragon kit with yes the resicast flail kit the flail chains were the hardest part of this build it is all so full of filler. Hope you enjoyed looking4 points
-
Hello Folks, I`ve been waiting for this kit for ages and thanks to Gary at MAM I received this 1/48th scale Revell Ventura Mk.II kit which I`ve finished in a scheme that I have been researching for years,.....as one of two Mk.II`s flown by 1575 (Special Duties) Flight from N.Africa for missions over S. France, Corsica and Italy. I`ve submitted the article to MAM so won`t give too much away, however I will say that it is a nice kit, the BP Type C turret is very nice, the masks provided in the kit are great but Revell forgot to add a new canopy with clear bulges in the roof and left hand side and have simply put the original canopy from the PV-1 kit in the box instead! My attempt at rectifying this was to carve a pair of blisters from the spare canopy left over from an Arba resin Blenheim kit and attach these instead,....but it is nowhere near perfect and it would be great if Revell did a new part or the aftermarket came to the rescue. Anyway,....here is the model; [/url] I do hope that this kit is imported into the UK soon as there are so many more that I want to build and Aviaology in Canada have just released a pair of sheets featuring some extremely interesting Ventura`s,....I want to build at least four of them! Hope you like it and thanks to Gary for the model,.....the full article will hopefully appear in MAM or SAMI magazines soon, Cheers Tony PS- I meant to add that this Ventura, AE881 failed to return from a Special Duties `Wireless' sortie to Italy during September 1943 and the crew are remembered on the RAF Memorial at Floriana in Malta as they have no known grave, I`d like to dedicate the model to them. PPS- Since sending the article off for printing I`ve been in contact with one of the surviving Ventura crew members from 624 (SD) Sqn called John Russell who confirms that; - The Ventura coded A was AE 881 and B was AE 948, although according to his logbook AE 881 was changed to X, in the middle of August 43. He doesn`t recall any squadron letters being applied,...just the individual code letters A & B. - No guns were fitted in the nose glazing. - He also recalls that the camouflage was all over grey, not black,...however the photo of the real AE881/A does prove otherwise. Maybe they were changed at a later date? - The Ventura`s were used for for ferrying SOE staff,mostly between Algiers and Tunis and some communication, between SOE operators on the ground using a specially installed set. - AE 881 must have landed at Palermo,Sicily to refuel on the night that it was lost with its crew, probably to extend its time over the target in Italy. All the best Tony3 points
-
Finally there she is, Hans Langer mount as depicted in the EagleCals EC132. The scheme is quite standard except for the white color fuselage band and rudder which along with the big white 12 make the aircraft look quite attractive. Painting strategy with pre and post shading allow me to give volume with different filters and shades. The kit, well there are different opinions, but from my perspective it’s a great value for the buck, fit is very good though there are the fuselage joints on the fwd wing root which isn’t natural at all but can be solved with a bit of putty. Wheels are MDC and harnesses of injected plastic from Finemolds and beside the decals the kit is OBB. Hope you enjoy it. Build is here http://www.britmodeller.com/forums/index.php?/topic/234958121-132-revell-bf109-g6-markings-tbd/ Cheers3 points
-
- Coincidentaly there is 2002 in WIP from Italeri again. -For my model I've used the after market razorback and adapted the wing of the 2001 with a few scratch building to terminate - The different color of the flap is not the color of the raw plastic it looks to be but another grey shade I've used as a weathering effect, but when examinating the photos I think I had better rectify this in using the general under surface color3 points
-
Welcome everyone. I'd like to show you another model from my collection. This time it is Ford Sierra Rs Cossworth from Rally Elmot 1992. As a base for this model I've used Tamiya Ford Sierra Rs 500, which is track based model, so I had to modify whole interior. Changes include: pilot seat, scratch built rollcage, redone dashboard, cloth seatbelts with photoetched buckles, fuel tank and spare wheel. From the beginning: Original dashboard: And my dashboard: Interior: And the whole thing assembled: Thanks for watching3 points
-
3 points
-
Finally got a Sea Harrier on my shelf! This is the Italeri 1/72 kit built with Airwaves etch, Pavla intakes, nozzles, gun pods & seat. Painted with Xtracrylix & decals from the Xtradecal Falklands anniversary sheet.3 points
-
Gentlemen and Ladies. May I present you with my take on Hasegawa's Heinkel He-111P2 from KG55. She's OOB with a few very small scratch built bits in the cockpit and on the outside. The paints are a halfords rattle can primer, citadel nuln oil wash for the preshading, Vallejo model color for the camouflage and citadel satin for the top coat. Everything apart from the primer and varnish was applied with a hairy stick and this was my first attempt at preshading with a brush, inspired by my friend Stix. The build has been fun most of the time, although I had some real issues with the under carriage and I'm really annoyed that I missed the internal framing on the canopy before I closed it up. There's a WIP thread here: http://www.britmodeller.com/forums/index.php?/topic/234956005-hasegawa-he-111p-172-finished/ You'll notice that the tail has been slightly doctored. The kit provides swastikas but, as I explain in the WIP my girlfriend's grandmother was an Austrian Jew whose entire family were murdered by the Nazis during the war and at her request I don't display swastikas in our home. So, without further ado, here she is. I'm generally pleased with how she came out bit as always, criticism and suggestions are actively encouraged. Damn you photobucket! Thanks for watching. Richard3 points
-
Well, I rushed the last bit, lost a few antenna bits to the carpet, broke off the under fuselage aerial and thought I could spray matt without masking (you shouldn't). This model could have done with more weathering, more exhaust soot? and general a little more time in the final stages. Not 100% happy but it's ok. Thanks for the comments!3 points
-
Well worth the effort.LTAT 2 anyone?3 points
-
I like my whifs to have a foothold in reality (even if it's only a very tenuous one) The TSR2 to me seemed the ideal candidate for conversion to long range spyplane. It already had impressive range and speed. All it needed was the ability to attain sufficient altitude, hence the wings. Which in turn leads to more fuel storage and even greater range. Add to the mix some improved Olympus engines from the Concorde program and we have Mach 2 supercruise and M2.5+ in full reheat. The bomb bay is converted to a sensor bay, with cameras and radar mapping and scanning systems.3 points
-
I remodel this aircraft a little. 1. I changed 4X MK 108/30mm cannons on 2X Mk 103 . 2. I remodel shape of the wing and tail. Oryginal looks not good enought for me ,-)) 3. Remodel fusulage tu make bigger cockpit and bigger fuel tank. Here is W I P http://www.britmodeller.com/forums/index.php?/topic/234961138-focke-wulf-flitzer-172-tuning-version/ And I make it more dirty ,-))3 points
-
Feel a bit like Bill Murray in the film Groundhog day at the mo'; doomed to endelessly repeat the same modeling tasks. Haven't got Andie Macdowell to looke forward to at the end of it either I think Peter is somewhat right in that I think the windscreen is not 100% true - but I also think that the 'lean' is exaggerated by certain camera angles and it looks good enough to the naked eye. Anyways. I followed thro' on a final attempt to paint the central internal framing and I'm inlcined to think I've cracked it this time: In parallel I had a go at Dean's suggestion of decal film. I found that laying down the external colour, followed by the internal colour (remember the decal had to be applied to the inside) and then a coat of varnish and then cutting a thin strip - was really easy. I applied a strip to the back-up vac formed windscreen and found it pretty tricky to get it to lay truely straight and also to adhere well (both because of the thinness of the strip - but manageable and on balance probably a better solution than painting. Next time... In keeping with the ground hog theme. I was unhappy with the work I'd done on the decking behind the seats. In particular the prominent avionics boxes. I think I tried to include too much detail and in the process they ended up rather messy. I decided that in this scale I was better off trying for an 'impression' and making them neat. So second time around I concentrated on just getting the boxes true and square with a simple and smooth black finish with just a little dry brushing to emphsises the edges/wires. I'm happier with the result (the earlier version is just a few posts back): Wouldn't it be nice for us all if I actually moved these builds forward..... Steve3 points
-
So, time for my next edition of these two kits. Really I should call this the Coroguard episode. I really haven't done much on the Panther... actually I spent most of my time rectifying the right wing's coroguard, which didn't really go on well. It was really because I didn't thin the surfacer enough and it didn't go well after that. The other problem is that I totally forgot that I had a resin nose replacement for this kit, that I'm going to need to find and use, Anyway, onto the banshee... First went on the surfacer. Then I sprayed on the Alclad, aluminium. Then I masked it off. And finally here is the final result; And that's that. I'll need gloss coat the areas for decals. That will either be tonight or tomorrow. As always, thanks for looking.3 points
-
1/48 Revell Bf110 G2 Decals : Start Luftwaffe im focus ZG1 Brockenhexe Build Thread3 points
-
Matchbox 1:72 Noordyun Norseman Canadian Forces Unknown unit Model master acryilics airbrushed Build: http://www.britmodeller.com/forums/index.php?/topic/234954714-my-wee-efforts/3 points
-
Well, better late than never ey? I've been busy this afternoon with some construction and dryfitting. Intakes have been filled and sanded and I have a cunning plan to make the intakes seamless and have the ramps in the open position to show off the gaping maws... I have cut the excellent Quickboost (Aires with the seatbelts moulded on) GRU-7 seats from their bases and assembled them. The amount of detail is just superb, though the kits seats are undoubtedly the best seats you can get in a kit. I added a throttle handle to the kit pit - just a bit of carved sprue. Intake trunking all filled and smoothed down. I added the Steel Beach resin F-14A 'Late' update . This is the Hobby Boss parts copied in resin. There has been a little shrinkage, so some fillng was required, but it is ok. The main gear bays are a cinch with the Hobby Boss Tomcats - the fit is so positive with each other and also to the fuselage parts. A lot easier than the Hasegawa bays and streets ahead of the Revellogram F-14 (thankfully I sold mine as soon as I bought one!). My cunning plan... Two strips of card to insert on the inside of the intake to allow the ramps to be posed in the fully 'up' position and not have a gappy, stepped inside face of the trunking. The plastic card will be inserted in the gap behind the forward ramp in this pic.3 points
-
D.H. Mosquito FB Mk. VI, 1/72 Tamiya build and ruin thread http://www.britmodeller.com/forums/index.php?/topic/234955313-mosquito-fb-mkvi-172-tamiya-finished-yea-lets-call-it-that/ more photos also there3 points
-
So here we go: Here you can see the moving wings: As described above I formed the wing seal bags from old foam and bicycle hose. This way the wings stay flexible and i still don't need to bear thos ugly holes. In 1/32 that goes way easier than in 1/48. Maybe you can also make out the little differences between the left and right side of the tail fin.3 points
-
Here is the third FAA Corsair I started not long ago. I found a small problem with the Tamiya kit in that the wings do not fold up to the correct position ie not close enough. I will be posting more of this one and the last of the four on Aussie Modeller in the near future. Here is the link to the other two I recently completed: http://www.britmodeller.com/forums/index.php?/topic/234961190-two-148-faa-corsair-mk-iis-completed/2 points
-
Wash your mouth out Brian! 16 Sqn are the Saints. (Formed in Feb 1915 at St Omer. Conveniently someone then produced a 60's TV show, and hence one of the Sqn formation callsigns is Templar)2 points
-
As can be seen above this has been a fantastic GB! And the hosting by Mark has been good like it was two or three active hosts.2 points
-
Preshade mostly. I don't think this is much different from what other people do, but I might as well explain my process... which is kinda based on when I had a larger brush with less fidelity (a .5mm Iwata Revolution CR, versus a .3 Iwata HP-B for detail work now). the .5 really can't do effective post-shading, so I would put down first a pre-shade layer then fill in the panels with paint, but only give the panel lines a light coverage. Probably best if I give a cross sectional diagram using the ancient tradition of ascii art: Main paint layer: ---- ------ Pre-shade layer: -------------- Panel line position: V So long as I have enough different shade underneath (in this case black) I can control the main paint's application to show that. It doesn't matter if its tidy or not, since I'll paint over it until I get to the actual line. I can fill the panels itself enough that the underlying paint won't show until I need it to. I'm also using the new black Mr Finishing Surfacer, which is pretty awesome. I just apply it with a brush in this case, when I was doing the leading wing edge... its self levelling properties and slight gloss might have contributed to this outcome.2 points
-
Thanks Alex. Everyone's kind words are really well received and it has been an honour to host the GB for you all.2 points
-
He he he... nearly got credit for something I didn't do. Looking good, Steve. Cheers, Dean2 points
-
It's probably too late now - I did think it was a little odd at the time, but the instructions showed them as being fitted even for the Vietnam scheme included in the box. Oh well, it's obviously a 'privilege of rank' thing, and an experimental fit on the CO's machine2 points
-
Well there we go the GB has finished. A massive thanks to everyone who entered. This has certainly been a great GB. I'll catch you all tomorrow. (You know what I mean)2 points
-
And I think Edgar is and always will be a gentleman. You Sir need to have a look at the forum rules about being civil and not indulging in personal attacks. Thank you.2 points
-
Not been about much this week - nor done much modelling (prepping for planned Normandy trip next week) - but have managed just a little more on Connie. Main Panel - now on another iteration after ****-up on my part - working through the excellent Airscale bezels - Mil. Connies appear to have had instruments mounted from the front of the panel for, presumably, ease of removal and maintenance (civvy Connies appear to have them mounted from the rear...). Also made a start on the cockpit rear bulkhead. As mentioned previously - it's a real bear trying to get everything lined up horizontally and vertically: Last time you saw the pattern for the rear half of the tip tanks it was plain wood - in the lathe. After a first wet coat of clear lacquer (automotive spray) was applied, allowed to dry and sanded back, subsequent layers of high build filler primer have been sprayed on over a period of almost two weeks - allowing each layer to go hard before the next. Today the pattern - still in the lathe - was spun up again and successively finer grades of glass paper, then wet and dry and finally Micro-Mesh used to clean up the surface and make ready for mould making. A panel line towards the rear added on the lathe as a last touch before removing the scrap end of the wood. Quite pleased with the result! Have fun! Iain2 points
-
Words you will seldom hear me say: "Thanks to the Daily Mail". Not exactly my favourite newspaper, but they came to my rescue this week. I have been looking for reference photos of the bridge roof for ages, and they are like the proverbial rocking horse poo - but then http://www.dailymail.co.uk/news/article-1216122/Ark-Royal-sets-sail-12m-fit.html this one came up via that nice Mr Google. Second photo down; yee hah! OK, so this is post-refit so not my era - but it's the real detailed stuff I was after up there, not the big pieces of kit, aerials etc.; I could see them in pics from further away. Anyway, I am now finally getting the busy look on the top of the bridge that I am after, having added a few comms boxes, cable runs and speakers for the Main Broadcast. Also added the platforms for the navigation ights (though not yet the lights themselves, or the DF aerial which will sit above the nav lights - too fragile to put on yet), and the NATO satcom dish, which was exceedingly fiddly but looks a heap better than Airfix's original... oh, and drilled out the face of the sirens, so they at least look a little hollow. Getting there, now; once the guardrails and a couple of aerials have been added (not to mention the blooming great 1022 bedstead on top), this will look much more like it. I will, however, never complain about 1/48 again! Edit: you can also see in the background the beginning of a new structure between the for'd funnel and the foot of the mainmast. I have no idea what this was in real life - it disappeared once she'd had a refit. Something communications-y, at a guess; it certainly had aerials coming out of the top of it running up the mast. For a while I couldn't work out the drawings, but eventually the penny dropped that it wasn't symmetrical; on the port side (overlooking the flight deck) there was an opening into a corridor, in which there were doors on either side (i.e. one into the funnel structure, one into this new space) - but on the starboard side it was just a blank wall, flush with the side of the island. There is something similar - though much smaller - to be built in the space between the for'd funnel and the foremast. I have also realised, from poring over these drawings trying to judge what was going on, that the starboard Chaff/SRBOC platform is not only smaller than in later life post-refit (which I already knew), but also a deck lower (easier to depict than describe - watch this space!). More cutting to be done on the hull. None of these additions / changes to the island is that big in itself, but taken together there's actually quite a lot of work here to get the island looking right for 1988 Ark. And that's without even mentioning the work I have still to do at the top of the mainmast (different ESM & radar fit) or the scratch-built mizzen (which is little more than an oval pole with a 1006 radar aerial at the top of it) and accompanying structures. It's easy to think that the 3 CVSs were pretty much the same, but when you actually look in detail I very much doubt there was ever a moment when any two of them were identical. This is one of those builds where the more you look the more you realise how much there is to do. Hope the voyage of discovery is as much fun for you as it is for me! More soon!2 points
-
Hi all The seam clean up is well underway and I should be ready for primer very soon. I have started to reinstate the lost panel lines but there was one panel line I was happy to remove and that was the one for the fuel tank cover; as moulded the line for the cover when the fuselage halves were together was oval when it should be round, this presented a problem as my scribing set did not have a round hole of big enough diameter to do the re-scribe. I measured the diameter of the cover on a Tamiya kit and found my larger punch and die set had a perfect size punch to produce a template but what to use as the material to punch?? I thought about using plastic sheet but was concerned it would not be sturdy enough to scribe against and if it was tough enough it probably would be difficult to bend around the fuselage without cracking so what else could I use that was round already? Looking around the house I thought of using a drinks can but could not find anything and then looking in the fridge I came across the perfect item! Around the top of a bottle of unopened wine was a metal sheath, this was sturdier than the foil type but getting to use it would cause several problems, these being: 1. In order to get to the material below the cap, I had to open the bottle. 2. Trying to tip the bottle to get a good grip on the metal meant that some liquid would leak out..... 3. Pouring some of the liquid into a glass helped but just filling the one glass I had was not enough . 4. After the glass was emptied and refilled enough times the bottle was empty but I could no longer see straight! 5. Using sharp knives when ones eyes are very blurred is not a good idea! I eventually triumphed over adversity and here is what I came up with........ The black finish allowed me to mark up the position against the panel lines so I had the right position. Here it is placed near to its correct position. And the final result. The tail planes have also been added so I just have a couple of places left to sand down and it's off into the paint booth for this one. Thanks for looking. Best regards Tim.2 points


.thumb.jpg.0cb281983c298f55509ab7d9a06994bd.jpg)
.thumb.jpg.d17ff607fc7e89ed057e63fcb6f2a888.jpg)


This leaderboard is set to London/GMT+01:00