Jump to content

Leaderboard

Popular Content

Showing content with the highest reputation on 31/05/14 in all areas

  1. Hi All This was supposed to be part of the FAA group build a while ago, I did not complete it, I think doing two kits was a bit ambitious, I completed the DH Dominie but this had quite a bit to go. I lost the two lights from the Port Tail fin, bit of a school boy error on my part and I omitted to read the instructions properly and so ended up trying to cut them off the clear insert that was supposed to be there and the pings off into the jaws of the carpet monster, lesson learnt ! The Airfix kit builds up very nicely as does the Alleycatz conversion Not much filler was needed with the worst bit being the wing to tail booms which, tio be fair may well have been my own fault. Model is brush painted as usual using Humbrol enamels although on this occasion I used Revell paint for the white, this was slightly troublesome so have reverted to my trusted Humbrol paints. I have finally finished her and am pleased with the result. Hope you like it. Thanks for looking All the best Chris
    12 points
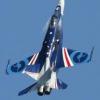
  2. This is all my 1/72 scale Canberra's 51 in all, The WB.57F at the front is still in the process of being built.
    8 points
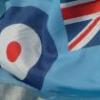
  3. Finally got these off the bench after a few months of modelling inactivity. Enjoyable builds, and I think the Hurricane looks much sweeter on its boots than the Spitfire, so as a modelling subject I prefer it. They are the limited edition kits using box decals (Mostly) although the prop on the Romanian one is an Airfix Spit prop thanks to Troy, as well as the guidance he gave throughout the builds. There a few things left to do and some errors most noticeable on the Romanian one, but I'm not going to tell you if you don't already know! Painted with Gunze dark earth, Tamiya dark green (xf-81), Xtracolour mid stone and azure blue. The only aftermarket bits were the Mk.II exhausts and Falcon canopies. The Crois de Loraine decals supplied in the kit are red, so I cut some blue decals up to overlay them with blue ones which from the evidence I've come across appears to be the case. Hope you enjoy Romanian kite Free French kite Thanks for looking, Neil
    6 points
  4. Evenin' all, Last wedding anniversary Mrs Viking asked what I might like as a present, and as always I didn't have to look far. High on my list of wants for a while has been the RE.8, such a classic first world war aircraft. The RE.8 can fairly be classed as 'not the best, but available in large numbers'. It was an honest enough aeroplane and could give a reasonable account of itself in the hands of an experienced crew. Large numbers of them fell to the guns of the German air force, but then there were large numbers of them over the line. I love the Heath-Robinson look of the aircraft, as if it was designed by several people who all created their own bit and then they all got bolted together. The vertical stack exhausts, the Vickers gun bolted to the outside of the fuselage, and the interuppter gear for it being taken off the rear of the engine, fed outside via a drive shaft, and along the outside of the fuselage to the rear of the gun! Anyway, after severl month building she is finished. I seem to have been rigging for weeks and weeks, (Maxima Chameleon fishing line pulled through the top wing). Next model I build won't have any rigging! Looking at the photos, I realise that I've forgotten to put the windscreeen on. It's the only bit that is streamlined!. I'll fix it on tomorrow. Hope you like; Can you make out the see through image of the upper wing roundel on the clear doped linen on the reverse side? The lower cowling can be made removeable; A few pics of the interior before the fuselage was assembled around it; And one last one with it's Nemesis! [EDIT] I've put the windscreen on![/EDIT Having created the champion of all 'dragmasters' they then fitted a nice streamlined windscreen (or not if you were me making a model of it) And it is fitted now; Thanks for looking, John
    6 points
  5. Union Infantry Officer 120mm Verlinden Productions.
    6 points
  6. Here you go then.......
    6 points
  7. The Airfix Sunderland is finished, and is now in the safe hands of its new owner! I knew what I was in for with this model, but the fact it was more or less OOB took the pressure off a bit. The fit and finish is pretty bad as expected for a model of this age, the raised rivet detail being a big problem. If you fill and sand the gaps in the fuselage halves and wing roots, you end up removing a load of tiny rivets too. Masking over rivets is also tricky because the paint 'bleeds' under the raised bits. The fuselage halves don't match up very well, so there is a bit of a step there which is very difficult to remove without days of work. The cockpit glazing was a pretty good fit on the fuselage, but if you fit the pilots, you can't fit it because the pilots are about 2mm too tall. I had to cut their feet off. The control columns also don't fit in the cockpit opening without raking them back a bit. IIRC the only things I added were stretched sprue float bracing wires and an aerial, some rubber handle grips to the beaching trolley, red band decals on the bombs and a pale band decal around the D/F loop fairing. FWIW I'm happy with it all things considered. Cleaned-up parts. I was hoping the portholes could be masked by punching masking tape through a paper hole punch, but they are too small. I used a steel punch to do it and it worked pretty well, although the glazing is a poor fit and some portholes are badly deformed in their centres. The bombs were in halves which didn't match up. This required more filler. I added some red bands by cutting up an old Matchbox 1/32 Spitfire tail flash. Much easier than painting! I also drilled the back of the bombs to make them a bit less bulky, but it's obviously impossible to drill a round hole concentric with an oval solid! The prop spinners are all wrong, so I tried to make them more realistic by painting the white to about the right size, and leaving the rest black. I used Tamiya Smoke for the exhausts and pre and post shading the panel lines. It's good stuff because it's almost transparent and gives you a good chance to correct mistakes as you're spraying. I tried sanding flats on the tyres to make them look loaded. Worked OK. Upper wing roundels are about 2mm too large: they should be a bit further outboard, but as they are they would touch the ailerons and the black l/e strip. I added some reflectors to the wing lights out of punched foil - they look good although the clear glazing is not a good fit to the wing l/e. There is absolutely no framing on the screens or the turrets. All the framing is done by looking at 3-view drawings and photos, and masking the glass bits before overspraying first with interior green followed by outer surface colour. Cheers!
    4 points
  8. My latest build..... The Trumpeter 1/72 scale Su-27 Flanker B in Ukrainian markings using the Digital Flanker decal sheet from Authentic Decals... The model is straight OOB, with airbrushed AKAN paints as reccomended on the Authentic Decals instructions.... The base colour of light blue was airbrushed - the light grey and darker blue are decals. The decals are extremely thin and once applied were reluctant to move - but they cover well and bedded down superbly with the use of a little Micro Sol. Any patching/painting was done using the other paints from the AKAN set - perfectly matching the decals. Ken More photos.... I have just spotted that I haven't painted the RWR antena on the boom tips.... Ken
    4 points
  9. More weathering today. According to my one good in-service pic, the true waterline can be a bit below the anti-fouling demarcation. So I added a broken line of MIG dark wash to provide an oily grimy waterline, and spent some time blending it. I also added more of the "salt streaks" stuff to the sides of the bow and again blended it in and streaked it a bit. I've been out with the family today so not much modelling time, but this evening I spent 4h or so applying washes to the remaining decks and superstructure and cleaning them up. I thought I'd differentiate the weapons and masts by using "Cold Grey" rather than the brownish stuff but I think I don't like it and will go back and add some pin washes of the other colour tomorrow. I also need to clean up the funnel some more since I was going a bit square-eyed and the photo's show some stains and blotches and brush marks etc. which I could live without. I'm not sure how visible some of the things I'm unhappy about are in these but you can click on them to go to Flickr and "View All Sizes" to see the details. Overall it's still plenty of forward progress, it's just that enamel washing/weathering is a very painstaking task and time consuming to get right. Not quite ready to throw in the towel yet, but given that I need to make/fill/prime/paint/varnish/weather/varnish things tomorrow it's going to be a long day. One big problem I discovered is that the AA gun tubs are overscale. I knew this and was going to modify them, but they're so overscale that they won't fit Perhaps I can stick the AA guns on basic platforms, or leave them off for the GB finish? Tot volgende keer! Will
    4 points
  10. Personally I think a lot of the older Monogram kits have had their day in the sun. I pulled out my P-61 recently to have another go at finishing one and while raised lines arent that much of a biggy for moi I would really prefer if they were straight and access panels etc were access panel shaped not the free hand with an engraver that cover the old things. Great in 1970's but its not 1970 anymore. No doubt I will buy a GW Widow when I set eyes on one and will be perfectly happy with it even though it has a 2mm fatal flaw with the canopy (apparently) and is utterly unbuildable. (nor would I give a toss about 2mm on a Vampire Sea Venom nor anything else I get rabid about before anyone wants to have a go) As for the "Monogram is better than any thing the evil Godless Chinese make" I suggest that horse is deceased composted and in the rose garden. Further beating should be avoided as it is like arguing with your refrigerator because its butter compartment is to small, somewhat pointless. Edited: Really really bad spelling
    4 points
  11. Well, she is up on her hind legs now....
    4 points
  12. Oki, i ll take it quickly because theres a lot of stuff to do yet -cockpit doors done all from scratch, painted (the black tiny stuff on the side ll get to the front side of the doors after painting and weathering) -back fuselage doors done all from scratch, painted -rocket rails + few rockets painted -bomb bay doors painted -bomb rack installed in bomb bay (no photo for this) -guards painted (ll be between fuel tanks and rockets) Also, i had a bit of fun with one of bombs It got few layers of paint/salt/paint/salt/paint/salt, speeded up with hairdryer. Ofcourse i forgot to buy chalk and i dont have white pastel at home, so i had to use vallejo acrylic white for the signs, but well... And hope you wont mind one historical error there.. The bomb ll get the little "propeller" on the tip later from PE set for B-17
    3 points
  13. Hello all, Here is my recently finished 1/48 Hasegawa F-14A Tomcat in VF-41 'Black Aces' markings during Operation Enduring Freedom in 2001. Build thread is here Extras used included Aires cockpit set, Steel Beach FOD covers, Quickboost seats, Wolfpack Designs update set, Bombcat set and fuel tanks, Yellowhammer decals and GBU-12's from the spares. And alongside my other OEF 'A' model Tomcat of VF-14: Both from the USS Enterprise, it was the last time two A model squadrons deployed together and both would surrender their Tomcats for Super Hornets upon returning to the USA. This left only VF-211 and VF-154 flying the A model 'cat. Comments welcome, thanks for looking. Dave
    3 points
  14. Hello, here is my latest build, the Hasegawa Sufa. Thanks for looking.
    3 points
  15. Hi Wolwe82 and sdk_uk, Thank you for your comments. Wolwe - wet'n'dry is Wet and Dry paper. Rather than me try and explain: This is the packet I buy from a DIY store: This is a sample of some of the actual sheets: Now don't laugh....... these are the two pieces I currently use: . . . . . . . The piece on the left is still slightly abrasive, the piece on the right would probably count as just a piece of paper by now, but it gives a very fine finish. sdk_uk I agree with wolwe82. The lines don't need to be straight. Most people paint them with an airbrush and they look better if they're not regimented. I just happen to use hairy stick and end up painting reasonably straight lines - I do try and randomise them a bit! Anyway - this morning I got the underside painted. I ended up using a satin finish paint as it was the closest match to the colour I wanted: Painting the upper side is next. Hope you have a good Saturday. Kind regards, Stix
    3 points
  16. Thank you guys for your comments! Hi there! The diorama is nearly finished...Only the addition of the figures and the Zeros -which are both done- is remaining and the 13-month-old project will go to its (big) shelf! Thanks for looking, Cheers to all, Panos.
    3 points
  17. Here's my Gunze Sangyo 1:1 scale Lesser Spotted Woodpecker. Quite please how it's turned out, could probably do with a coat of matt varnish I think. Glad I made it under the wire. Right, on with the Harrier build!
    3 points
  18. Simple diorama - Gutersloh Lightnings - WIP. Base - Plywood. Fence - old railway parts. Figures - Italeri (i think) Green - railway accessory.
    2 points
  19. This is a very old kit! Loads of flash, ejector pin marks everywhere, but its a big bi-plane, so I decided to have a go at it as I have never built and rigged a bi-plane before. I refined some of the details, but its virtually out of the box. I replaced the moulded on ring sights with a couple of etched ones from the spares box. The rigging was done using fishing line, and was as fiddly and annoying as I expected! Humbrol enamels were used to paint her. Coincidentally, the markings are for 45 squadron RFC based at Itrana in Northern Italy in 1918. Itrana is now Treviso airport, and my mum was born in Treviso! upload img upload imagem image free hosting adult image image hosting 30 mb jpg images post image online image ru Thanks for looking
    2 points
  20. Hello all, is my recently completed 1/144 Revell C-17 from my Op Herrick multi-build. The thread is here Completely OOB, sprayed with Humbrol Sea Grey. Comments welcome, thanks for looking. Dave
    2 points
  21. I remodel this aircraft a little. 1. I changed 4X MK 108/30mm cannons on 2X Mk 103 . 2. I remodel shape of the wing and tail. Oryginal looks not good enought for me ,-)) 3. Remodel fusulage tu make bigger cockpit and bigger fuel tank. Here is W I P http://www.britmodeller.com/forums/index.php?/topic/234961138-focke-wulf-flitzer-172-tuning-version/ And I make it more dirty ,-))
    2 points
  22. Here is my effort depicting Anson L7951 of 45 Air School near Oudshoorn in the Western Cape in 1940. Tackling the kit only now had it’s advantages as numerous previous builds could be used to point out any problems or pitfalls. The underside is finished in a blue used only in South Africa during the war and is described as SAAF Sky Blue A (close to FS 35190) by historian Ron Belling in his book ‘A portrait of Military Aviation in South Africa’ So, another one in the bag........ BTW Has anybody got a solution to overcome the terrible quality of the Photobucket images? Cheers. Edit; Sorry for the double post......had a power surge
    2 points
  23. He's quite a character isn't he? His face is filled with pathos and expression, he will bring the whole thing to life.
    2 points
  24. day 7 base coat on. note the hi-tech spray booth I am trying for a VMA-311 marines jet during operation desert shield. I have seen a few pictures and read a few descriptions of the 2 tone camoflague these jets used and Im going with my own mix to try to match as best I can. Not overly worried if it isnt the absolute right tones as long as it looks right to me.
    2 points
  25. Hi folks,after a fair bit sanding and cleaning up got the beast primed today.Still needs a little filler along the wing and tail to fuselage joints but as I use flexible filler from the DIY store and smooth with a damp cloth the primer is not affected,because I had to sand a fair bit of the top of the fuselage join I filled and(plasto) sanded those panel lines affected.thanks for taking the time to look.
    2 points
  26. With time expiring, I have finished. Really enjoyed doing a figure, that I went and bought some more. Hopefully my figure painting skills will improve with practice.
    2 points
  27. Hello fellow modellers. This is my first post in RFI, comments welcomed. All brush painted using Humbrol enamels, decals are a mix of the supplied kit ones & Fundecals 1/144 Vulcans. Enjoy the following pictures of surely what should have been instead of what if!
    2 points
  28. Another one complete, Its the Revell kit, I replaced the probes on the nose with bits of squashed solder otherwise its out of the box. Fit wise its great but i've found a few sink marks on the leading edge since i painted it so too late to fix those but oh well. Thanks for looking
    2 points
  29. Thanks, Andrew. At least someone understands what I ment Most of the discussions I read ended with something like "And Zvezda is cheaper anyway". My point was that if you want to compare the price of profipack edition kit, you should compare it with equal competitor, ie. a kit + equivalents of all the accessories included in the profipack. And if you do such comparison between Gustav profipack and Zvezda F-4 + PEs + mask, suddenly you find out that profipack actually really is cheaper ($39.1 vs. $46.75 in Hannants prices). Weekend edition will be released in few months, then it will be fair to compare the price with just the Zvezda kit because the content of the box will be the same (OK, Zvezda will have one or two decal options more). I wish Zvezda success as it may be motivation for Eduard to be extra careful and nail the S-199 the same way as they did with the Spitfire.
    2 points
  30. Finished! Yay me! Photos tomorrow.
    2 points
  31. This is the first model I have finished in 48scale for 15 - 20 years and for me it is a number of firsts. First time I have used and airbrush, masking, panel lines, weathering, decal setting solutions, Vallejo Air Colours. Yes there are a number of things wrong with it but hey ho and I must also do something about setting up a better photo taking box, studio, table
    2 points
  32. Finished! Yay me! Photos tomorrow.
    2 points
  33. Been a bit since I posted an update. Progress is slow, but progress nonetheless. More detailed pics once I start getting things assembled
    2 points
  34. Well over due another update! Starting with the GR7, primed and the underside lichen green is on I've used Zero colour matched paint for this, in pretty happy with the colour! Since taking the snap, the lower surfaces are all masked off waiting for the Nato Green topsides. Onto the GR1 and 3 Dark sea grey sprayed and then paper masks made from enlarged versions of the GR3 instructions Green sprayed and masks removed It's come out ok I think I normally free hand spray, but it's a bit fiddly in 1/72, even if the masking took forever.... Next up is gloss coat, except I might try some filters on the GR1.... Now I'm going to finish my cider and shout my self horse watching the Saints in the premiership final! COYS! Phil
    2 points
  35. 2 points
  36. Small bit of progress. Been test fitting the cockpit after removing the ribbing off the inside of the fuselage. Realise this build has been done many times in this forum so I apologise for covering old ground! This a lovely cockpit... Removing other bits and pieces to be replaced... Next task I tidied up the Red Bear wheel wells and test fitted having removed the kit parts. Some areas are so thin I have put some tape behind to temporarily protect it... The wheel bays will make a good addition and I'll add in some etc wiring shortly before priming. Lots of filler will be required to fill the gaps when they're attached. It took me a while to figure where the separate pipe work goes but off BM I found loads of great ref pics (though I'm bound to still get it wrong!) One of the seats had a broken piece(probably me) so I added a tiny piece to level up. Am I correct in thinking these are the bits that are designed to break the canopy? Added weight... Raised panel lines have to go on the bomb bay doors... That's better!! Purchased some Hertiage intakes to have a seamless intake. I couldn't really see any shape difference other than the seamless effect and the fact the kits compressor blades are set much further back in the kit parts. Anyway less sanding for me....hopefully! Added various vents and grills in approximate positions. Grills were old PE and are just for representation. Any advice/comments appreciated. Thanks for looking!
    2 points
  37. Hi all, Airfix 1/72 AWACS based at RAF Waddington. Built it straight from the box and painted with enamels, also added a "Diecast" F-16 for scale purpose. Also a bit messing about in Picassa.
    2 points
  38. Hey guys i leave it as it is then. Meanwhile i have done some painting.Top side is almoast done i jest need to do some touch up. Today i start painting metal parts
    2 points
  39. Tour preshade looks great i still have a problem to draw straight line even when im sober
    2 points
  40. OK guys, cutting it fine but pictures now up in the gallery. This has been my first group build and I have really enjoyed it, not in the least because it had the desired effect of spurring me to finish something. My modelling is not as good as some of the masterpieces on here, but I'll keep trying - this is not my last GB!
    2 points
  41. I had a quick look at the Airfix wings, and as it turns out they've made it quite easy to droop the ailerons. The entire aileron is moulded as part of the lower wing - a couple of easy passes with a scribing tool, and the lower "panel line" between aileron and wing becomes a nice little hinge! Load the Euclidean Plane Geometry reticule into your Mk.I Eyeball, bend the "hinge" and set the angle to 11 degrees. Done! Nice thinking (and engineering) Airfix! Well done, mates! Cheers, Bill PS. Yes, I know that the port aileron is actually set to 12 degrees. But I'm going to leave it that way and see who spots it in the RFI post. Probably the same guy who can spot the 0.5mm error in the AZ 1:72 scale 109G - he must have the Mk.II Eyeball.
    2 points
  42. Regarding reference material, the Maircraft plans are generally acknowledged to be the most accurate available by those with an intimate knowledge of the subject. Strangely enough, and perhaps embarrassingly for some, the Trumpeter kit compares more favourably than the Monogram kit when these are reproduced to 1/48th scale. Whilst accepting that there are some niggles with both kits, it would appear that the issues with the Trumpeter kit are more easily corrected than those of the Monogram offering. A point raised on more than one occasion by some well respected modellers that have actually built the kits in question. Aftermarket products are available to correct the engine cowls and rudder of the Trumpeter kit however, the incorrect nose profile of the Monogram kit will require filler, sanding sticks and a little elbow grease to put right. In my opinion the old Monogram kit has had it's day. Time now to make way for the new kid on the block. Chris.
    2 points
  43. 2 points
  44. Woohoo! Got it finished...can't quite believe it myself. I've mounted it on a piece of firewood as I really don't like the look of the base that comes with the kit. More in the gallery!
    2 points
  45. Hobby paints notwithstanding MSG does not resemble ANA 602, not least because the former is a Munsell PB (Purple Blue) and the latter a Munsell Y (Yellow). MSG is a cool blue-grey (or should be!) and ANA 602 a warm, slightly brownish grey. The difference between the two standards is a whopping 10.9 where <2.0 = a close match. ANA 602 was originally promulgated as a substitute for MSG, the requirement for which (in US factories) was to be eliminated but in January 1944 this was revised and Navy Dark Gull Gray 621 was supposed to be adopted as standard to replace both MSG and ANA 602. However the latter colour continued to be included in ANA Bulletin 157 until 1959 together with ANA 620 and both had FS 36440 cited against them as the replacement colour standard to be employed. I've measured the ANA swatches and in fact 602 is a little darker than 620, not lighter as stated above. There is a reason for this to do with the pigments used for Light Gray and Light Gull Gray but the retention of both well into the 1950s is a bit mysterious. Paints matched to 602 contained the anatase form of titanium dioxide (white) which had a tendency to chalk whereas paints matched to 620 contained the rutile form which was resistant to chalking. This suggests that the 602 standard was perhaps darker because the chalking effect of the applied paint was understood and allowed for but I have no direct evidence for that. The retention also suggests that there might have been a specific requirement for 602. I think that might be connected to USAAF requirements as Neutral Gray was to be dropped in 1942, supposedly to be replaced by the 'dark' colour ANA 603 Sea Gray and later FS 36118. This might also be related to Graham Boak's observations about 'light' versions of Neutral Gray seen in photographs. Here is the colour science:- ANA 602 Light Gray = Munsell 5.5 Y 6.0/0.8 = FS 36440 @ 2.78 ANA 620 Light Gull Gray = Munsell 5.6 Y 6.7/0.5 = FS 36357 @ 2.72 (FS 36440 is @ 7.41) The Munsell Value (the central number) show that 602 is darker and the Chroma (the last number) that it is slightly more saturated than 620. The difference between the two is @ 5.98. But bear in mind that those are the paint colour standards and applied paints made to match those standards could and did vary. When people talk about ANA and "Dupont Sky Grey" they are mixing two different terms. ANA was a paint colour standard and "Dupont Sky Grey" a proprietary paint manufactured to match the British MAP colour standard Sky. The ANA standard for Sky was 610. Aircraft manufacturer paint specifications often cite the ANA numbers without cross referencing the paint manufacturers designations, so there can be an element of doubt as to which paint was procured and applied. I would like to see more evidence for the statement that Corsairs intended for the FAA had 602 undersides. The Temperate Sea scheme (TSS) under surface colour required by the FAA was provided for both by pre-ANA matched paints like Dupont 71-021 and subsequently ANA 610 Sky. 610 was never dropped from the standard and was still included in Bulletin 157 in 1959. ANA 602 was not required in the USN tri-colour scheme so it is difficult to understand why it would have been used even expediently in the Corsair factories. However there would have been no difference in the upper surface colours applied as substitutes for the TSS and Day Fighter scheme (DFS) as both were Olive Drab ANA 613 and Sea Gray ANA 603. It could be argued that using 602 as a standard under surface colour would ease procurement/supply but in reality FAA and RAF fighters were not being built by the same aircraft manufacturers. North American's Mustang drawings show 602 for the under surface colour (for MSG) and 610 (called Sky Blue!) for the prop spinner which shows that 610 was 'known' to US manufacturers and included in procurement requirements. There was a brief period when the JAC accepted Neutral Gray as the standard under surface colour on land based aircraft - in early 1942 - but that was soon objected to by the British and overruled, probably one of the reasons that Sky was incorporated into the ANA colours. Nick
    2 points
  46. Thanks for the kind comments. With regard to: - I'm always ready to share my knowledge and experience, you can contact at any time; - I am not a fan of the Luftwaffe, they just really a lot of models produced; In the history of so accepted that good always triumphs over evil. Therefore who won - and that is good))). - I place my ready models just in two display stands. While the place is.
    2 points
  47. G'day Chums, For your amusement and delectation may I present to you my take on the Hobyboss Easykit Zero.The build thread is here http://www.britmodeller.com/forums/index.php?/topic/234961609-hobbyboss-zero-in-172nd-scalefinished/ My thanks to Mish for doing her bit,Mark for doing his and to one and all for looking in.Cheers chums.
    2 points
  48. Sweet 1/144 Sea King HAR Mk3 RAF. Build thread.
    2 points
  49. Ha ha!.....everyone giving you "schmitt" about not having a 109 in the collection.....pardon the pun!
    2 points
  50. I used solar trim on mine (followed by a dipping in Kleer), what I like about using it is there is a slightly raised edge which helps freehand painting afterwards: There are overlaps which are visible, but look OK after painting:
    2 points
This leaderboard is set to London/GMT+01:00
×
×
  • Create New...