
Leaderboard


Popular Content
Showing content with the highest reputation on 26/03/14 in all areas
-
Airfix new tool Zero painted with Tamiya Acrylics, weathered with Vallejo chipping medium. Cockpit is Eduard.11 points
-
The Harrier Project – 20/20 Vision My last act of self-aggrandisement on BM – a final pointer to my completed Harrier Project for those of you who want to see it. I counted them all up and I counted them all down. Here’s the collection … … and more photos for those that way inclined via this link. So it’s goodbye from them. And it’s goodbye from me. Happy Modelling folks!10 points
-
9 points
-
There she is, this kit is all fun. Happy with the results with Alclad II being the first time I use such paints. Overspray of blue color paint over propellers is on purpose, reference pictures show such feature. Enjoy the pics, the las two is a lineup of my last three models uploaded in this forum. Here is the build http://www.britmodeller.com/forums/index.php?/topic/234953086-132-tamiya-p-51d-early-cripes-amighty-3rd/ Cheers.9 points
-
First up is the DC-8 -51. I wanted originally to do the bare metal version, but given the less than stellar job I did chopping up the fuselage, well, gloss white hides a lot more sins than silver. Decals by Twosix, and Contrails engines. Main thing I can say about my job on the engines, is "There is a lot of room for improvement". I even had Mikes' ( Mitchems ) perfect examples to copy, but . . . Really enjoy this Minicraft kit - have to be careful I don't end up with a herd of DC-8s. Mike The Pan American DC-8 -62 , Decals by Classic-Airlines and a much easier time of it on the engines!7 points
-
Hi Folks the latest off the bench,Classic Airframes 1/48th Meteor T7.Painted as the hack for 33 Squadron based at Middleton St George in the late fifties whilst operating Javelin FAW7s.Painted with Xtracolor HSS and an old tin of Gloy day glo paint,I really miss Gloy paint it was very good.Dressed up in Xtradecals sheet 48-049. Ian7 points
-
Here's my latest build, I picked this up from fleabay for £0.99 + p&p as the box was damaged and was pleasantly surprised at the qualityof the kit. The decals were awful, like leather, so again I procured some from ebay. I think like a number of kits the instructions tell you to fit the pitot tube on the starboard side which is wrong this has been corrected here. Only thing I forgot was the r/v mirror and the nav lights but WTH. Enjoy and feel free to bash constructively. Paints are Tamiya.7 points
-
This is a nice little kit. Well engineered and thought out. It comes with a jig for joining the wings, though the top arms could do with being longer. The transparencies have nice ridges that mean no masking required before simply hand painting. A really nice touch is the inclusion of the catapult cradle to display it on. The colour decals were very flimsy, so I ended up painting the yellow leading edges, but everything else went on OK. Tamiya paint for the upper and lower surfaces, Humbrol for yellow leading edges and cockpit green interior, Vallejo for the prop and hub and Wire Wool for distressing the paint. Klear before and after decals and an atrists acrylic matt varnish to finish. Hope you like it. Any and all comments welcome. cheers Grant6 points
-
Here is my finished dornier DO 217 M ll conversion useing the revell Do 217 E4 This build has taken around three months . Link to my Work in progress here http://www.britmodeller.com/forums/index.php?/topic/234951941-dornier-do-217-m11-koster-aero-enterprises-conversion/6 points
-
Trumpeter 1:700 Liberty Ship - SS Jeremiah O'Brien Build Thread6 points
-
Thank you, chaps. Giorgio N, thanks I will give that a try next time. Well, the old Matchbox decals went on a treat. A fair bit of gluey residue from the paper came away with the decals, and they needed a bit of a rinse off before placing them on the model. Luckily they were fairly strong and stood up to some handling. I even used the rear fuselage band, something I wouldn't normaly do. It had the serial numbers on, so it saved a bit of messing about to just use them. I'm not the best at weathering, but thought I would give it a go. Used a home made black 'wash' and some silver paint chips to try and give it a well used look. Spitfire's can get pretty oily underneath, and I really wanted to portray that. Then it had a matt varnish coat overall, to tone it down and blend everything in. Before I knew it I was finished. A Polish pilot of 306 'Torun' sqdn. gets airborne in his Spitfire IX. I couldn't resist using the stand. It would be a shame not to! I even managed to get the prop to spin round I enjoyed building this old Matchbox kit, and I think it still makes a decent Spitfire (ish!). Thanks for all the comments and likes. There are few more pictures in the Gallery. Thank you.6 points
-
This is my first biplane for about 40 years Used CA glue and monofilament for the 'generic' rigging, it was a pig especially the bits close to the fuselage after the top wing was on, but I'm fairly pleased with the result despite the CA glue running over the decals(I'll use thick next time with an accelerator5 points
-
F-4B Phantom Bu 153019 VF-111 `Sundowners` USS Coral Sea Late March 19725 points
-
I'm calling this good enough to show pics of as I'm now just waiting for the "remove before flight" flags and ordnance to turn up. Basically as nice kit to build but a little complex in the way it all goes together so a lot of test fitting is the order of the day here I reckon. Funnily enough one of the easiest bits was the Aires cockpit tub as this slotted in with hardly any rubbing down to fit. Heres the pics5 points
-
Hello Dear Friends, I have recently finished the construction of two Vampires and one Venom that belonged to the Venezuelan Air Force (FAV), and operated during the years 1950-1960. The first De Havilland Vampires FB-Mk52, arrived in Venezuela in late 1949, to replace prop fighters P-47 Thunderbolt. These were the first jet aircarfts used by the FAV. A total of 24 FB-Mk52 were received. In 1955 five DH Vampires T-Mk55 two-seat training aircraft also were received by the FAV. In 1961 all Vampires became part of Fighter Group No. 12, together with DH Venom and F-86F Sabres. From 1968 they began to be replaced by the more advanced fighters, American F-86K Sabredog. A Vampire FB-Mk52 and T-Mk55 still preserved in the Museum of Aviation FAV, in Maracay, Venezuela. To build the Venezuelan Air Force DH Vampire T-Mk55, two-seat trainer, I used Classic Airframe kit "DH Vampire Trainer" 1/48 scale. To build the DH Vampire FB-Mk52, I used the Alley Cat multimedia kit (resin, white metal, and photo edge) De Havilland Vampire FB.MK.5, 1/48 scale. I used "Model Master" acrylic paint; and all decals were home made. De Havilland Venom FB-54 jets, began arriving in the Venezuelan Air Force (FAV) in 1955. Twenty two were received from Great Britain. After more than 15 years of operation, they ended the service in 1973, being replaced by the American fighter F-86K Sabredog. To build the FAV DH Venom FB-54 fighters, I used "Classic Airframe" kit DH Venom FB-4, 1/48 scale. I also used "Model Master" acrylic paint; and all decals were home made. The detail building (step by step) of Venezuelan Air Force DH Venom and Vampires can be seen in this thread: http://www.modelismolatino.net/vampiros-amp-venom-venezolanos-tema7702.html BEST REGARDS RSK48, From Venezuela5 points
-
Another couple of modern fighter prototypes. Firstly Zvezda Sukhoi Su-50. Not a bad kit but some vague fit around the intakes. The scheme took a bit of masking. I used Light Aircraft Grey, Neutral Grey and Extra Dark Sea Grey. Then Trumpeter's Chengdu J-20. Another decent kit. Not too happy with the black finish but it'll have to do. Both together Then with the two I did last month.5 points
-
Trumpeter 1:700 Liberty Ship built for the Less Than a Tenner GB. This was a great build that got me out of my comfort zone and I am already planning more maritime subjects. Really enjoyed it. WIP here.5 points
-
Hello friends Thank you all for your nice comments. I didn't put more pictures before because there was some details to finish (i just noted another one… the "stick" between the rigging!! Well tomorrow i will do it, now i will share this pictures, i will put here one or two when i add those two parts. Well all of you already know the kit, this is such a funny kit to build!!! I recommend it to all of you that like the theme, lots of marks and colours available, i will build more soon… i think. I hope you like it, thank you for looking. Regards from Portugal Vitor Costa5 points
-
Matchbox 1/72 Supermarine Spitfire Mk.IX. No.306 'Torun' (Polish) sqdn. RAF.5 points
-
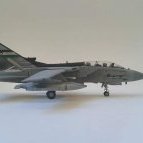
Spanish Harrier #3 Harrier EAV-8B II Plus, 01-919 / VA.1B-29, Escuadrilla 009, Arma Aerea de la Armada Espanola, (Hasegawa 1/48th) The latest model in my Harrier build project (#18, 2 to go) is the Harrier EAV-8B II Plus variant flown by Arma Aerea de la Armada Espanola – the Air Arm of the Spanish Navy. The first EAV-8B II Plus was delivered to the Spanish Navy in January 1996. They received eight new-builds in total, with Construcciones SA (CASA) in Spain completing the final assembly in conjunction with McDonnell Douglas. A further five EAV-8B II Plus were remanufactured using EAV-8B II donor aircraft (01-904, 01-905, 01-906, 01-910 and 01-912). The aircraft are flown by Escuadrilla 009. This build uses the Hasegawa kit plastic straight from the box, with just the addition of a Maverick air-to-surface missile (kind donation from fellow BMer). The model shows the current camouflage scheme of Dark Gull Grey (FS36231) over Dark Compass Grey (FS36320). It is brush painted with Lifecolor’s acrylics and I used Series Españolas decals. The model is weathered using Tamiya powders, artist pastels and Zig brushable pens. Vallejo matt varnish was used to flatten the finish. This is how it turned out ... All feedback welcome as ever. Next in for a rolling vertical landing will be a USMC AV-8B II Plus4 points
-
Hi, folks! This is my next model. The "Brengun" firm released the captured Spitfire Mk.Vb, which the specialists of the Daimler-Benz installed they own engine DB605A. The model is based on the old model of "Azmodel." Plastic is typical "shortrun" with small set of photoetched parts.4 points
-
Hello Friends Well another one, right but this one with different colours so i hope you like it. (i will post more pictures soon) Best regards Vitor Costa4 points
-
The first of my trio of Presentation Spitfires from Richmond/ Twickenham. (The old Airfix 1/48 Seafire) Originally a Spitfire Vb, this a/c was one of the first to be converted to a Seafire Ib (NX982) to serve with 761 Squadron Naval Fighter School at Henstridge Somerset in 1943. 761 code was 'GI' but I found no reference to this aircraft's individual code. However in Henstridge shots I've come across, many Seafire's carried no codes at all, so I went that way4 points
-
Last of the Line – Harrier GR.7A, Naval Strike Wing Harrier GR.7A, ZD411 / 40A, Naval Strike Wing, Joint Force Harrier (Hasegawa 1/48th) The LAST* model in my Harrier build project (#20) is the Harrier GR.7A in the colours of the Naval Strike Wing (800 and 801 NAS combined) within Joint Force Harrier. ZD411 first flew in April 1989 as a GR.5 and was later upgraded to a GR.7. Delivered back to the RAF in May 1993, she remained a GR.7 until withdrawn from service in March 2010, and was the last GR.7 flown operationally by Joint Force Harrier. For a time she flew with the Pegasus 107 engine, hence the “A” designation. ZD411 is depicted here when deployed on HMS Illustrious in July 2009. Although not carrying the CRV-7 pods at that time, these pods were used in training and in operations in the Gulf. And as they were not going to get used on anything else, I decided to fit them!, so there! This is the Hasegawa 1/48th scale Harrier GR Mk.7 “Royal Air Force” kit. The model is straight from the box, with the addition of a resin MB Mk.12 ejection seat, Amraam-line’s extended in-flight refuelling probe, L’Arsenal’s Paveway IV LGBs and Belcher Bits’ 6-shot CRV-7 rocket pods. The model shows the penultimate JFH camouflage scheme for Harriers of Dark Sea Grey over Dark Camouflage Grey, with a liberal sprinkling of replacement Medium Sea Gray panels and flaps, etc. There’s even a bit of primer on the tail fin for good measure – all as a result of a visit to the JUMP line? It is brush painted with Humbrol enamels and I used a combination of kit, third-party and home-made decals. The Hasegawa kit decals largely fell apart – just as well most of them are not relevant to this era of Harrier. I had to use up another MDC as the first disintegrated into 5-10 pieces once on the canopy – they are the worst aspect of the Harrier model IMHO. The model is weathered using Tamiya powders, artist pastels and Zig brushable pens. Vallejo matt varnish was used to finish. I don’t think I saved the best model until last, but this is how it turned out, for richer for poorer ... You can see a few more shots of this model and all the others by clicking on the "My Harrier Project Models" link in my signature. All feedback welcome as ever. LAST*. Well, sort of. The GR3 I’ve used in the collection to-date was one of the pair for my Operation Corporate set. I will replace XZ989 with another GR3 from 233 OCU in due course, but the project brief has technically been met; “one of every single-seat variant that flew operationally with every service operator”. It’s taken just over four years and has made me much more knowledgeable about the Harrier, introduced me to lots of new experiences and people I would not otherwise have had and been a lot of fun. Special mention here to Nick and Colin in particular from the IPMS Harrier SIG – I couldn’t have done this without your help and friendship. I might even have become a better model-maker as a result, but that was a by-product and not an intent – and I was starting from memories of 30 year’s previous! My club colleagues at West Middlesex Scale Model Club might be thinking they’ve seen the last of the Harrier … but will they?4 points
-
Afternoon, I've finally given into temptation and made a start on this one. I have some big(ish) ideas to go with this kit - we'll see how many of them come to fruition. Things I definitely want to do are: - Drop the flaps - Separate all the flight control surfaces, - Add external (and possibly internal) lighting - Motorise the props My inclination is to keep all the doors closed up - out of the box the cargo hold is fairly plain, and I think it would take a lot of work to get it in to a state that I would be happy with. Also, I'm inclined to do it 'in-flight', so whilst the ramp could be down, it's more likely to be up. I'm still undecided on whether to have the wheels up or down - the kit wheels are rather strange slab-sided affairs, and I'm not aware of any AM replacements. I have the PE set and paint mask, but don't think I'll be bothering with the SAC landing gear - I'm a bit sceptical about the utility of these in most cases. I think this aircraft is quite well suited to dropping the flaps - it has a very simple high-lift system: no leading edge devices and dropped-hinge flaps with a fixed vane on the trailing edge. This should make getting the geometry correct that bit easier. So far, I've mostly been cutting things up, starting with one of the flaps and flap-hinge fairings: I've also cut out the ailerons, elevators and rudder, so I'll need to get the Evergreen strip out are start building up the missing parts. I might cut out the spoilers too, possibly only on one side, as these are also used for roll control and I want to try and capture a 'dynamic' snapshot as it were. If anyone has any advice on lighting, I'm all ears! http://www.britmodeller.com/forums/index.php?/topic/234957864-adding-led-lights-to-models-any-good-how-to-guides/ Thanks for looking! Andrew3 points
-
Hi Guys, This is my first GB of this year. I will build a F-14A+ from Hasegawa. I will backdate it to a Iranian version. Here are some pictures of the content of the box. The boxart The Sprues And now the goodies This will be the first F-14 from Hasegawa and a major build for me with all these goodies. I hope the Cheers,3 points
-
Another chapter in RAF aviation history has just passed with the last operational flight of the Lockheed Tristar. Operated by 216 Sqn since their conversion from BA and Pan Am airliner stock in the early 80s, the RAF notched up over 30 years of service with the Tristar. The aircraft were originally purchased to help provide the airbridge between the UK and the Falkland Islands after the conflict in 1982. They went on to serve with distinction in all major conflicts since that time including Iraq, Kosovo and more recently Afghanistan. Following the VC10 retirement in Sep 2013, the type has also provided support to the QRA Typhoons of 1435 Flt at Mount Pleasant Airport. Three variants of the Tristar served with 216 Sqn - the C.2 pure freighter, the K.1 air refueller and the KC.1 combined air transport/AAR platform. Sadly the aircraft have reached the end of their economic lives and as part of the RAF's AT/AAR modernisation, together with the late lamented VC10, are solely to be replaced by the A330 Voyager of 10/101 Sqns. Until recently 216 was the largest sqn in the RAF with nearly 500 personnel. Over the past few months the drawdown of aircraft and operations has stepped up with aircraft being progressively retired to Kemble and Bruntingthorpe. By March 24th just 4 Tristars were left serving, including the specially marked 30th anniversary aircraft, K.1 ZD951 which only returned from fighter trails to the US on Sunday 23rd. March 24th was the date selected to be the last operational flight of the Tristar before the sqn disbands on 31 March, and ahead of the last 4 aircraft retiring to Bruntingthorpe for scrapping on March 25th. For the final mission there were to be two KC.1 aircraft flown: Fagin 11 - ZD948 was to conduct AAR for the last time followed by flypasts at several airfields with which the type has been associated including Cambridge (Marshalls) and Bournemouth (Cobhams/Flight Refuelling Ltd. Fagin 12 - ZD950, carried the media party and recorded the final flight for posterity. Here are some shots from the final flight including the last tankings followed by some ground shots of the anniversary aircraft and the type that has now replaced the Tristar. My thanks are extended to Wg Cdr Morgan -OC 216 Sqn, Flt Lt Beauchamps (organiser) and all the personnel of 216 Sqn who made the event possible and so memorable. Sadly in a shrinking RAF the chances of Two-Sixteen being reformed are slim to say the least and so it is both the end for another historic and famous squadron as well as farewell to an important and distinctive aircraft type. Thanks for looking. C&C always welcome. Mark3 points
-
Hovering with the “Flying Nightmares”, VMA-513 Harrier AV-8B II Plus, 165006 / WF01, VMA-513, USMC (Hasegawa 1/48th) The latest model in my Harrier build project (#19, 1 to go, can I/you believe it?) is the Harrier AV-8B II Plus variant flown by the United States Marine Corps (USMC). Now forming the backbone of the USMC Harrier fleet, the first AV-8B II Plus was delivered in March 1993. 165006 was delivered in October 1995 and was the last of the new-build Harriers delivered to the USMC, the remaining AV-8B II Plus aircraft were “remanufactured” AV-8B II aircraft that were withdrawn from service to be pushed through the remanufacturing process. In all, the USMC received 27 new builds and 74 remanufactured AV-8B II Plus Harriers. VMA-513, the “Flying Nightmares” disbanded in July 2013 as part of the transition to the F-35B. This build uses the Hasegawa kit plastic straight from the box, with just the addition of two resin Mk.83 unguided bombs. The model shows the aircraft when she was flown as the VMA-513 Unit Commander’s mount WF/01 in the Harrier Tactical Paint Scheme of Dark Compass Grey (FS36118) saddle and Dark Gull Grey (FS36231) over Dark Compass Grey (FS36320), circa 2009. She is brush painted with Lifecolor’s acrylics and I used the kit decals. The model is weathered using Tamiya powders, artist pastels and Zig brushable pens. Vallejo matt varnish was used to flatten the finish. The “saddle” is probably darker than real-life and I’m not convinced of any of the greys used – that Arizona sunshine soon fades the paintwork. The blue tail is a guess as well. What the hell, it’s only a model. This is how it turned out ... All feedback welcome as ever. LAST, but not least, from the production line is the GR.7A flying with the Naval Strike Wing as part of Joint Force Harrier.3 points
-
Ok finished this last night I liked the kit easy to go together and no problems for me considering I am not the most experienced builder. The thing for me is this is the first kit that I have used an airbrush for the entire painting of the kit. Sorry for the photos as they are from my phone.3 points
-
Hi Folks I just completed this yesterday. Built totally OOB with some artistic inputs......sorry for the crappy pics....but I am not a good photographer.....nice mold and detailed well for its age.... A refreshing change .....building something different.....all done with gunze paints. I decided to go with a used look as opposed to a new one....also painted the ESCI logo on the display to give it some colour..... Thanks guys rgds mr b3 points
-
Some inspiration: Andrew3 points
-
Evening All, Number five of 2014 see's me return to 1/48th Here is my rendition of the much aligned HobbyBoss TA152-C1 I picked this up at SMW for a bargain £9. I did no corrective work in terms of basic accuracy, but have to say this was one of the best fitting kits I have had the pleasure to build. I used no filler any where and just a touch of Mr surfacer to hide the seams. Decals are from EagleCal and depict a possible scheme from JG300 Welzow Germany April 1945. Paint is my usual Gunze light weathering, and Albion Alloys tube just for pitot and gun barrels. I added seat belts from foil to seat, ashame I didi not complete it for Hinckley show yesterday but ready for Cosford, Thanks for looking, feedback as always most welcome, Rick G3 points
-
No, I've just checked, no fjords with my name on but there is a Billefjord for Billy or maybe you meant Namsfjord? I was hoping to find one with a rude name (childish, I know) but Boknafjord was as close as I could get! DB3 points
-
All wrapped up HERE3 points
-
This is a report of a very personal project I started on about a year ago, and which I recently finished. It is a tribute to my great-uncle, Willem Pieter Adriaan Ditmar, and a gift to his nephew, my father, Eric Willem Roubos. Historical background In the very early morning of 26th of February 1942, Catalina Y-63 was flying over the Banka Strait, north of Sumatra. The PBY had been flying through the night on a recon of the area and its commander, Willem Ditmar, had to decide to turn back to base or continue the patrol and risk an almost certain encounter with Japanese forces. Ditmar chose the latter. The PBY was part of the forces of the MLD (Marine Luchtvaart Dienst) the Air Force of the Royal Dutch East-Indies Navy which had been involved in a struggle with the Japanese for a number of months now, since a Japanese invasion of the Dutch colony was imminent. At 6:40 in the morning, while the plane was flying just under low cloud cover to avoid detection, the PBY was jumped by two groups of three Ki-27 'Nate's' of the JAAFs 12th Air Brigade. A fight ensued, during which the gunners on Y-63 succeeded to shoot down two Ki-27s. However, the numerical superiority of the Japanese proved too much. Co-pilot Noë was hit, the plane went into a dive and was only with great difficulty brought back under control. Severely damaged the plane landed on the water, where Ditmar ordered his crew of 6 into the life boats. Y-63 sinks within seven minutes, raked with bullet holes from continued strafing. The Japanese fighters disappear and Ditmar and his crew, with the injured pilot, manage to reach the Noordelijke Gebroeders Island and eventually, on March 3, Sumatra. From there, with canoes rented from the locals, they reach Anjer on Java on the 6th. To their dismay they learn that the Japanese have landed on Java and control most of Java, including the area they have just arrived at. Ditmar and his men leave the injured pilot with a local official for treatment and continue their journey to Batavia, hoping to avoid the Japanese troops. The remaining six men split into two groups. One group is captured by locals and all three men are murdered. Ditmar's group is spared this fate but is betrayed by locals and handed over to the Japanese. Willem Ditmar was sent to a POW camp in Siam (Thailand) to work on the infamous Burma railroad. He survived the war and rejoined with his wife and his two daughters, who had been detained in Surabaya not knowing for more than three years if Willem was still alive. After the war he became the most decorated Dutch officer in the East-Indies theatre and returned to work for the Royal Dutch Navy and later for the Dutch government in South East Asia in various capacities. He died in Bangkok in a traffic accident in 1982, remaining a legend in our family. This story is based on several post-WWII publications, especially the report by mariner Gerard A. van Schooten, crew member of the Y-63, and on personal communications from family members. The Kit Academy’s PBY-5 has been around for quite some time. I think it’s still a fine kit and the only serious option if you want a PBY-5 (Revell has an antique molding which is out of production). The lines of the PBY-5 are captured well, the fit is generally excellent and the recessed detail is quite good, if a bit soft in places. The fuselage is covered in rivets, but they are quite restrained and look good under a coat of paint. The kit does disappoint when it comes to the finer details, a general issue with Academy kits of this vintage: Interior detail is minimal, the engines are very basic and the propellers are nothing like the real thing. As this was to be a special project I decided to shell out the extra cash on some aftermarket parts to correct these areas. I acquired the QuickBoost replacement engines, props and cowlings, Eduard’s photo-etch (for PBY-5A, but many items are of use) and MiniWorld brass .50 machine guns for the blisters. Construction Yes, it starts with the cockpit! Eduard’s photo-etch really improves this area as it really is quite bland. The cockpit floor requires carving up to make the parts fit and the I substituted the horizontal bar on which the yokes sit by an n-shaped piece of wire that more accurately represents the real thing. There is a gap behind the bulkhead which allows you to see into the void of the fuselage, but nothing can be seen with the cockpit window in place so I left it. The observer position has a few PE parts to spruce up the machine gun supports. After installing the six small side windows I closed up the fuselage. Fit is pretty good with the exception of the area behind the cockpit. I had to use some Mr. Surfacer 500 here and rescribe the lost detail in the area. The wing assembly consists of six pieces which form a middle segment containing the engine nacelles and two outer segments. They go together very well with just a hint of Mr Surfacer 500 required to remove the seams between the segments. I taped off the area to avoid losing the fabric detail while sanding the seams. The nacelles require a bit of filler as well and a few swipes with a sanding stick. The triangular pieces that form part of the float areas on the wing tips were another matter: They left huge gaps with the wing tips and needed quite a bit of filler to get a smooth result. At this point I had to start considering the build sequence. I usually put as much of the model together before I start painting, but the floats and wing supports were rather fragile pieces and I estimated their chance of snapping off at some point during later construction work was 100%. They also got in the way of masking, so I decided to paint the wings and fuselage separately and put them together only after decaling. I drilled some holes for the antennas and aerial wires ( I always forget to do this and end up having to do it after painting – the pine vice will slip and…), then added the PE corrugated ‘shield’ in the nose. After some fettling I pushed it in a it just stuck – no glue required. To the paint shop! Painting First step was to do the preshading. I have only used this technique a few times and I find it a very easy way to add some interest to a model. On a big kit like the Catalina it is a great way to break the large surfaces, so I set to work and an hour later I had a rather patchy and fearsome looking amphibious creature (I know, the PBY-5 is not amphibious…)! On towards the real painting then. All my references on the Catalina indicated that the MLD planes had ‘milky white’ undersurfaces. Unfortunately, this is not a color any brand carries in their range, so I made my own by taking a fresh bottle of Gunze flat white and adding a few drops of yellow to it (my thanks to FlevoDecals for suggesting this). My milky white needed about three thin layers to cover the preshading just enough to shine through (I’m afraid it doesn't show up very well in the photos). This was followed by masking off the white, and it was at this point that my references started to fail me. Although there are many photographs available of MLD PBY-5s, I have been unable to find a picture of my subject, Y-63. This wouldn't be such a problem if the MLD had been consistent in painting its Catalinas, but my references showed they were anything but. Among the differences are the demarcation between white and grey, the color used to overpaint the orange triangles, the color of the prop hubs, the exhausts, the antennas and the painting demarcations on the floats and surrounding areas. Almost no MLD Catalina is exactly the same, and without photographs it is impossible to know which combination of options Y-63 featured. However, it also meant nobody could prove me wrong if I were to guess, so that’s what I did. Undoubtedly someone will sent me a photograph of Y-63 after reading this and prove me wrong on all counts! After making my choices, it was on to painting the upper surfaces. My references told me to use ‘Dark blue-grey’, the MLD description of the color. I hit the internet and the consensus was that Dark Blue-grey was actually identical to the well-known Dark Sea Gray, so that’s what I used. On removing the masking I was unhappy with the demarcations on the fuselage to I spent quite a bit of time remasking and respraying, but the end result was very satisfying. I left the finish slightly patchy to allow for the fact that these planes were used in tough conditions. Next up was masking the overpainted orange triangles on the upper wing surfaces and the orange rudder. I sprayed these with Dark Sea Gray with some black in it (yes, I’m aware this is cheating – I should have used lightened DSG on the whole plane and ‘fresh’ DSG on the triangles…). The little V-shapes on the fabric area of the wing were masked and sprayed yellow. On Revell’s PBY-5 kit these are supplied as decals in red but on a number of my photographs they very clearly have a light color that really contrasts with the dark color of the wing, so I decided on yellow. I think it looks goods, it adds some color to the plane but at the same time blends in pretty well. I polished the surface with a 6000 grit micro mesh cloth, then applied a few light coats of Future on the areas that would receive decals, which are few. Both Dutch Decal and FlevoDecals have sets that include the PBY-5, but FlevoDecals very importantly adds a full set of serial numbers, so it was easy to go beyond the included versions and create Y-63. These are some of the best decals I have worked with; there is virtually no carrier film around them. I only used some MicroSol and they settled beautifully into the panel lines and rivets. The horizontal stabilizers were also painted in this stage. Test fitting had shown they fit very well, and as they are large I decided to leave them off until the end of the build so they would not get in the way. I neglected to attach the cowlings before painting the wing assembly. Silly, as I had to respray the demarcation a few times to get it to line up exactly with the nacelle that is attached to the wing. While I had acquired QuickBoost’s cowlings, I ended up not using them as their diameter is about 2mm smaller than the nacelle! Photographs clearly show they are the same width. I don’t know how an aftermarket part can get it so wrong. I ended up using the kit parts, rescribing the very soft detail on them and they ended up looking perfectly fine. In future I will do a bit more research before buying what is supposedly a ‘direct replacement’ upgrade part… Construction continued With the main assemblies completed I returned to the smaller parts. Still lots to do! The floats required a lot of clean up: The idea is that you insert the thin supports before you glue them together, catching them between the float halves. This I felt was a recipe for disaster, and in addition would make cleaning up the very obvious seam a major pain. However, my solution was far from perfect! I cut off the vertical main support from the floats themselves. This allowed me to clean up the seam on the floats, as well as the sink marks on the supports. So far so good, but it did leave me with a nasty butt joint to attach the two together again. They would break a number of times throughout masking and attaching them to the wing in the days ahead… On studying a movie I found of the PBY-5s in use with the MLD I noticed that they carried not the rather standard single .50 cal in each blister (which I had acquired already) but a dual .303 Browning setup. The .50 cals went in to the spares box. It was an opportunity to reuse some of the PE Eduard had kindly provided to spruce up the kit parts (in combination with plastic card), and I got some Master brass .303 barrels to make the dual setup more convincing. I used a similar combination of Eduard PE, card and Master brass for the front gun. The Eduard PE for the blisters is really meant to represent .50 cals but no one will know. Right? Right. Ok – there is no way around it – you are gonna have to attach that wing to that fuselage! I’ve never been lucky with models that feature spindly supports, and this kit would be no exception. It started off fairly well – the fuselage fits perfectly into the central recess in the wing. Pleased with myself, I forgot to do the obvious (can you guess what it is?) and went on towards the part I dreaded most: The supports. I started on the starboard side. Not a problem – perfect fit! Port side then, and that’s where it all went wrong: Both supports were too short by over 2mm. I slapped myself for not checking alignment after gluing the wing on top of the fuselage. I checked, corrected, checked, corrected, checked, measured, corrected, in the process breaking off all four of the supports again. After finally getting the right alignment I decided that it would be a good idea to let the glue set for a night before continuing. The next day I attached the supports again. Starboard, again, not a problem. Port? Would you believe it? Still a 2mm gap! I checked alignment again, and, satisfied that that was not the problem, proceeded to flood the gap between the supports and wings with a mix of superglue, Mr Surfacer and Tamiya liquid cement. My concoction created a permanent bond (probably the strongest on the entire model!), and after two days of sanding, cleaning, respraying, and more sanding, cleaning and respraying, I was very proud and happy with my now winged Catalina! Final Construction Quite a lot of this really. Main challenge were the cowlings – the use of the resin engine means you can’t use the mating surface on the nacelles as they are too deep and I had to rely on gluing the circumference of the cowlings instead. This, it turned out, was a lousy idea as the weight of the resin engines meant the thin mating surface did not provide enough strength to glue them properly to the nacelles. I decided to create a new mating surface using the back of the resin engine blocks. For this I had to remove the half-circle shaped areas on the nacelles, and by building up the layers using thin plastic sheet I finally got a nice, big, smooth mating surface. All my efforts had resulted in some spilled glue so some more respraying was required. A final piece of aftermarket I used were Red Roo’s fishtail exhausts. These are cast in resin and look quite good, although they are not as crisp as some Czech items of this kind. I had to sand the attachment points quite a bit to get a good fit to the engine nacelle. The fishtails are a bit of conjecture from my side again; I know from photos that some MLD PBYs had them, and they make the plane look a bit different, so there we go. Other bits and bobs went on quite easily; stabilizers, antennas, wires, machine guns, blisters, turret, fuel ejection pipes. I sprayed the entire kit with a mixture of 80/20 Vallejo matt and Future, and removed the Montex masking (great item, no-brainer on a kit like this) on the clear parts. The final items on the to do list were the PE wind shield wipers (attached with Future) and some Little Cars lights to represent the landing lights. They were taped over with clear cellotape to represent the glass. After some touch up I had a completed PBY! Conclusion Academy’s PBY-5 is still an excellent kit. With a bit of aftermarket it can be turned into a great kit, and it really has no significant vices to speak of. I really enjoyed this build from start to finish. After a long car and boat journey from Norfolk to The Netherlands, the revived Y-63 made it to my parents' house where it currently has a place of honor in the living room. I'm very happy with the result and so is my dad! References Bosscher, P.M. (1990) De koninklijke mariene in de tweede wereldoorlog. Part 3. Van Wijnen, Franeker, 490 pp. Geneste, W.J. J. (1992) MLD-er met twee bronzen kruizen. Mars et Historia 26(3): 57-61 Meijer, H. (2008) Voor dapperheid onderscheiden. Nieuwsbrief Vrienden Legermuseum 16(1): 12-13 Postma, T, Visser, G., Van Schooten, G.A. (????) De Catalina Y 63 door de Jappen neergeschoten. http://www.visser-maritiem.nl/Catalina%20Y%2063%20%20(1).html Womack, T. (2006) The Dutch naval air force against Japan: the defense of the Netherlands East Indies, 1941-1942. McFarland & Company, Jefferson, NC, 207 pp.2 points
-
Starfix 1/72 scale P51d Mustang. Painted using Revell and Tamiya acrylics Decals from the Airfix kit courtesy of Chrisrope. Thanks again.2 points
-
I have been pondering what to do for this GB and most of the ideas I have had seem to have been picked up by other modellers. So wanting to do something different, today I hit on the idea of trying recreate the inverted scene from Top Gun using this and for the fictitious MiG-28 this Well as I have never tried anything like this it's either going to be a complete b***s up or will look pretty good when and if I get it finished. It may turn out to be a bit too complex to complete in time but we will see how it goes. I still need to search for aircrew, suitable decals and then figure out how I am going to recreate the scene. :mental: All suggestions are welcome.2 points
-
Having posted various planes when i have finished building them I thought I'd do a WiP of my latest build, which is Kitty Hawks Jaguar GR1 with some extras too. I haven't built a Jag since I was a teenager which was quite while ago now and in more recent years I have pondered over getting the Airfix 1/48 but when I saw Kitty Hawks release of the GR1/3 kit I thought I'd have a go at one. To go with the build I purchased the Aires Gun bay, Airbrakes, Cockpit and Wheel bays too + Masters pitot tube and Flightpaths fuel tanks and pods + SAC's landing gear. The kit does come with nice bits and bobs of photo etch some of which i will use but i am a bit of a sucker for Aires pit's and wheel bays. From reading reviews I realise that Kittys Hawks GR1/3 Jagaur comes with some flaws (as in i don't think you can build a correct GR3 from the box) but my general work style is to build it from the box and throw in a few detailed after market extras, dip in paint and job done!! I'll appreciate any feedback during the build if I'm doing anything wrong. I started the build a couple of weeks ago but this was just painting and weathering the pit and wheel bays, so here we go.....sorry if there's too many photos....... Here are the main landing gear bays, cracking detailing.... Lots of bits to prime up...... Landing gear wired up..... Landing gear painted up in FS 36320 Dark Compass Grey (Lifecolour)......though they look white in the pic!! Still haven't weathered them. Everything gets dipped in aircraft interior green (mixture of Mr Hobby interior green and Humbrol pale yellow 81), except the inside of the air brakes. The pit and front landing gear being dry fitted. I had a lot of sanding to do to get these two to fit. Front wheel bay needed grooves cut to fit the landing gear. Avionics bay wired up.... ....then painted up..... and dry fitted..... Bays painted, not much weathering required as i had primed in black. Gun bays painted.... Air brakes bay painted... The plastic sheet showing cockpit dials is reversed and painted white to highlight them. Now the fiddly task of doing the belts. Primed, then painted in sand colour and aluminium for the buckles. I dry brushed the pit with aluminium and highlighted knobs. wiring and switches. So today I have achieved the following..... Clear parts seated in position...and glued.... Then liquid masked to protect during painting.... Canopies removed from sprues and tided up.. Angle of attack hole drilled and dry fitted. Will fix in place at the end of the build. Enlarged the hole for the pitot tube as it's actually made for the Airfix model. CA glued gun bay, air brake bay and wheel bays. Also CA glued main landing gear in position as it's difficult to access once the bays are assembled. Weights added, probably won't need that much as i've added aftermarket cockpit and front wheel well but as i'm using white metal gear it will take the weight. There you go, that's where I am now. Next job will be to complete the joining of the front fuselage and getting the cockpit and front wheel well to sit together.2 points
-
Seeing as the last one was the first GB I'd entered I figure this time around it was time to mix it up a little, and this will definitely, either, make or break! The plan is to build all 3 1/72 Hasegawa 'cats that I have in the stash, at the same time, each with their own differences and hopefully keep them all pushing to the end. Seeing as trying to keep all 3 builds in the air at the same time is going to be hard enough I'm combining the WIP, one less thing to worry about. First up the plate will be this mean ol' sea-dog. An F-14A from VF-154 "Black Knights", built as the CO's jet from May 2003 showing their tally from OIF. Next up, another old jet long in the tooth and long in service. An F-14B from VF-102 "Diamondbacks", built as another CO's jet, this time from October 2001 during OEF. Finally, last but not least the freshest bird in the line up. An F-14A from VF-111 "Sundowners", built not as the usual high-vis CO jet but as a standard line jet in the rarely seen low-vis scheme. This one will be put together using the JFK squadron boxing with FCM decals so if I do change my mind on this half way through I do have birds from the TOphaters or Swordsmen as options. Hopefully you guys will enjoy this as much as I will, and wish me luck! Keeping track of 3 nearly identical builds is going to be tricky!2 points
-
Here we have a Trumpeter Soviet Br-2 152mm Gun M1935. Something a bit different. This is out the box. With it being all one colour and no markings on it i tried to add some other colour with the weathering and washes as you will see.If you have fat fingers you will definitely need tweezers, some of the parts for the details are very,very small. There have been a number of very good models on Britmodeller over the last few weeks so i hope i don't disappoint the site with my humble offering....Comments welcome and thanks Britmodeller for a great site....Colin.2 points
-
My bodged colour scheme is now on. I used H302 for the green, and after finding out the hard way that Dark Earth was a bust for the brown, I used H406 Chocolate Brown instead. Maybe not 100% accurate, but after the weathering, who can tell? I sprayed both colours at the same time using both Infinites, which enabled me to touch in any over-spray, dodgy line positioning and get the job done quicker. Then each one was lightened twice and the colour changes started. I'm not massively happy with it, as I suspect it's overdone even for what I was trying to achieve, but I'm going to see if I can tone it down a bit later. I've cut the National markings out of the decal sheet and am presently spraying some thinners with a touch of pale grey over them in very fine misted layers to try and tone them down a bit. For a worn out aircraft, they're a tad bright2 points
-
No problem Alex. I can see a mini FAA group build appearing within the main group build! Sean2 points
-
And finally I finished it! For the Administrator: Can I post also in " Ready for inspection " section?? Sure Also finals pictures Ettore2 points
-
Made straight from the box2 points
-
Hi folks, just an update two disasters.one of the spitfires has had to be re-primed due to me putting a second coat of green on out of the wrong bottle,and a Hurricane bit the dust after bouncing of the table and hitting the floor(OK I admit it I was admiring it in a flying pose doing the Battle of Britain movie theme).So we have two complete two Spitfires nearly there and now spraying the primed one earth.Thanks for looking in.2 points
-
There she is Ready for Inspection here2 points
-
I started on a secondary application of filler but was mildly upset to find that my beloved Squadron Green filler had dried out to the point where it was difficult to work. Here I have my halogen light at an oblique angle to better highlight surface flaws: Fortunately I do have some of their white version which was still fine: I just find that sometimes it helps to have different coloured layers to eliminate flaws. I think HobbyCraft do it anyway, I also need some angled tweezers to repair stuff in the interior. At a bit of a lose end, I had a closer look at my fuel bowser: There is not a lot to it but it looks like a nicely detailed kit. I was going to poll opinion on whether to include its build here or start another thread in the vehicles section but I have pretty much decided that it should not be buried here but be given its own little WIP thread. My original thinking was to run the electrical wires down the tow hitch and into the base but it might just be better to hide them behind / inside the back wheels. Any ideas appreciated. Bye for now, Nigel2 points
-
I'm sure somebody with a deeper knowledge of the subject will be able to add more information, in the meantime I can add that from what I've seen the typical load was Sidewinder over the wings, Phimat pod on the outer right pylon, AN/ALQ-101 pod on the outer left pylon, fuel tanks on the inner wing pylons and 2 1,000 lbs. bombs under the fuselage.2 points
-
Altogether now... "Hot Potato, off his drawers, Trumpeter will make amends. (Plucks nose)" (with apologies to E. Blackadder and Messrs Keanrick and Mossop).2 points
-
WOW !! "Ninja" build here ! Cracking !2 points


This leaderboard is set to London/GMT+01:00