
Leaderboard


Popular Content
Showing content with the highest reputation on 15/01/14 in all areas
-
Wildcat V from HMS FENCER. This machine was flown by Dennis White, who later became a director of the Yeovilton FAA museum. Built from a FM-1 boxing. Fixed couple of things - wrong shape of ammo bays on the wings bottom (easily rescribed), overly simplified landing gear (just added few struts) Added True Details cockpit/wheel well, Squadron vacuform canopy, Quickboost horizontal stabilizers. Painted freehand using Italeri/Vallejo Model Color paints and varnishes. Decals are Xtradecal "Yanks with Roundels". Please feel free to criticize.4 points
-
Hiya Folks, After a long time laid up over Christmas here is my first for 2014, the excellent Eduard 1/48th scale Spitfire Mk.IX kit converted to a Spitfire Mk.VIII and in the markings of 1 Sqn SAAF; Here are some pics of the build, using parts from the spares box the wingtips came from an ICM kit, the tail wheel and doors came from a Hasegawa kit,.....decals are Xtradecal although the serial was the wrong style so rounded letters and numbers from a Modeldecal set were used instead and the 1 Sqn SAAF badge was altered to match the original, although the real eagle was much more simplified on the real aircraft. The hardest part was scratch building a rectangular rear view mirror from the scrap etched metal,.....very fiddly; Some more of the finished model, hand painted using Humbrol enamels; Cheers Tony4 points
-
This beauty isn't one of mine. I'm just the one who's lucky enough to have it displayed on my shelf! This is Hasegawa's brilliant F-2A in 1/48 as finished by master-modeller Periklis Sale, who is -of course- a member here. I'm particularly fond of the asymmetric JASDF loadout and that "hard to replicate on a scale model" JASDF colour scheme. I'm sure you'll agree, it's a very nice piece. It's a shame no other nation latched on to the "agile falcon" concept. Would make for some interesting "what if" subjects using this amazing kit! Anyway, massive credit to Periklis. Here are the pics:4 points
-
A straightforward out-of-box build...Aeromaster enamel DE/DG, Floquil Platinum mist beneath, Testor's flat overcoat. Decals are a combo of Model Alliance (serials), Xtradecal (roundels), Microscale ("19's" from an old sheet of generic Luftwaffe codes, to replace the off-register MA ones), and what seemed like hundreds of the excellent kit-provided stencils. These "new Airfix" kits have their much-debated pluses and minuses...but are irresistibly fun! Not sure I can logically articulate all the reasons, but they are a delight. I haven't enjoyed a build so much since I was a youngster.3 points
-
Here we go with a Lancaster Bomber - using Eduards photoetch for the interior but otherwise will be out the box which being a Tamiya means its will all go together perfectly. Hopefully this one will stand out but there's a lot of these about at the moment so got my work cut out I think! Here's progress - three evenings work so far but so far so good, will be closing it up tonight all going as planned. I've come the conclusion there's no 'correct' interior, some were black and some green, I figure the pale green makes it easier to see whats in there once finished?3 points
-
I guess I must be the only person on the planet that doesn't like the P.51 ( please don't hurt me, just my opinion )3 points
-
Hello all I would like to show you my first model in 2014 This is mossie From Tamiya 1/72.The miniature is from 540 photoreconnaissance RAF squadron.The plane was used between October 42 and September 43. I enjoy this build.Tamiya did great job wit this kit .Wit this build I try to make look of a used plane. Iam looking forward to hear your commts and ideas haw to make next one better. Enjoy watching and have a nice day2 points
-
I know there's quite a few flight simmers here on BM, yet there seems to be very little activity in this corner of BM! If anyone's interested there's been an awful lot of new stuff going on in the flight sim world in the last few months..... Lockheed Martin have released Prepar3D V2 which is the continuation of Microsoft's ESP, which you may know better as FSX. It's not strictly speaking an entertainment product but you can buy it and most of the FSX addon developers are starting to make their stuff available for this new sim. The major improvements are they upgraded the graphics engine to DirectX 11 which offloads a lot of the number crunching from the CPU to the GPU, so if you've got a modern PC with a decent graphics card you will likely see an improvement. They've also spruced up the graphics a bit as well. X-Plane 10 is really starting to make itself known, and is steadily moving from being a cult flight sim to something a lot more mainstream. There's some really good stuff coming out for this sim now, it made the move to 64bit in 2013 so won't suffer any of the memory errors that have plagued FSX (and Prepar3D) users when they start to add too many complex addons into the sim. In FSX land there's been a bumper year of addons. Orbx finally rounded off their scenery packages that now cover the entire British Isles, including Ireland. They did some nice UK airports as well but they weren't a commerical success so the plans for more have been dropped. They also released their South Alaska package, which is probably their best work yet. On top of that they also released FTX Global Base and FTX Global Vector which are huge upgrades of the entire FSX world scenery, soon to be joined with their FTX Global Landclass in 2014. PMDG released their long awaited Boeing 777-200LR which has got to be the most complete and high fidelity airliner sim ever made for the PC. Majestic bowled everyone over with a superlative Bombardier Dash 8 Q400 that was very detailed, and even had a custom flight model that ran outside of FSX and was injected into the sim via SimConnect. Sibwings did a fantastic Antononv An-2 that is really a work of art. On the British aircraft front Aerosoft recently made a surprise announcement that they have a Lightning in development, which looks to be much more detailed than the JustFlight one. Speaking of Justflight, their Eurofighter Typhoon was awful, but they've made a new in-house development team that is working on a Canberra PR9 due for release very soon and looks absolutely fantastic. After the PR9 they are going to do a VC10! For WW1 flight simmers Rise of Flight trundled on with new aircraft, the last release of 2013 being the Sopwith 1 1/2 Strutter. OBD Software released the latest version of the Flanders Fields series called "Wings Over Flanders Fields" - very, very nice indeed, what they've achieved with the CFS3 engine is remarkable, although the price tag of $60 for the mod and $25 for an additional aircraft skin pack (not including VAT) was quite hard to swallow. WW2 simmers had the most interesting year, with not one but TWO new sims announced. After the debacle of IL-2 Cliffs of Dover (more on that in a bit) the lead developer left the company and teamed up with Eagle Dynamics to make a new module for DCS called DCS:WW2. They did a Kickstarter campaign for this and raised enough money to get things going. A 2015 release is on the cards and should feature northern France in the 1944 timeframe with a gaggle of relevant aircraft. I have some reservations about how this is going to turn out.... The publisher/developer behind IL-2 Cliffs of Dover has teamed up with 777 Studios (Rise of Flight) and is making the next IL-2 title called IL-2 Battle of Stalingrad. The early alpha version is out for pre-purchasers and features the LaGG-3 and Bf-109F, and lots of snow. Full release is slated for spring 2014, but that's a bit optmistic I think. It will have the most famous aircraft from the Stalingrad campaign, and will follow the same business model as Rise of Flight so more aircraft will be released for purchase as the sim develops. On the old IL-2 front, Team Daedelus are still pumping out "official" patches which are pushing this classic even further. We've seen the recent release of the HSFX7 mod which is based on the latest TD patch and adds an awful lot of new aircraft and maps to the sim. Dark Blue World is still going strong, but is based on the older TD version, but has now been augmented by "The Full Monty" mod which adds even more stuff into the sim to make what is surely the most comprehensive and complete WW2 sim anyone is ever likely to see. The horrid mess that was IL-2 Cliffs of Dover has in fact been rescued thanks to the work of a community group called Team Fusion. What they've done with this sim is nothing short of remarkable... they've proved that not only can you polish a turd, you can actually turn a turd into something very good. A nice man by the name of Heinkill has also made a series of single player campaigns to replace the horrible ones that came with the original. If you've got IL-2 Cliffs of Dover do yourself a favour and get the latest Team Fusion patch and Heinkill's Redux Campaigns, you won't regret it. As far as very fast noisy jet go, it's been a slightly more quiet year. The mystery next official DCS module has now been revealed to be the F/A-18C, but there is no word as to when this will be released. Eagle Dynamics are working on getting a new graphics engine called EDGE implemented in DCS. ED also announced that their plans to make a Su-27SM module have been cancelled because the Russian government have objected on national security grounds. Instead they are now going to an Su-72S. On the third party DCS module front 2013 saw the release of the UH-1H and Mi-8MTV modules, which have to rank as among the most advanced helicopter sims ever to be seen on a PC. The MiG-21Bis module looks like it is getting very, very close to release now. One thing that caught my eye was a group called VEAO who are making a Hawk T1 for DCS, this is supposed to lead onto a Typhoon module to come later. What interested me is this Typhoon module is being made with the assistance of the real aircraft manufacturer and will be available in two versions - one "full fat" version for use by real Typhoon operators, and one consumer version with all the classified bits removed. Sounds quite interesting! Still, it sounds like it's a long way off yet. Someone announced they were going to make a high fidelity F-35 module for DCS, and this really set the cat amongst the pigeons as most flight sim fans don't believe for a second that it will be anywhere near accurate given the real thing isn't in service yet and even when it is most of the interesting bits will be very classified. This has led to some speculation that ED are selling out the DCS series reputation for being a high end high fidelity simulation platform. Back in September Seven-G announced they were at 95% with their new F/A-18C sim, but nothing's been said since. Hopefully this one will get released and not vanish into thin air like the much maligned Jet Thunder (1982 Falklands sim) appeared to do in 2013. Some group tried to get crowd funding for a multiplayer based F-35 sim as well, but they didn't raise enough money. They've gone back to the drawing board. So that's it.... if anyone wants to try and resurrect this section of BM please feel free to chime in, and if anyone wants some links to the stuff I've written about above let me know and I'll be happy to oblige!2 points
-
Doing some cleaning up this morning and pulled maintenance on my collection of 1/72 BAe Hawks. These have been built over a period of 10 years or so. In construction order, first the old Airfix Red Arrows Hawk, finished with brush painted Humbrol enamels (at the same time as the previously posted Red Arrows Gnat). Then the Italeri Mk 100 finished as the demonstrator, also brush painted with Humbrol enamels and with the kits supplied roundels replaced with spares. The Tamiya T1 - I think this is actually the Italeri plastic. The kit decals were the weirdest colours I have ever seen for low-viz RAF markings so I invested in Xtradecal sheet X031-72, which has kept me going ever since. This one is completed as 1992 display aircraft for 7FTS/63 Squadron RAF. Brush painted Tamiya acrylics. Fujimi kit completed as a T1A of 2TWU/151 Squadron RAF, July 1992. Brush painted Tamiya acrylics. The Italeri T-45 Goshawk completed straight out of the box. Tamiya rattle can for the white, brush painted Humbrol enamel for the red. The Italeri Mk 100 finished as a T2. This was my first go at converting a kit with a bit of scratch building (around the tail end). I was intending to put together some "fake" markings together from my decal spares collection, but just in time Airfix released their new Hawk T2/120 kit, so I used one set of markings from that. At some point I will work up courage to complete the donor kit as the Mk120 demonstrator. Brush painted Tamiya acrylics. And finally the new tool Airfix T1 finished making use of the decals from the Fujimi kit as a camouflaged machine from 63 Squadron. SNEB rocket pods are from the old tool Airfix Hawk. Brush painted Tamiya acrylics. Thats it for now, but I have another T1 under construction (stalled), the Mk120 and two more T1's in the stash - so watch this space Thanks for looking.2 points
-
Yes guys, the title is true, I have actually finished a model!!! The catalyst for this was an upcoming club competition to build a model for under a fiver. Rummaging around my local model shop I found an old Revell kit of the Polish PZL P11c going for £4.95. Having very much liked this kit as a kid it was something of a no brainer and the kit was duly purchased. Given its age the model did need a bit of tarting up but I was expecting this. Having rescribed the airframe, I knocked up a basic interior and opened the holes on the engine fairing inside the cowling.The cowling itself was thinned and its rear edges opened out. The undercarriage legs were refined and the wheels replaced with better looking items from the spares box. Tie rods were also added to the assembly. The porpeller was thinned down and exhausts and wing guns fabricated from Albion Alloys aluminium tubing. I shall have to throw myself on the mercy, or otherwise, of the guys at the club as the kit decals were unusable, being cracked, faded and having black smudges on them. I had to turn to the Techmod sheet for the type which technically puts me over the £5 limit. The Techmod decals were horrible things to use. They consistently tried to curl up on themselves and resisted even the strongest of decal solvents. Still, the main point is I have actually finished something, I had fun building the kit and enjoyed revisiting my childhood. So £5 well spent I think! Now where did I put that Revell Fiat CR.42? Here are the pictures and thanks for looking2 points
-
Hello all Here is my Meng´s Fiat G-91R4 of 702nd squadron ready for another mission against FRELIMO´s guerrilas positions in northen Mozambique in 1973 Only extras i used was Aeroclubs white metal MB4 ejection seat and metal gun barrels from Master(The ones for the P-47). Painted with Humbrol 196 and blue filter from MIG. Weathering with promodeller wash and oil paints.Bombs came from a Revell´s P-47D kit Had a lot of fun building this kit and looking forward to build another i or 2 more, of the Portuguese Air Force of course. Enjoy the photos. Stay tuned for another Gina soon... Regards and happy modelling FBorges2 points
-
Hi folks,after last years Hurricane fest I thought I would try a few Spitfires,Airfix,s little kit has it,s panel line issues but builds well. WZ-T has both upper roundels applied which may raise an eyebrow or two but a couple of manufacturers have issued it as such. thanks for looking2 points
-
Hi! Posting a finished kit for the first time since joining this great site! This one was actually finished in March 2013 and was the last kit I finished but I never got around to photographing it. Since then I've been busy with a newborn son and living in exile while our house has been rebuilt. The model was finished in custom mixed xtracrylix with decals from the spares box as this particular aircraft isn't available on any decalsheets. In a couple of months I hope to be back in action actually building something!2 points
-
The model is very nice and very easy to build, nearly "shake’n’bake I must say. It was the Profipack version with a lovely PE set and canopy masks. The paints are my good old Aeromasters thinned with Tamiya acrylic thinner, the French insignias are from my decal bank. Thank you for looking!2 points
-
Hi all, Finally finished my entry for last years Mosquito STGB, well at least its in time for the KUTA GB deadline! The kits actually quite nicely detailed and a reasonable alternative for the Tamiya kit apart from the gear legs being too short and the wheels being too big (which i can live with) and the mis-shapen spinners, which i did manage to reshape to improve them a bit. Unfortunately the kit is now OOP which is surprising for a kit that was first released in about 2008 i think? I was progressing reasonably well in the STGB but then bust the canopy while polishing it and as i then learnt there is no aftermarket option for a 48th scale mossie bomber canopy it languished in the modelling box on top of the microwave waiting for divine inspiration. Eventually I managed to vac form a replacement, wont bore you with the details here but theres a link to the build thread here - hmm cant get the link button to work so its in the KUTA IV GB!! So finally was able to complete it, paint was with Tamiya for main colours and finished with Xtracrylics matt varnish all that remains is for me to say a really big thanks to PeteW for taking some decent pics for me with his proper camera, they look a million times better than anything i could get with my bog standard camera! On with the pics: Thanks for looking in and as usual any C&CC greatly appreciated! Cheers, Stu2 points
-
Peter Mayhew (Chewbacca) has been posting some great pictures on Twitter of behind-the-scenes on some of the Star Wars films. https://twitter.com/TheWookieeRoars/media anthony2 points
-
I've got the old Dragon 2-seater Habischt (sp?) trainer on hand, plus the Meng kit... could be tempted, but might have to be reminded nearer the time2 points
-
I'm having a real hoot with this GB and making much better progress than I normally do. On that basis, is there any reason why I couldn't add a third build to the list? This one would be Japanese, a dedicated trainer only used by a training unit, very rare and not a jet. Andy Overly ambitious (again)2 points
-
The inspiration came to last days off and was engaged in painting. I stirred colours by eye, and can quite not conform to the accepted standards, but me arrange quite. The top is a little darkish, but after decals I was accustomed to do couple of varnish coats with addition of the white. Literally two-three droplets on an air brush tank. Levels colour, decals aren't so strongly allocated and the impression of small burning out on the sun is made. As it seems to me. At present the model is blown by two varnish coats. I think, now decals and exhausts, a remover in niches, the varnish and can be passed to the chassis and small things.2 points
-
Happy new year everyone. I realise that this isn't the most exciting or inspired build but since I finally decided to give up on this build and call it finished I thought I should post it here. Taken me months to get this one done just because of a lack of free time and disaster struck when my rattle can of varnish crinkled the finished paintwork on the underside and leading edges. Guess you can't win them all but I was gutted that the whole thing had been ruined. Anyway, I went for dropped flaps and drooped the ailerons a little and an open canopy for the first time. The kit was so so, large sprue gates and a terrible dihedral being the major problems. I corrected the latter and did the best a novice can with the undercarriage to get the gait right, although the wheels do appear to just be too far apart on this kit. Apart from the top coat it's all hairy stick painted. Hopefully I'll get more than 3 builds finished this year. Thanks for watching. Richard2 points
-
Well the final insult.... Try as I might for some reason I can't post the photo's Off to the looney bin for another short holiday If the situation changes you'll see the photos....if it doesn't I'm taking up a new hobby that is less painful......like sticking knitting needles in my eyes Cheers!2 points
-
Okay some progress made on the build a little bright perhaps but with a coat of Klear and final coat of satin varnish things should tone down.2 points
-
Maybe, but I honestly didn't stop for a schnelly at the chicken inn on the way! Selwyn2 points
-
Hi, is it too late to join this? My contributions would be an RS models Miles Magister in. CFS aerobatic team colours - the red and white striped profile on p.27 of the Airfile Trainers Vol 1. As I have the Xtradecal Commonwealth trainers sheet, an Airspeed Oxford could be next unless AZ release their Chippie... If I could join it would be good, the GB ends on my birthday too2 points
-
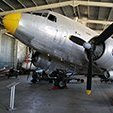
I'm going to vote for the Dakota as it's my favourite aircraft, and a great plane like that deserves at least one vote....2 points
-
evening all and Happy New Year so... it's been a good 3 weeks away from the bench what with spending the holidays in the US - wild weather too, 80 degrees one day 40 degrees the next...still a great time had by all but now I am back I need to re-orientate myself with what I was doing on the Hornet.... ..I was trying to work out how to do the cockpit as HpH have not chosen the traditional route - you have to assemble the fuselage sides, put the cockpit in from the top and slide the wings through the slot in the middle... ..this doesn't suit what I want to do as I have lots of detail to add to the cockpit so want full and easy access to it in both fuselage halves before assembly - I needed to work out if I can insert the wings afterwards from each side and whether the geometry stacks up.. ..first a look at the wings taped up with the spar parts - these ensure correct dihedral so I will have to watch out in the future when I get to that.. ...this is how it should be assembled... ..the spar position is where it should be in real life when slipped through the fuselage... ..I mocked up where the headrest goes - this is not a full bulkhead, it is half the depth of the fuselage and sort of hangs in the air so the cockpit is all pretty open around the seat... (this is not how HpH have it though...) ...I added a floor and now I can see how it all goes together I will probably put false walls on the fuselage halves covering the front of the wing slots so I can assemble the fuselage in two halves - then I can insert the wings separately later...(much later...) ...I see lots of complicated cockpit scratchbuilding in my future and apologise in advance to anyone tuning in for an HpH Hornet build all the best everyone.. TTFN Peter2 points
-
Because it's American? (ducking behind a wall) A media thing, methinks.2 points
-
If you are using enamels then undercoating is not usually necessary as these are "strong" enough to grip well on the plastic. Acrylics are a different story and usually need some form of primer on the plastic. At the same time a coat of good quality primer (better if grey) has the advantage of making well visible any imperfection on the model like bad joints, scratches and so on, allowing the modeller to sort these in time. For this reason I always use a coat of primer on all my models.2 points
-
Away for most of last week, but painted with Mithryl Silver at the weekend. and2 points
-
Hi guys, here are more pics In a blue background Cheers, Pierre.2 points
-
Evening all, a few months ago I started a thread looking at whether it was possible to convert HP's HMS Saber into an Aussie River class destroyer. Thanks to some advice from a couple of gents here I decided to scratch build. Started work Sunday night and with it being Teusday night now and back to work tommorrow here's what I got done. I'm using plans of HMS Ferret, a British I class destroyer which the Rivers were based on with some mods. I'm just comparing Ferrets plans and a side and top view of HMAS Parramatta and improvising the differrences. Above is the plans and templates glued to sheet styrene for the hull sections Templates all cut out and glued together for the hull while below is test fitting the deck below is the decks in place and ready for the first layer of outer skin. First layer down and sanded plus start of bridge structure And a couple as she is now. Its not perfect but I'm pretty happy with it so far. Thanks for looking and more to come soon Cheers Callum1 point
-
Hello there beautiful people. This is my first finished kit to greet the new year with. I will be greeting the new year with a newly finished Type 10, one of the recent offering from Tamiya. Released in September 2013, this kit is very beautifully moulded with moulded-on antislips, clear plastic sheets ( as usual from Tamiya ) and rubber tracks. I painted this gal in Tamiya JGSDF Dark Green and a mix of JGSDF Brown and normal Brown. A lot of references seemed to show hard edge patterns, I did the green first and masked it off and applied the brown. I just followed the pattern from the instructions. I wanted to exercise artistic license and went for a what-if winter scheme but since I have already made the Type90 in that way, I just decided to keep it factory scheme. I debated on how to weather it, mainly snows and mud but I realize I have to build more dusty builds as practice so I decided to keep the weathering to a dusty appearance. I didn't do it all dusty ( like my Leclerc) just a moderate amount of dust. The dust was applied first with two layer of oil wash and brushing pigments on top after that. Here's some photos - Well, that's about as much I can sum up about the build. More informations and more photos ( many more) can be found on my blog - http://modeller-innovation.blogspot.co.uk/2014/01/tamiya-135-jgsdf-type10.html Please do have a look and thank you so much in advance for any feedback you guys may have. Until the next launch .1 point
-
Caught! Growing up a Spitfire partisan in the United States was no easy thing. I still have and treasure the letter I received from an American pilot who flew both Spitfires and Mustangs at different points in the war -- I asked him to adjudicate the dispute between my father and I over which plane was better, and he came down firmly on my side. A glorious moment for an eleven year old.1 point
-
Nice work, ow was the kit? I think your weathering and general finish are examplary.1 point
-
That's really nice!1 point
-
Ugh, it's always videos of people flying 109s, never of people shooting them down.1 point
-
The Canadian Tigers can be confusing There was a DH 82a © for Canada, then a DH.82C (Gipsy), DH.82C2 (Menasco Moth I), forget the C3 (Gipsy radio trainer) the the DH.82C4 Menasco Radio trainer which were converted back to Menasco Moths II's. The Menasco has a slightly higher thrust line and has a straighter top to the cowl with the cooling aperture to the pilots right side with a spinnerless right hand prop. The forwards stagger braked u/c with tail wheel was not fitted to the DH.82a (Can). The Canadian Tigers also had an insulated jacket on the oil tank. The thin struts can be simply made by scraping a length of rod with a blade and cutting to length. I might be persuaded to do a set of metal ones, a cowl and a prop and canopies John1 point
-
You can Revell (look it needed saying) in a job well done.1 point
-
gorgeously clean...I can't belive how good that is in that scale. Bravo1 point
-
I would like to do a Vietnamese MiG as my stash is full of them1 point
-
Very interesting update. I was an avid flight simmer some years ago, but my PC couldn't keep up so I lost interest.....if and when I get a new, state of the art machine, wouldn't mind getting back in to this SD1 point
-
Lovely job, looks really good. This has made me go out and get a second one today1 point
-
Almost there, looking great1 point
-
Very cool collection1 point
-
The fairings above the wing are not correct for either variant - the split of parts makes it likelier that a compromise was expected rather than an entire new wing. We can hope otherwise. I'm interested in your comment about a Mk.III with full stripes, for it seems that the Mk.Vs changed to fuselage stripes only shortly afterwards. Merrick speaks of the squadrons re-equipping with A Mk.IIIs in October 1944. I'd like to do that A Mk.VII too, but would the mass (or at least massier) market? It would permit the use of Airfix's forthcoming Airborne Jeep as a payload - panniers are too easy! My real dream is of a Coastal White Hercules Halibag, which means an A Mk.IX.1 point
-
Hi All, I haven't posted an RFI for some time as modelling seems to have been done in spurts here and there over the past few months. Something called "work" getting in the way of life. This build is Roden's fine 1/48 version of the Junkers D1. All my builds contain new elements that I haven't tried before and I thought this would be a relatively easy way of getting into WW1 builds. This also gave me a chance to have a go at painting a prop to simulate a laminated wood construction and I'm reasonably pleased with how this came out. Overall I found this to be an enjoyable build with few gotchas to look out for. The main parts go together well and the fit is close with minimal filler needed. That's especially good, for this aeroplane has corrugated surfaces and so trying to maintain the effect whilst sanding down filler would have been pretty horrendous. Where I did need to fill I used a triangular profile needle file to keep the corrugations and this went well. The instructions, even though they are quite well illustrated, are still a little approximate in places as to exactly where some parts should meet but I think I got there in the end. I'm not 100% certain that some joins are precisely where they should be on the real thing but I recently qualified for my International Artistic License (Unlimited) so my best guesses are wholly sanctioned. For an injected kit, certain details such as the guns are very nice indeed. There's quite a good engine too but when everything is zipped up you see very little of it indeed so I didn't really go to town on that. The windscreen comes printed on a piece of clear plastic film but I managed to ping that away down the carpet monster's gaping maw and had to fashion a replacement from some packaging material. The U/C bracing is EZline with brass tubing at the ends. The U/C itself was a little tricky as the joins to wings and fuselage are somewhat agricultural, oddly out of character with the rest of the kit, so holes for the locating studs were drilled and this was one of the few areas where I had to use a little filler - Squadron white thinned with cellulose thinners. Where I did find problems was in applying the decals as they are remarkably fragile but at the same time they need to be worked hard to conform to the corrugations. The whole model got five coats of Klear to make the surface as smooth as possible and then each decal was applied using a cotton bud soaked in Microsol but, annoyingly, there is still some silvering in places. I'm not heavy-handed but even so I managed to break EVERY decal in the application process. If you want to build this kit (and I do recommend it) then you need to be extremely careful in this stage. The cam colours used were Tamiya JA Green and Purple (XF-13 and X-16, respectively.) I didn't do much in the way of weathering as these aircraft didn't see much service, as far as my research led me to believe, but I dry brushed the cockpit surround to simulate scuffed leather and did a little silver dry brushing here and there. The finished model was then AB'd with Revell matt varnish. On to the pictures! All comment and critique is always welcome and I hope you enjoy the shots. Cheers all, Roger1 point
-
Hi there, Here are some pics of my just completed Hasegawa Ki45 , a kit that I picked up at a bankrupt stock shop for a pricey 9€ some 4 years ago. At that time i had only just started airbrushing, so left it half done for a couple of years while my technique got a bit better. Well the ophthalmologist or what ever her name was advised me in May that i should cut back on my models a bit, so the camo was done over four 2 hour sessions, which was quite long enough in one session cause after I must admit that i was starting to get a bit of brain warp. As always on the very last hurdle disaster struck as i was giving it the final lick of paint silver on the end of the pitot tube (whats one of those ?) after shaking my container of Vallejo i didnt notice I had paint all over my fingers, say no more, in panic i tried to clean it off with mild alcohol which dissolved the future finish . Then on the very last job I over stretched the aerial, oh well never mind. The kit was built OOTB apart from an Eduard zoom set for the cockpit, everything went together well and I can thoroughly recommend it Hope you like it and all criticism welcome. Thanks for looking Mike PS, Yes I know that the props should be brown , but the paint call outs said propeller color, and i assumed that was black, a mistake i didnt realize until looking at an example on BM1 point
-
The second pair of "ceiling hangers" for my friend. Monogram 1/48 P-51B and Hasegawa 1/48 P-51D. Hope you like.1 point
-
Third pair of "Ceiling hangers" for my friend. Needed some "Bad Guys". Monogram 1/48 Me-262. Hope you like.1 point
-
Finished at last! This is my second model and it was quite a tough build for one so inexperiemced! Anyway, I'm quite pleased with the result. I made quite a few mistakes, but I don't think they notice too much - for anyone 'not in the know!' Thanks for all the help on the WIP thread... I really enjoyed it.1 point


This leaderboard is set to London/GMT+01:00