
Leaderboard


Popular Content
Showing content with the highest reputation on 26/09/13 in all areas
-
well everybody, here is my first british aiplane in my collection, and is a Jaguar, for me the most beautyful plane ever build in europe, and thsi scheme is my tribute to the RAF, hope you like it, (just need two more decal to be finished)4 points
-
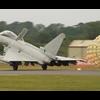
Looking at those Italeri F-35 sprue shots in 1/72, and assuming that one day there'll be mainstream (non-Panda) kits of the thing in service, I'm declaring the official end of my interest in the latest military hardware. In my teens, I built 200+ more or less "current" 1/72 aircraft from Hunters and Mirages right through to state of the art Eagles and F-16s. I had a model of every current USN aircraft, and most of the combatants from Israel and her enemies. But now we're not only in the era of boring grey jets, but they're even UGLY boring grey jets. I bought an Academy F-22, but can I be bothered to make it? The last cool jets were the Eagle and Su-27... IMHO. So, in my view, we're officially at "the end of history" for military aircraft. Instead of ten new types a year, we have planes designed to be in service for decades, with software upgrades. Plus they don't even look good... Good job there's plenty of history to go at, and other modelling genres, eh? Bring on the McLaren F1 and Avro Mirage 720, I say... Bestest M.4 points
-
I joke with SWMBO (who's more into airshows than even I am!) that in a few years they'll all be drones and unmanned craft, and the pilots will use Xbox controllers. I'm not so sure it's a joke anymore. The unique selling point of RIAT 2025 may well be an actual piloted craft. To the OP though. Yep. I agree. Do scifi/starships instead....much more fun, and you can light them. And you don't have to be anal about paint colours or rivets.3 points
-
On Pprune John Farley put up a quote he got from his proof reader, a 70 year old lady who knows nothing about aeroplanes but whose grammar is immaculate: You can’t have a Lightning II. Especially when THE Lightning had a red hot exhaust and was quite attractive and this thing looks like it should come down your street sucking out the drains.3 points
-
This is the new tool version and was a joy to build hope you like it. Hope you like it Cheers Drew2 points
-
Hi, Here is my interpretation of the 184 Squadron Typhoon IB, MN233 'Y' flown by W/O. Charles Geoffrey Polkey. W/O. Polkey was killed on 25th May 1944 when this Typhoon was hit by flak during a bombing raid on the marshalling yard at Gisors, France. The decals are aftermarket and the propellor is from the Airfix Typhoon 'starter kit'. Unfortunately no photo exists of this aircraft so a bit of guesswork was involved. Cheers, Russ2 points
-
Hi folks, This didn't make it in time for the Helicopter II group build but I've kept going and now it's done! It's the Italeri Wessex HU.5 done as XT480, which I believe was involved in the rescue of survivors from Sir Galahad. I used this image for colour and some detail reference, as well as a collection of walkarounds. The kit goes together OK. Quite a bit of flash/burrs on the edges of parts and I thought when I dry-fitted that it was going to be a disaster, but removing the locating pins from the fuselage halves allowed things to line up properly. The nose wasn't bad either - some putty needed underneath and to clean up some seams, but the big zig-zag seam is where the nose cone lifts up for maintenance access so I left that one alone The main problem is the cockpit glazing, which really doesn't fit well at all - I had to glue it to the frame on one side, hold 'til it set, then do the other side with a fair bit of pressure. I used some big files and a lot of putty to re-build the fairing (which is still wrong - it should continue the straight line of the glazing rather than end in a fillet) but at least it doesn't have a gap now. I added three antennas on the rear fuselage which weren't in the kit, some piping to the hydraulic reservoir on the main rotor head, fire extinguishers and wiring looms in the cabin and cockpit, a map/document box, overhead blinds, rotor brake, etc. etc. Also rearranged the seating in the cabin and provided it with a plywood floor. The kit cockpit is pretty nice, especially the collectives and the IP, although I stuffed that up a bit - I thought I'd got the fit right but it bowed away from the backing so the instruments look a bit weird. Oh well. In a sense XT480 isn't a great choice as the kit only provides white stencil decals and they should be black, and the typeface for the serial and XQ code letters is much too modern/too bold. Oh, and most of the stencils are the wrong size! I opted to work with what I had since I was trying to finish for the GB, and cut up/faded various decals to try and get things as close to accurate as I could. The paint is Tamiya - a mixture of olive green fading to darker olive green at the bottom, and olive green plus khaki drab at the top. It's a wee bit darker in real life than in the pics, I think. I had a couple of varnish disasters (frosting/cracking) which I mostly recovered from and did some weathering with MIG washes, AK stuff, and pigments. To do the painted-out crests behind the cockpit I cut masks from post-it note (following the pictures not the decals, which in this case were too small) and blotted paint through with a cotton bud. The scariest job was probably stringing the antennas, but it turned out to be OK once I got into it: This all sounds a bit grumbly but honestly I did enjoy myself (except maybe for the varnishing). It is a surprisingly challenging kit though, given how incredibly glowing all the reviews are, but I'll chalk that up to inexperience on my part. And while you could do a lot more work to fix the accuracy issues than I did, it does look like a Wessex! Thanks to everyone who commented on the build, and particularly to Colin and Smudge for their expertise and encouragement in adding the various extra bits. Cheers, Will2 points
-
Hiya Folks, I was really pleased to see that Italeri had followed up their Hurricane Mk.I & Sea Hurricane Mk.Ib kits with a Mk.IIc and as soon as it came out I bought two of them,...this being the first one to be finished. As with the earlier kits this Italeri Hurri fitted where it touched and needed some internal reinforcing of the fuselage and wings using scrap plastic from the sprues to help strengthen them. The inserts for the cannons in the leading edge was a poor fit and the way that the instructions tell you to insert the cannons from inside just didn`t work for me, instead I cut the cannons down and attached them from outside and they fitted much better. The decal options provided in the kit are very interesting but the one that I selected, the SEAC option from 113 Sqn seems to have been based on a colour side view from a well known Eastern European website and thus the serial was too rounded and the code `Y' was too large, based on a photo of the real thing found on the 113 Sqn website! I think that the Ocean Grey in the colour scheme would have been incorrect too so it was replaced by Dark Earth,...anyway enough blurb,.....here is the model; The rear cannon panels on the wings are additional etched brass parts and are a bit of a cop out really, but it does point to a Mk.IId and possibly a Mk.IV version following on using the same wing parts. Personally I would recommend using the etched parts as a template and to scribe in the panels onto the kit plastic. As 113 Sqn usually flew as fighter escorts or as fighter bombers I added a set of bomb racks and bombs from a Hasegawa kit, especially as the pilot, Flying Officer Skellum recorded quite a few bombing sorties in his log book while flying `Y'. I hope that you like it, my second one should follow soon, converted into a Sea Hurri Mk.IIc, All the best Tony O2 points
-
finally finished2 points
-
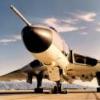
Hi all, another of those beautiful Airfix Lightnings. Finished from the box and painted with Humbrol Enamels. Airfix 1/48 Scale Lightning, 11 squadron, Binbrook 1978. Brian.2 points
-
I'm an ex detail freak and have seen work on this site that is absolutely beautiful, stuff my failing eyesight and shaky hands couldn't come close to achieve, but....it drives me nuts to see guys adding wiring loom details and twisting them, as an ex aircraft electrician I have to implore you, don't do it, wiring in real live demands equal OCD levels of attention and is NEVER twisted, it is a sparkies pride to ensure wires NEVER cross because it would cause chafing. So please take this onboard you detail freaks and keep up the ever increasingly good work2 points
-
Real shame about your friend mate, but that is one beautiful bike. Well spooky, how does the saying go, 'I know a bloke...' One of my friends is selling his, so if you can figure out a way of fitting it a suitcase, ill bring it over at christmas... Beautiful....2 points
-
Using thinned coats of ordinary paint will not make profit for Lifecolor.2 points
-
Well, has to be this...the Vincent Black Lightning........and it shouldn't be too hard a conversion from the Revell Black Shadow......2 points
-
Revell 1/72 B-17 Little Miss Mischief This is my version of the B-17 Little Miss Mischief. Seeing as it was my first go with an airbrush, I'm quite pleased with the result. I'd like to say that the faded and streaky patches were deliberate - well some were but others just down to inexperience. But actually I think it all adds to the used and abused effect. I also decided early on in the build to have this one flying. This kept me thinking for a while as there was no option in the box for this configuration and I haven't seen any others to get ideas from. Even after I'd finished I still had not worked out what to mount it on! So here we are, approaching home from a mission looking a bit worse for wear.2 points
-
Tea, tobacco, weed and strange powders, sounds like you are having a pretty good party there.2 points
-
The USAF/Boeing has been taking mothballed F-16s from AMARC and converting them into full-scale aerial targets to replace the QF-4. It's not new, it's not revolutionary, it's just the latest iteration of a system that's been around for donkey's years. The BBC's article was about 5% fact, 95% made-up hyperbole.2 points
-
It is actually. The sky and the atmosphere (both of which change constantly) being two different things in terms of perception. "The sky, also known as the celestial dome, commonly refers to everything that lies a certain distance above the surface of Earth, including the atmosphere and the rest of outer space." Good luck with the concept of travelling through the sky in order to walk up the street to the bus stop. But you got the diffusion of lightwaves in there. They are either transmitted, refracted, reflected, or absorbed but the "fog" idea (Rayleigh scattering) is not universally accepted because the precise nature of light and how it travels is still debated as theory. And red sunsets on the distant horizon are not blue . . . Nick2 points
-
Hi Keef thanks. Yea hes pretty fun looking aint he. I should make another snow man to go next to him with his head turned towards him and put a little plaque on the dio saying (As he turned to me he said "can you smell carrots")....2 points
-
I have nothing to add at this point but just wanted to see that said again. I might even get it printed on a T-shirt.2 points
-
I don't think that is necessarily the ultimate aim of every model at all. I have seen plenty of models that are clearly meant to be models involving no deception and none the worse for that. In fact those models that achieve the illusion you describe (without other media being involved) are probably few and far between. The perception that a model is a model does not mitigate any delight in viewing it. In fact it is often the recognition of miniaturisation that stimulates that delight as the expressions on the faces of people viewing a model railway layout reveal. No-one is really trying to pretend those trains circling model towns and villages are the real thing! Viewed at its most basic a model of a Corsair, say, finished in Xtracolor Sea Blue Gloss and not toned down says "This aircraft had a glossy finish" avoiding the risk of ambiguity as to what is being depicted. I can see nothing wrong in that whether it looks like a "toy" or not. It is an art form of individual expression with a sliding scale of scale fidelity compromises. Nick2 points
-
Hiya Folks, Here is my second finished Italeri 1/48th scale Hurricane Mk.IIc converted into a Sea Hurricane Mk.IIc using the hook parts from the Italeri Sea Hurricane Mk.Ib kit. As my old Hasegawa kit of an all white 835 NAS Sea Hurri was looking a bit sad and wore the wrong markings care of an incorrect aftermarket decal sheet I decided to replace it with this new kit, finished as NF700, 7-T which hit the round down of HMS Nairana on the 2nd March 1944, snapping the rear fuselage; I`ve managed to accumulate quite a few photos of 835 NAS Sea Hurri`s including those wearing D-Day stripes (NF698, 7-D was one of these and I was sorely tempted to do this one,..maybe next time?) and these came in very useful for reference. According to these photos NF700 had a feathered airbrushed edge around the anti glare panel in front of the cockpit which was a section of the original Temperate Sea Finish, but as I don`t have an airbrush I tried using a rattle can and the blue tak sausage method, but this was a total waste of time! Reverting to type, I attempted to replicate this feathered edge plus some overspray on the propeller blades and exhausts using some careful brush work, .......hope it looks OK? Cheers, Tony O2 points
-
I work in the mobile phone business. In the last five years, the phones we sell have gone from a range covering every price point from £30 -- £600 (of which Nokia made one at each end and a lot more in between) to a range that consists only of expensive flagships (iPhone and Galaxy S4) and cheap "good enough" Android phones and a few really low budget talk only phones. And the second hand market is booming. I think military aircraft have gone the same way. There are a few "silver bullet" technology leaders, affordable only by a select group, which are vastly more capable than they need to be, fighting the war before the last one. And a lot more "a bit better than the neighbours' planes... probably" affordable or second-hand last generation but still pretty good "mass market" alternatives. It would be interesting (academically, though I hope it never comes to it) to see what happens if you put up drones up against well-flown F-16s or Mig-29s rather than convoys of Land Cruisers... bestest, M.2 points
-
Hi all, I just thought to share the photos of my F-Rsin Air NZ ATR-72-500 with you. I know this is far from perfect ( comparing to some amazing models here ) but this bird is special because: It is one of my favourite aircraft! My first airliner build My third built kit My first attempt using airbrush My first attempt to use decals heavily It survived two 6.5 Meg earthquakes! I would like to thank Laurent (F-RSIN) and GG for their support! For me it was a very challenging build . Starting from putting parts together, to using putty and sanding, to gluing , painting and the decals. Took me quite a while to complete it, while knowing the flaws in the build and mistakes I made, I learned massive amount building this bird and faced lots of challenges with positive outcomes. Here are some photos taken by iPhone, The phone tends to "stretch" the objects a bit , and that is why the proportions might look uneven at places. but hope you enjoy Kit : F-Rsin 1/144 ATR72 Livery Decal: F-Rsin Aircraft Detail Decal : Nazca Additional parts: Wing tips, two vortexs on main wings and Antennas , made by myself.1 point
-
Hi all, this is just me testing out an idea. I have HP's 1/700 scale HMS Sabre. I bought it to add an Aussie S class destroyer to my dockyard dio but it was in the wrong configuration and S class boats were allready scrapped in the time frame my docks set in. Now I have found a use for it (or just ruined a perfectly good kit). I've been toying with the idea of scratchbuilding a preWW1 Aussie river class destroyer to go with my Australia build but started looking at modifying Sabres Hull to a Smaller River class. So finding a scale converter on the web I've worked out the different basic dimensions for each class's hull then grabbed the saw. At this point the only drawing I had to work off was a very small side profile so I really had no idea just what the differences are between the classes. Then last night I found a side and topview drawing online. Turns out there is quite a few differences, I figure doing it this way at least gives me a flat deck and a hullform as a starting basis. I'm not sure how the hull halves will hold together but a couple of bits of rod between the 2 should give it strength. I'm not getting into building it now I'm just looking at what has to be done and what I need. Out of interest the hull length in 1/700 is 109mm's and just having remeasured the plans, I printed them a smidge underscale it needs another mm in length and 0.5 mm in breadth. I'll shut up now, figure it to be a while before this gets interesting I really need to get these other projects finished before I really get stuck into this. Thanks for looking Cheers Callum1 point
-
Hi everyone, I have three new sets due for the Airfix Avro Lancaster this week. They are Lincoln stlye and ASR.III main wheels (both treaded, with different hub styles), and RR Merlin 24 larger carb intakes. Website to be updated shortly. The carb intakes are keyed to fit the Airfix engines only, but the wheels will fit the Hasegawa or Revell kits without modification. Thanks for looking! Colin1 point
-
Plastic really is the best option for scratch building-the hull is pretty simple,no sheer, a bit of flare up front,but this can be carved or scraped in to the hull once built. I'd use 40thou (1mm) for the carcase,and space the internal bulkheads,or stiffeners every 3/4" ,or 20mm if you prefer. The upper foc'sle deck can be added as a block. I have used wood for a few hulls, Holly is quite a good option if you can get some seasoned wood, easy to carve,hard but not overly so,keeps a nice edge and doesn't split down the grain. Doesn't knacker blades in 5 seconds either. If you can find any builders models of that period and of a similar type you'll get a feel for the fixtures and fittings of the period. I think there was a volume on the "First Destroyers" but am not sure which classes were covered,I don't have the book. A Chatham book I think. The Reed book is very good IMHO, it covers the construction of a Ca class destroyer,in wood and plastic,with just about every other type of "scrap" material so useful to scratch building,bits of copper wire,paper,all sorts,but as Seadog says,to a larger scale. Really useful book,just the photos are a little bit "digital" for my liking,lacking the reproduction of a book of pre desktop publishing times,but most books seem to have gone that way now. HTH MTD1 point
-
Great work Rob & Mrs. Rob!! That stuff is really effective looking, I've got a couple of 'snow products' in stock, but none of them give results that look as realistic as that ! Hope you put a link here when you get to do your layout. Talking of which, have you seen this micro on RMWeb? http://www.rmweb.co.uk/community/index.php?/topic/53438-stoating-bank/ Snow does make a nice difference to a layout!1 point
-
The orange/red is stunning.1 point
-
Dear Ladies and Jentlemen! Let to introduce my latest model from my series of Japanese seaplanes. Been redone jointing lines, made imitation riveting surfaces and much more.1 point
-
Ok so I have been back to it this morning and its time for an update. This is my first ever attempts at doing any scenery and I am very happy how its coming out. After a second layer of soil over pva last night this morning I dry brushed pva around the tree bases and sprinkled on tea leaves to represent dead leaves twigs and mulch. I am thinking tobacco on top of this could be nice to add more of an orange autumn look. Next I rinsed off the soil residue left in the sieve and got myself some nice little stones to glue on and ad more tea around. I did the same with the left over bits of twig from the tree/weed backing in the oven (that sounds really bad don't it !) then I added tea around these too. I then added two grades of woodland scenic's flock powders to represent foliage moss etc. and I know have this my first bit of scenery ever. Cheers all next a light frost effect and then maybe full snow fall. But next the snowman needs mounting on a base and having his hat and scarf fitted. Rob1 point
-
That's what Merlin lancs do1 point
-
<cough> AV-8A, perhaps? <cough>1 point
-
Interesting. I'll have to go study some photos. I confess that my confidence stemmed from a number of comments in documents that this would be happening, and perhaps even was happening (early '41, with the appearance of Merlin 45). I've also got it in my mind that I've seen early PR Spits with Rotols (the blunt-spinner Mk.II variety). It is quite possible that when the DH Hydromatic became available (late '41 or early '42?) that became the preferred prop. I haven't studied different kit props against each other. If I do, I'll report back! bob1 point
-
Another thought of mine, however hare-brained it might be: A high gloss finish on a model often looks "too thick" because the thickness of the paint (or the clear varnish) doesn't scale down. It's pretty much the same thickness on the model as it is on the real thing. Consequently, the model's surface must be exceptionally smooth, not unlike the preparation for a natural metal finish. I have seen many high gloss models of automotive subjects (typically competition or custom cars) and when I ask the modeller how he achieved it, I almost always hear Micro-Mesh followed by automotive lacquers and finally hand rubbing and polishing until the desired finish is obtained. The results achieved in such a way are stunning, and far more realistic than simply painting high gloss, or over-coating with clear gloss varnish. Cheers, Bill1 point
-
here my model of the P-26 in 1/48 by academy. Model was Painted with alclad II paints. hope u like it1 point
-
Try these http://www.sora-shop.com/Customized-Products/.html And while on about cases, I have a Academy 1/350 Warspite(premium edition) there's a picture inside the box of what looks like the full size model, anyone know if the height is correct on said picture.Going by that it should fit in a case 650mmLong x150mm depth x 250mm high, does that sound about right, anyone got one made up they could measure Thanks Colin1 point
-
The resin cockpit is pretty much ready for painting now. Basically none of it fits, either to the fuselage or to the other resin bits of assembly. The cockpit sides had to be reduced in length, the instrument panel brought forward by around 3mm, the rear deck support trimmed in height being the main mods. I've also added a seat height adjuster and a couple of plastic rod braces to the back of the head armour (not fitted until the detail paiting is done). The resin rear deck is a bit of a strange addition since I think it's totally obscured by the rear fairing and turret. I'll paint it just in case.1 point
-
It's a complex beasty about which much theory is currently being explored and tested. Essentially in terms of human perception gloss rating does diminish with distance but the curve followed between gloss rating and distance also depends on surface and illumination. A gloss surface is "recognised" as a result of reflective highlights and the way those appear depends on surface size and angle as well as distance. Shiny cars look shinier on sunny days at greater distances than on dull overcast days. The highlights can't really be scaled down so on a model they "tell" the brain it is a small sized object. Particulates in the atmosphere "fogging" the gloss is a good one but if that were true photographs of distant mountains reflected crystal clear in the still water of a lake would not be possible. It has more to do with the limitations of distant vision and human eyesight not being able see the reflected highlights at distance as well as the diminishing receipt of reflected "colour" as the light entering the eye becomes more diffuse over distance. Nick1 point
-
Falcon vacform canopy set No.26 (from Hannants at 12:99) has a Potez 63-11 canopy set on the sheet, which should take away the problem of over-thick transparencies for those brave enough to try.1 point
-
Try Nigel at Airframed http://www.airframed.co.uk/ a good bloke and fellow modeller, highly recommended Mike1 point
-
Poxy Nazi firework tech has been holding us back for decades.1 point
-
Great effort,welcome to the fold! and keep posting your builds.1 point
-
Just a few shots of some minor paint detailing I have been doing this week! Gregg1 point
-
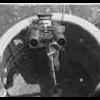
Not done much modelling recently, but decided to have a go at the Defiant turret. Taped the kit turret glazing together - no way that's going to look right - it's in two halves (which don't line up), it's too high, not very transparent and the rear fairing doesn't fit it : Apart form that it's fine....No problem I thought, I'll use the Falcon vacform one instead: Much more transparent and better shape with no seams, but obviously too short, because unlike the original, the slew ring isn't included. In the end I though I'd simply make a slew ring out of aluminium on the lathe, and recess it to fit the vacform dome. I added a couple of circumferencial features while I was at it, and it's turned out quite well considering: here it is without the dome fitted, and the rest of the turret components: I'm going to try to model it with the rear doors open, to show some of the detail inside. These short run kits are quite a challenge! They are enjoyable though, at least the Curtiss Hawk and this will certainly be unique models by the time i've finished them.1 point
-
Very impressive work1 point
-
great work1 point
-
That is really great work! Want to do the same soon. Mark Really nice work! Want to do the same soon. Mark1 point
-
So the original cowling didn't fit, and despite trying to mod the original, there was no way it was ever going to fit both the engine and the fuselage. I thought why not try Rapid Prototyping a replacement. I started by scribing and filing a step in the fuselage over which the new cowl would fit: Then, found some 3-views online: Surprising how bulged the cowl is in plan. Anyway, after scaling and measuring I drew a new cowl on proE Wildfire. Quite a simple job, only about 1/2 hour of work: Then 'grew' it on an RP machine. Ours uses the fused deposition moulding method, and extrudes hot ABS plastic in layers: The first one was slightly too thin, and cracked easily so I added 0.25mm onto the wall thickness on the CAD model, and tried again. This time it was OK, so I covered it in thin cyano to make it more durable, and sanded it back smooth: The resolution of the RP machine isn't good enough for surface features, so these were scribed by hand and a drill bit: And here it is slotted onto the fuselage: No, it's not perfect, but it will at least allow me to hopefully finish the model, plus I've learned a hell of a lot about the process. Once higher resolution RP machine become cheaply available the filling and rescribing will not be needed and the above would be the work of a couple of hours.1 point
-
Great build and love the finish article, blooming quick if I may say so sir1 point


.thumb.jpg.76f12b87ce9ca9929c9aabdcf8f9d2dd.jpg)


This leaderboard is set to London/GMT+01:00