
Leaderboard


Popular Content
Showing content with the highest reputation on 17/09/13 in all areas
-
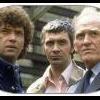
Hi, It has been a while since I've posted. I've now finished my AAC WAH-64 Longbow Apache AH Mk.1. It has been a slow build, but I managed to finish it. It's from Operation Herrick ca. 2006. I've scratched som UK specifik antennae, and a scoop?? on the right side of the nose. I've also remade the grips and the guards in front of the landing gear. I did some wire superdetailling on the Longbow unit and on the gun. For the HIDAS gear, rockets and the decals, I've used Isracasts conversion set. Cockpit is Aires resin cast. I managed to find a '4' in my spare decal box, and the serial is ZJ224, which I think is the one Ed Macy flew to Jugroom Fort ? It was painted with WEM Helo drab and toned down with MM helo drab. Afterwards, I made a thin dust wash, which doesn't really show through the dust powder. I wish the dust would have been more red, though. I wanted to show a dusty Apache, from Afghanistan. I hope you like it. I am just pleased to have finished it and can now move on to something other. Cheers,4 points
-
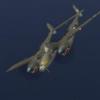
Hi Chaps Many moons ago, I started this and its more or less there........Paints are Gunze .....wanted the used and neglected look............. Some minor fine tuning to go.....the whip antenna needs to be glued back straight......and some minor pesky clear lenses for the nav and top side lights............ Overall the kit fought me most of the way but the end result and the size is impressive......Maybe it was also due to the fact that when I started this I had many other things on my mind as well.............. Thanks for looking Mr B As always pardon the photos I am not a good photographer and the weather is very iffy these few days in my part of the world...........3 points
-
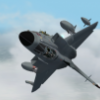
Hi all, here another model by me. Kinetic`s F-5A in 1:48. Used some PP`s by Eduard and a nice sheet by Dutch Decal. The rest is build just out of the box. Hope you like the result.3 points
-
Thank you guys for your comments! Hi all! After spending more than 40 days looking for information and constructing the Akagi admiral bridge is finally done..Far from being spacious, the bridge could hardly hold 6-7 officers back in 1941..Very little will be seen after the roof will be cemented but as in aeroplane cockpits this is also the case with this cramped little space!... Cheers to all! Panagiotis.3 points
-
Well, finally got this finished. Except now looking at the pictures, need to do a little work around the front windows. I believe as I am getting older my eyes are getting worse, what a shock!. Made this a tired old bird that had seen better days. The kit was almost no problem to put together. Two issues, one the undercarriage is way too weak to support this kit's weight. I am crafting a new one out of metal. The second issue is the nylon representations for the ammo versus the miniscule attachment points for the machine guns. I need to figure out a more permanent way to secure the guns since there is continuous pressure to distort them from the ammo. Still working on that. During the shoot one of the machine guns popped loose from the tension. Would recommend this kit to anyone of any level. Just wish they would reissue it as the phantom model. It is very large when finished. This is taken in front of my office door and it almost spans the width of the entryway. Comments welcome. Now back to the Mosquito and the obsolete group build.2 points
-
This is the Italeri Wessex that I converted to a HC2 of 72 squadron based at RAF Aldergrove around 2000. I used the A2ZEE & Heritage sets. The GPMG came from the Airfix Lynx and the paints were Tamiya. I also rebuilt the cabin seating to represent a HC2 interior. Michael2 points
-
Well before I completed the F-84E, I did these. The YF-22 and one 23 were strip-downs and repaints of kits first built in the early 90s. The dark grey 23 has decals from the Dragon kit, bought specifically for them. The details - The YF-22 is the Italeri kit with Airfix decals. All the original kit was still in one piece, I just removed the u/c, added a bit of filler, and the nose probe from the Airfix kit too. Both YF-23s are the Italeri mould (one from a Revell release). Not too much weathering on them but the decals on the dark grey one silvered quite badly. The YF-17 is the Anigrand tooling. Straightforward if not too accurate at the nose end. The nose probe I added is a bit on the long side! The canopy was quite cloudy though. The X-32 is (IMHO) a gorgeous looking machine! This was the Revell boxing of the Italeri moulds, of which I have another, and may well end up as the X-35B. Accuracy, again, is not all there, especially in the back end, but I couldn't be bothered to make new vertical stabs or move the wing, OR put in an exhaust on the back left fuselage.. but I enjoyed making it - went together well! Finally the Gnat and Vampire make up the Brit end, Airfix versions of course. They went together ok, but not superbly. A bit of filler and rubbing down on a few joints that didn't want to mate up, and panel lines that didn't seem as fine as the aforementioned X-32. On the Gnat, I had a lot of trouble with the Alclad orange peel effect, despite being rubbed smooth and properly primed. In the end I opted for Humbrol Metalcote overall, along with their 209. The Vamp was painted too initially in Alclad, but I wasn't happy with it (I have seen pics of Vampires having what looks to me like a greyish metallic colour, whilst the Alclad seemed a bit too... metallic?? So I opted for Xtracolour High Speed Silver instead.) You will also notice some of the display stands in their naked formats - I haven't gotten around to stain varnishing them all yet Also, I put the YF-22 next to an F-22, just for comparisons.. Apologies if this is a tad pic heavy URL=http://s764.photobucket.com/user/jasman71/media/null_zps13090729.jpg.html][/url] Thankyou for looking2 points
-
Or... you could find out what is wrong with the kit. And then ignore it anyway...2 points
-
Hi chaps, many thanks for your kind words and comments. Thanks Gary, I used Tamiya Dark Green XF-61 and then highlights and lowlights drybrushing etc. On reflection I think I will go for this set. Progress is slowwwww but I've finished the cockpit 'tub' so thought id post a few pictures. I've made a start on the tail wheel area and also the cockpit sidewalls. Comments are always welcome. Cheers...2 points
-
pretty ok kit, definitly not as good as hasegawa's A6M5 series either tamiya's new kits. but no other choice. from pictures, these planes were pretty new. added eduard seatbelts, gun barrels, and brake wires. thank you for looking, comments welcome.1 point
-
Hello. Finally finished this one, been at it for ages but this model fought me at every stage. I started off again with the airfix Canberra B2 and the Alleycat PR7 conversion, I decided to fill all the surface detail as well as it is far too prominent. I decided to do 31 Sqdn RAF WT521 again as she was in Laarbruch about 1965. The first time I used the Alleycat conversion it all fitted together very well, this time however it just refused to fit neatly, by the time it was all fitted together and was sanded the inside of the model was FULL of fine dust that I couldn't get out. Its painted with Halfords primer, Racking grey and Tamiya AS9 spraycans. Decals are a mix of the Airfix ones and Model Alliance stencils, I had to make up the underwing serials using bits of other numbers.. Its turned out no where near as good as I was wanting it but I'm just glad to get it finished. Ive got another B2 in my stash but think I'll wait a while before starting. Probably keep it a standard B2 next time. All comments welcome. Mark.1 point
-
B-17G Updates (for HK Models) 1:32 Eduard HK Models have done a fine job of their new Boeing B-17G kit, and out of the box it's a sight to behold. As I often say though, there's always room for improvement, by using mediums that are more appropriate to the task in hand and that give a better result. These mediums are Photo-Etch (PE) brass, and resin, both of which Eduard excel at now they have their Brassin range of high-quality resin upgrades. These sets are for the dedicated modeller that wants to spend the time and money on improving the level of detail to greater heights than achievable with injection moulded styrene. Today we have the immense Flap set, Engine set, Undercarriage Bay set, and the Brassin wheel set, which is pretty incredible value if the price I've seen online is correct. Flap Set (32337) This arrives in a large flat-packed back containing two sheets of PE measuring 26cm x 20.5cm each, and I have one criticism. The weight of the brass in the bag requires a little better protection than bag and card, because in the event of a corner impact, the PE will buckle, just like my set did. Fortunately, no damage has been done to the parts, but it is a definite issue with larger sets that needs addressing to avoid disappointed customers and additional costs for Eduard in having to replace damaged sets. Moaning aside, these are among some of the largest PE sheets I've seen, and certainly the largest parts I've seen. Don't be too overcome by their size though - all you'll need is a method of folding longer parts, and you'll be ok. The set doesn't look to be too taxing beyond avoiding damaging the large parts during handling. The kit doesn't need too much preparation either, as the flaps are already separate on the wing lowers, so only the oversize hinge parts are surplus to requirements. The flap bay has moulded in ribs, which must be removed and the trailing edge thinned down as much as possible. The bay is then skinned with a single part that has plenty of detail etched in already, and that is augmented by the large number of PE ribs that are double-sided for additional thickness and detail. Actuators and rams are added, and you'll need some of your own 1mm rod to finish the job, as well as some lengths of 3.2mm rod later on. Spanwise ribbing is added using additional parts, with extra parts laid to the sides of the main ribs to give them an L-shaped profile. The flaps are made up from an outer skin that has extra detail etched into both sides, which is folded, or rather curved, to create the leading edge of the flap, supported by a large number of curved formers with a convex trailing edge that butts up against a length of 3.2mm rod supplied from your stock. Another large part is glued to the rear of the rod to form the tapering back section of the ribs, and here you'll have to twist the ribs 90o to get them to stand up. A gaggle of spanwise ribs are added from the ends again, and various small parts installed to complete the details. The flaps should get be able to fix to the wing in the same manner as the real thing, although I suspect they might need to be soldered to get the necessary strength. A trio of scrap diagrams are used to assist in this process, showing you attachment points and the correct angle of the flaps. It goes without saying that you will need to build two of these assemblies in order to complete the job. Engine Set (32338) The kit engines are nicely moulded, and include one set of pistons, with an impression of the rear row, plus the pairs of push rods that are found on the front of each cylinder. The set adds detail in quadruplicate (I wasn't sure that was even a word!) to each engine and engine nacelle. The inner faces of every single cowling flap receives a detail skin made up from a single part folded to shape, and you'll be doing that job 44 times in total. The top and bottom fixed plates on the cowling ring are given detailed skins to improve the look, and the supercharger parts, which are already beautifully detailed are given additional tiny additions in the form of PE brackets and wire from your own stocks. Moving inside the cowling, the front and rear cylinder rows are linked by eight brackets attached close to the centre, and a cowling ring is added to the front of the first row by brackets on the left top of each cylinder. Each rear row also gets a detail plate added to the outer end, and a full wiring harness is added around the centre, wiring up each cylinder, with a scrap diagram showing where each one should go, between the halves of an additional guide attached to the top of each cylinder head. The central bell-housing behind the prop is given a data plate , and a row of small "pips" is removed from the rear lip. Undercarriage Set (32342) The fit of the gear bays was excellent during my tape-up test fit when I reviewed the kit, and detail was good. The parts in this set add to this appreciably in both the main wells and tail wheel well, and include a large number of skinning parts to cover bare styrene. Measuring 14.4cm x 9.2cm, it is a smaller set than the other two, but the additions are worthy. The hose from the supercharger is given more detail, as is the stepped area behind the firewall, and the ridged outer side of the bay is further improved with more parts to the ribs and trunking, all of which should look great when painted. There are also a number of small parts added to the main gear legs, such as brackets, data plates, strengtheners and linkages. The tail wheel also receives a small bracket between the yoke and leg. Wheel Set (632017) Arriving in the Brassin box associated with the larger sets, this one not only improves the wheels immensely, but is also well priced in my estimation. In the box are two huge tyres, plus four outer hubs and four inner hubs. Each one is keyed to fit correctly, and the detail is excellent, even down to the fins within the inner hub. You'll need to drill a hole in the main wheel part of the 3.5mm to 4mm diameter 9I can't get to my kit at the moment to measure the leg), but that shouldn't be too much of a problem unless you don't have any tools! Conclusion These sets are for the detail lover that wants to improve further on what is already a fascinating and well executed kit. You'll need some PE handling skills to do it justice, but at this size that's pretty standard fare. You can pick and choose which sets to buy, or wait for the Big Ed set once they're all out, or just buy a couple to suit your area of interest - entirely up to you! There are more sets coming in September, including the bomb bay and interior, so watch this space Very highly recommended. Review sample courtesy of1 point
-
After thinking I'd completed this this avo, it turns out I hadn't! This is the new HB kit from our friends at Creative Models, reviewed here, with Eduard's set of Photo-Etch flaps and some spare pre-painted PE seat belts pinched from a 109 to replace the somewhat oversized kit PE. The build was pretty straight forward, even cutting the wings and thinning the edges to accommodate the flap set, which was pleasant Paints were Lifecolor, with my own mix of RLM81, that adds a little extra brown tinge to the shade to differentiate it from 82 better. Matt varnish was Alclad's Flat Varnish, which is my staple varnish these days. The horrendously heavy exhaust staining was a mixture of Tamiya smoke and NATO brown, and I used Mig oils to add some streaks here and there. The wheels and lower parts of the landing gear were given a wash of Mig European Dust to simulate some muddy residue, toned down by rubbing my fingers over the surface. I caved in and bought some QuickBoost exhausts, but other than those items, it's TOTALLY out of the box! Can't think of anything else, so on with the pictures! A thoroughly enjoyable build to follow on from the slightly tricky Me.262 I did last (here), and as soon as the long winged versions are kitted by Hobby Boss, I'll be getting one, plus a Quickboost corrected Annular radiator cowling, which is a must in hindsight. If you're interested, the build thread is here. Next up is the new Meng FT-17 and Eduard Jugs over Germany reboxing of the Academy P-47D in 1:48. Work is already underway and I'll be starting a thread soon Review sample courtesy of1 point
-
Hi all, More big builds cleaned up... Trumpeter F-100 Revell F-4 Trumpeter Lightning Trumpeter Mig-211 point
-
Normally pronounced com-po-sit round here - note "s" rather than "z" sound! There may be a very slight emphasis on the second syllable, but not that noticable. My dad worked in the railway and that's how he refers to a composite or mixed class carriage. I dare say most of the workers in the oil industry here probably use the american sounding com-paw-zit, but i believe UK pronunciation normally goes for the "s" rather than "z" sound. Mike.1 point
-
I started one of these, a year or 2 ago. My fingers are getting sore just thinking about opening those cages up. I Have been thinking off getting back to it soonish (possibly for the KUTA GB). I have some other stuff I need to get finished first though. I wish you luck, sah.1 point
-
Nice work and certainly a subject you don't see out on the tables.1 point
-
Ohh I'll be watching this... I've been wanting to have a go at an Space 1999 Eagle for a while. I'd love a go at a Warp models version they are more accurate but they are pricey. The MPC Kit is being re released next year by Round 2... it was announced earlier this year and I've been patiently waiting but it seems it's due for release some time early next year. Link to the MPC announce here... http://culttvman.com/main/?p=297611 point
-
Good luck, it does not look a bad kit. I shall follow this build.1 point
-
Well you could of at least taken some more photos for the walk round section 😛,on a serious note,get well soon and happy modelling .1 point
-
Wow, very, very nice cockpit! Cheers.1 point
-
I feel we should regard it as an excellent display of interesting models rather than a more precise historical tableau. Ditto the GMC trucks - there are after all enough British ones available (now) to be more realistic if that is the modeller's aim.1 point
-
I`m looking forward to this build. I started working on these as a propulsion technician when we only had ZH102. ZH101 was delivered later, possibly after ZH103, as it was kept on in Wichita for trials. I notice Airfix have tape instruments for the engines, when they should be dials. Not a biggie, I guess. Secondly, the oily appearance in the U/C bays was due to the RAF insisting on a wax sealant being sprayed all over them. The NATO AWACS and TCAs never had this, nor did the USAF if I recall correctly. These aircraft were all brand spanking new when I started on them. I can`t believe they are now over twenty years old. Regards, Dave1 point
-
1/24th Hawk does nothing for me, nice plane and all that but in 1/24th would be a waste IMO.1 point
-
Wingtip containers. Original ...and mine1 point
-
In fact I would write: I've found plans that are pretty nice and I decided to follow them. If the final result matches the look of the real thing it's up to you guys to say!1 point
-
Hi Steve, You got it right as I was posting before so have just edited my response. Cheers, Daniel.1 point
-
Glad to see you stopped lurking and decided to post as there are some very nice models there. As to the S55, the original looks to be pretty clean so I would not weather in this instance. Should you decide to weather, I would try a couple of this coats of Tamiya Clear Gloss Varnish. This will not effect the shine of the silver and will, in fact mirror real life practice where a metallic paint is given a coating of clear lacquer to protect it. Martin1 point
-
Good pictures, those will help me a lot.1 point
-
Wasn't much better for aircrew, apparently. Dad always dreaded being posted to 51 Sqn because the cockpit crew were allowed absolutely no contact with the mission crew - they even boarded separately to prevent the one polluting the other. Even looking over your shoulder from your seat was an offence, the way he told it. A rather different atmosphere from the cheery camaraderie of the maritime patrol world, and I've no idea how the legendary Coastal Command catering might have worked in that set-up.'Course, he may have been laying it on a bit thick ...1 point
-
I am! Italian camouflage causes me nightmares!1 point
-
I agree with all the comments, the cockpit is looking awesome!1 point
-
That is looking stunning.1 point
-
Good stuff arnie. It's just the vote to get through now. Sean1 point
-
Point of interest, hopefully, I've found my ticket from the last time I was there (August 1996). There is a deck plan included and the funnels are very different in size.1 point
-
Right, first coat of paint, still needs a lot of tidying.... Got the bowsprit and jibboom together, if for no other reason that I need to be thinking about the base and case and how it'll fit. it also somehow marks a new chapter in the story. Some small woodwork on the catheads and the bowsprit cap that joins the bowsprit and jubboom...drilling closely spaced holes in small bits of wood is, uh, challenging - hurrah for drill presses! Close ups... The cap will need an 'iron' band around it and a few twisted wire eyebolts, not to mention the dolphin striker (no it didn't) and at this point the name and home port go on. At this stage it really starts to feel like it's happening. Mind you I'm not even thinking about the rigging - she'll have sails, so that will be a monumental amount of work in making just the blocks. I'm buying in belaying pins and deadeyes (3mm). F1 point
-
wooohoooo thanks Rich Yeah, thats why I chose the RC over the YZR, I think there might just be a few more schemes. Think im gonna do the Team LCR one, Casey Stoners ride, buuuuuuuut, who knows... We need 12 more people, roll up roll up. Steve1 point
-
1 point
-
Nice work Don. Few people know these were deployed in the UK, and you can still see the remains of the launch facilities at some of the sites on Google Earth, like the pic below at Great Dalby near Melton Mowbray The L shaped blast walls are clearly visible - these are apparently so solidly built they are almost impossible to demolish !1 point
-
Hi. I did originally put in exact FS & BS colour quotes and numbers in ALL the text captions but presumably due to space limitations these have been omitted post my passing the artwork on...if anyone does want my original text captions I can PM them on. Jon1 point
-
You always deliver with your posts Russ, quality build/presentation as per norm!1 point
-
Stickers on! They're starting to look a bit better.1 point
-
Towards the end. In 1987 IV(AC) Sqn celebrated its 75th anniversary. It struck me that 1987 was also XV738's 25th birthday so I suggested to the Sqn CO that the jet should be painted in a special scheme which I designed. That scheme was the squadron flash on the fin. Do a search on BM and you will find numerous mentions by me about that scheme! From that point on, I always considered Bravo to be "my" jet. Whenever I was running a HAS, I always made sure that Bravo was one of my jets. I loved that jet and made sure it was cared for. Considering it was the oldest Harrier in the fleet, it was always one of the best jets. We had a young jockey nicknamed "Bedlam" who had a reputation for bending (and sometimes breaking) jets. I made sure that Bedlam never, ever flew Bravo. Oddly enough, no one ever noticed how the INAS went into aurorev whenever Bedlam climbed into the cockpit of that jet.1 point
-
I'm in for sure. A Merlin Vampire T11/T55 is the preferred subject. It's an early Merlin product (kit 17) so from 1983-ish, utterly awful as is the standard for Merlin products and has been superseded by at least 3 kits (Aeroclub, CMR and the new Airfix)1 point
-
Get well soon! I'm quite envious! (of the Sea King trip obviously - although not sure I'd go to quite those lengths). My wife's a big fan of gas and air. I think it takes a true Britmodeller to take note of important details whilst spinning around on a wire high on gas and morphine.... Andrew1 point
-
Great start mate. Very tempted with one myself!!1 point
-
Fantastic! This is really OOB? regards, Markus1 point
-
That is some seriously good work. Stephen1 point
-
A little bit more progress to report. I've made a start with the upper paint work, where I'm going to be showing wear and tear I roughly applied the Ocean Grey and Dark green camouflage colours. This was after applying Alcad Aluminium which in turn had a coat of Vallejo Matt followed by AK Worn Effects over it, I then chipped the paint work, more so than what I'd have done if it was going to be the finished article. I then sealed all that in with some more Matt. This is the AK worn effects and Vallejo Matt I use. The next thing I'm going to do is apply another coat of worn effects and apply the RLM70, I was hoping to get this done tonight but was running out of time so instead I had a play with some colours with which I'll add to the RLM70 to give it a bit of variation and break it up a bit or it would look boring. These are the colours I'll be using. It looks a dogs dinner at the moment but theres loads to do yet. Thanks for looking, all comments welcome. Tim.1 point
-
OMG where was this set three years ago !1 point


This leaderboard is set to London/GMT+01:00