
Leaderboard


Popular Content
Showing content with the highest reputation on 04/09/13 in all areas
-
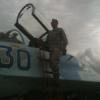
Hi Gents, Here are a few pictures of my F4F-4 wildcat. I used Cutting Edge decals and model master paints. Thanks for looking. Rod3 points
-
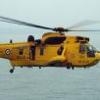
Hi folks one of thats been hanging about forever and never getting completed.This is the Classic Airframes 1/48 Gannet painted with Xtracolor enamels and dressed in Xtradecals representing one of 825 Squadrons machines based at Culdrose in the late fifties.I remember seeing dozens of these at Abbotsinch Naval Air Station in the early sixties awaiting the scrappers torch,sad thing is some of the aircraft there were only two to three years old.For photo's have a look at Neil Airds web site Prestwick Memories and follow the links. Ian3 points
-
Thanks guys! Only a few parts left to paint: the rear gun and the bomb racks. Everything else is ready for final assembly, so I should have her finished up soon! Did some staining and unmasked the clear parts - my favorite part of the build because it really comes to life!3 points
-
Hi all, Welcome to my hangar build. I noticed a build of this on this forum and decided to give one a go myself, given that I have space to accommodate it. The hangar is from GPM and is available in a few scales. The kit is laser cut cardboard. Firstly, here are the parts sheets: We then start cutting out the parts, starting with the roof. The general construction of the sheets appears to be a 3 ply system with card in the middle and a thin paper on each side. The laser cutter annoying hasn't quite managed to make it all the way through the card as I had to run the knife over every part in order to remove it in a clean way from the sheet. I found there was always a bit of clean up required where retaining tabs were left by the laser cutter to allow the parts to be held securely in the sheet. The two halves of the roof frames where glued together using PVA (the same throughout the build) After a lot of repetition the roof framing was assembled. The kit is not perfect, the two interlocking halves where the roof frames meet the perpendicular frames have been miscalculated. So car must be taken to glue the interlocking sections on a flat surface Decided to add further support to the centre and outer ends of the roof. This has firmed everything up. They we made from offcuts of parts sheet. With the roof framing largely complete, I decided to spend the drying time cutting out all of the other parts required and cleaning them up. As I wanted to make a reasonably big diorama, I obviously needed a decent sized base board. I bought a sheet of 15mm thick 1220mm x 610mm MDF. I will probably trim about 200mm off the length. I then began to work out spacing (still don't have a clue where to put things) and started to glue the hangar floor onto the MDF. The hangar floor has now been glued in place. Here is a preview of the roof framing and floor. As for concrete colour for the floor, I was thinking of XF-54 with a splash of the flory concrete wash. Attention could now be turned to joining the half sections of the corrugated front and rear of the hangar. Again this was done using PVA. There was a significant gap on the back of the halves which were glued together using a bit of paper. This has given the join quite a lot of strength. Couldn't resist roughly assembling some sides of the hangar. The original plan for this hangar was to convert into a 1/24 small single aircraft hangar to house the 1/24th spitfire that im building also. However the wingspan is a little too big for the hangar, and there's doors to go on aswell. Now the painting can begin. For the exterior, I am using XF-16 and for the framing, I am using X-14. Will probably do the interior walls white. I did some test spraying on some offcuts of the same material and found that as long as the area wasn't flooded, then there was no effect on the cardboards surface at all and so I decided to paint directly onto the card. I applied Klear to the exterior surfaces after painting as the alloy paint had a tendency to rub off onto my fingers and pollute everything I touch. Ran out of paint at this point, despite using a 50/50 mix and only really giving it a reasonably light coat. You get the idea anyway. I managed to find some of the same card material in hobby craft for a not so reasonable £5 a sheet. One sheet should do the rest of the diorama, however I got two just in case. These will be scored to create large concrete slabs to simulate how it would have been laid. I decided to carry out a complete strip down of the airbrush for cleaning and because im so strong, I managed to snap the thread on the needle pointy thing. So I have today managed to re-mortgage my house in order to pay for a replacement part! Moving on... Here is a sample of the idea I was playing with in regard to the concrete effect for the hangar floor/apron, leaves a lot to be desired I feel... Today I have finally laid down the large sheet of card, cut to shape and scored lines in the entire apron area. I am now sure how I want the diorama to look. Joins were unavoidable, but these hopefully can be blended in when I have some paint on there to see how bad the join is. I also began the task of cutting the see through plastic sheet that came with the kit, and sticking them to the backs of the window panels. Hard to see on the camera, but I have left these the natural colour of the card as there is little burn marks on the corners which pass as rust very nicely. These are not yet glued to the exterior because the interior sides need painting. Annoyingly, it seems GPM haven't been generous enough to supply the actual amount of clear plastic I need to complete the operation. I am now left with pretty much the entire rear side of the hangar without glass. I will have to source a similar material next time I am in hobbycraft. L.E.D's have been ordered along with appropriate resistors and as soon as they arrive, the soldering can begin. I may have to purchase a 3mm hole punch in order to get a clean hole in the cardboard roof. There will be 18 lights in total. With the new airbrush part here, I could now move onto painting the interior sides white. Took 2 pots of paint to do this task. The previously windowed panels could now be glued onto the exterior sides. The blue framing was also glued to the interior sides. Painting has resumed on the roof framing. The scorch marks from the cutting has left some nice rusting effect on the painted frames.. Finally the roof is done and painted! Been really struggling with cramp in my hands recently and this build has just about pushed me over the edge purely down to the size of the thing. Think its a carpel tunnel thing... I then turned my attention to the base. I started by roughly painting where the yellow taxi lines would be located. The yellow was then masked with 6mm tamiya tape and the curves were formed. Black was then sprayed next to the yellow. At this stage, I decided to pre-shade the entire base. The 'inside' area in which the hangar would sit on was shaded lighter, infact more of the dirty grey. 2mm jammy dog tape was 'piggy-backed' along the tamiya tape covering the yellow in order to protect the black outline. The right taxi line will stop roughly 1/3rd the way into the hangar. The line on the left is a parking ramp/apron for the upcoming learjet 35 model. Next the huge task of painting the base was started. This is basically XF-54 Dark Sea Grey in a 50/50 mix. I didn't make a particularly neat job of spraying it and this has worked to my advantage where the colour seems to be broken up with the pre-shading and areas of white showing through from the board. And the concrete a little closer. I then removed the masking tape. There are a few areas where the tape has lifted the paint but these will be repainted in no time at all. Half decent result I feel. Will probably look at post shading the yellow areas of the slab joins later. Its now time for the electrics part of the build. The components arrived almost a week ago now. The L.E.D is a 3mm white diffused ultra bright along with a 470 ohm resistor to enable the L.E.D to work on a 12v circuit. Not much equipment needed for the job. just a standard soldering iron would suffice, except I need a higher temperature one for other hobbies of mine which involve joining brass. Decent flux is a must in my opinion. Ok so we know it works. The black L.E.D mounts were first installed into the roof support. This picture shows the messy and not to be seen top side. And a little neater underside. The L.E.D will be mounted in this to give a clean look. Another component I am using to aid the build is Vero wire. Its quite good stuff when you look at the specs of this stuff, its actually quite useful. Although it looks like bare copper wire, it is actually insulated and so you can bunch multiple strands together of either the same or opposite polarity and it will not short out. The method I used to join the L.E.D to the wire was to simply wrap the wire round the legs of the L.E.D and solder. The heat burns off the insulating coating, although I must stress that you should have ventilation when you do this as it releases apparently bad fumes. Finally one side of the hangar is done. It takes so much time that i've lost count of how long. The wire gets very messy towards the end of the line. The L.E.D's have been wired in such a way that should one fail, it will be the only one which goes out. I decided to add some extra card which will be painted, to hide the wiring when viewing the hangar from the bottom. A start has also been made on the main power supply wires and to install the extra card along the central light strip. I bring some good news and then some bad. Firstly, I decided to roughly assemble the hangar and test the lighting. As per usual, one of the L.E.D's stopped working. Can't be bothered to rectify the issue. Couldn't resist getting the Hawk out... And all when it was going so well. I took the hangar apart again to paint the white areas on the roof framing and placed the hangar on the floor. I then stood up and went to go into the kitchen and got my foot tangled up in the framing and tripped. This is the result.... The hangar was repaired using superglue and PVA, the repaired area is on the left. The sides of the hangar were next to be glued into place. There was some modification required to enable the back of the hangar to be joined to the roof framing. Finally found myself up late enough to switch off all the lights and take some pics with just the hangar lighting on. Im contemplating installing some sort of taxiway lights in the yellow strip to liven things up. The strips of card that go around the base of the hangar have now been installed and painted. The baseboard was then given a good coat of flat varnish. Decided to get some fake grass on a big roll. This would be very long for 1/72 and thought it would be ideal for the grassy areas of the hangar. Ever heard the saying "measure twice and cut once".... Light shot. So back on with the 30 mile drive to hobby craft.... k with the 60 mile round trip over, It was now time to crack on with the roof. To no great surprise, I almost cut the board too short again and only realised this mistake just before the cut. I picked up some German Grey XF63 with the idea of lightly overspraying the already black board in the hope to create a patchy look. I did in the end, darken the XF63 with some flat back and roughly sprayed the board. For those wondering how I managed to keep the very edges down while the glue was drying, I simply used some reasonably heavy blocks of steel. Theres probably 1.5 - 2 kg of weight on the edge of the hangar and there is no flex of movement at all. Don't think we've seen a rear picture yet... And finally we have a roof! I did also pop into maplins and bought a switch to control the lights. Not sure where this will be located as yet, I may even try to integrate this into say an electronics hut which could be physically moved, resulting in the switch being turned on. I also want to install a fence at the back of the diorama and also start making some fixtures and fittings for inside the hangar. I do want a 1/48 figure, preferably sat in a deckchair or something aswell for a little idea I have. I decided to make a start on the fencing, which I was keen on installing to try and give this hangar the look asif it were poked away in the corner of the airport. I used some frying pan splash guard and cut this into strips 5cm high. The posts were made from 1.6mm dia brass rod. These were cut into 5.5cm lengths, the extra 0.5 for the holes being drilled in the base and so the fence can stand up without glueing. The fence was simply superglued together and the ugly glue marks only being visible on the back of the diorama. The grass sheet was laid and holes made for the fence posts. Decided on red as the colour for the fence. Also added a gate. The fence was then installed into the base after the grass had been trimmed flush with the end of the baseboard. Couldn't resist a few pics with the aircraft I have. I decided to just crack on with the doors. Here they are in raw form. The doors were then overlapped to give the staggered closed effect. They were pre-shaded and given a coat of the same blue used for the framing. The doors were then glued in place. Meanwhile I created the runner from some card. This was then glued into place. Probably should have done some pre-shading underneath the runner. And finally added a side door. Few updated pics. I will look into installing a few flood lights, maybe two on the front and two on the side of the hangar. It shouldn't be too difficult to do, just hiding the wire is the challenge. Not much more can be done on the diorama itself for the time being as I need to get hold of a few things to complete it. Updates if any will be few and far between so I guess consider it done. Dan2 points
-
...will portray a Libyan mechanic working on the rocket launcher. Now I am not so good with figures so I am working hard on trying to pant them to look right. I am still waiting for the mechanic figure. As it is the dio is about 98% ready. Hope you guys like it. Pics are not in any particular order.[/size]2 points
-
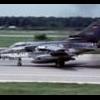
First two photo's the aircraft is landing in Seattle harbour,the rest were at Ketchican in Alaska.In the early sixties the U.S. Army operated a large number of Beavers and Otters in Europe.Many of them visited Prestwick airport where they would take off in a couple of hundred yards and take many minutes to leave the end of the runway,nostalgia is a great thing. Ian2 points
-
Unfortunately the terms of the various nonproliferation treaties were very strict.2 points
-
After trying to build two Typhoons simultaneously a few years ago, and failing, I decided it would be easier to build four(!) at the same time. One of the four is the left-over from the first attempt, see this thread on Aeroscale: Tale of Two Tiffies . I am using three different kits: the Pavla car-door, the Brengun bubble-top, and two of the Airfix late-war version with 4 blade prop and Tempest tail planes. The schemes I have chosen are: (Top two profiles by Chris Davey from Osprey's Typhoon and Tempest Aces of World War 2 by Chris Thomas; bottom two profiles by Chris Thomas from 2nd Tactical Airforce Vol. 4 by Shores and Thomas) I have spent several days already on getting the parts to fit together, which for the Pavla kit has been a considerable hassle! The wings and fin have had to be thinned considerably, as have the cockpit areas (and still the resin cockpit doesn't fit as intended). Both the Airfix and Brengun kits mainly need the height of the wheel wells reduced to allow the wings to close properly. In the case of the Brengun, the tops surfaces were sanded to translucency, as well as the bottom edges coming up too. The Brengun has the edge over the Airfix wheel wells, and in detail and accuracy in general, but every part needed some clean-up. The Airfix open gun panels inspired me to open one wing on the Brengun kit, originally intending to use the Airfix parts in the wing. However, on closer inspection 1) they weren't a good fit, and 2) are not accurate enough. So I'll have to scratch build something. All the parts needing silver painting were stuck to sticks and airbrushed, then given a brown wash. I'm onto the cockpit painting now (black above the tubular framework, dry brushed with grey, grey-green below). The Airfix instrument panel transfers look OK, and for this scale, and considering it is really hard to see into the cockpit of the Typhoon, they will be fine.1 point
-
- MIG 21 UMD in a special scheme to commemorate the birthday of the Croatian Air Force - Decals BEGEMOT - Scale 1/481 point
-
Hi, I had an online £5 voucher (with no minimum spend) for Argos a few weeks ago, looking through their kits found a few offers on their starter sets. The A-4 was down to £6.88 with free delivery, so one brand new A-4 kit was delivered to my door for £1.88!! (Is there a prize for the most inexpensive build? ) I had intended to build it OOB representing BuNo 142833 (kit markings) as exhibited in the Intrepid Sea, Air & Space Museum, but looking at a few photos I will need to do a little bit of work to match it. I'll have to drop the flaps for starters and there is a brace/collar on the front undercarriage to I'll have to make as well. More things will probably come to light as I find more photos if it online. I've been working mostly in 1/144 & 1/200 since getting back into the hobby so going back up to 1/72 for this feels like I'm in "The land of the giants"! Couple of pics to start off, the kit (which I haven't even unbagged yet) and what it should hopefully turn out like.1 point
-
Hi Everyone, I am reading Dale Brown's Patrick McLanahan series of books and would like to create a model of the star of the books, the EB52 Megafortress. Does anyone have an idea how to do that ? Should I start with a standard B52H model kit and scratch build the Megafortress parts or does anyone know of a Megafortress conversion kit that I can buy to create this amazing aircraft ? Cheers, Rick1 point
-
I built this Revell 32nd 109 a couple of years ago as a review model. I added a set of seat belts and the antenna wire, rest is out of the box. I used Xtra Colour enamels to paint the model. Then this happened: image hosting websites So I picked up the pieces and tucked them away in a box at the back of my shelf of shame. Last week my son found the box and asked what I was planning on doing with the bits. My initial reaction was "Bin!" but he asked me to repair the model so I did and I am fairly happy with the results. free screenshot tool screenshot studio windows 7 print screen screenshot pc Thanks for looking!1 point
-
Almost OOB model with RB-Model 23mm gun barrels and Eureka towing line. Polish Army markings.1 point
-
Thought I put this up here as well, it's my entry for the Helicopter II Group build, it’s FM 1/48 Sikorski Dragonfly with some scratch details and Belcher Bits decals for WG668 on board HMS Bulwark 1955 More pictures in the WIP thread here1 point
-
Hi all, here is my recently completed gnat. Everyone was saying this kit was nice to build but I certainly didn't have a great time. It was my fault though. I had stuck the wings on wonky so I had to de-glue them and re stick. Enjoy.1 point
-
A beautiful nightmare! After a disastrous glas shell crash and the truth about my error of wrong decal settings (see WIP thread http://www.britmodeller.com/forums/index.php?/topic/234937136-mirage-iii-cz;-148-hobbyboss/page-4 ) I proudly presents my nightmare Mirage! Enjoy and feel free for criticism!1 point
-
I have been giving the spheres a little thought and I have a cunning plan on how I'm going to paint them but that is far in the future at the moment. I could not leave work too early tonight and I made a little side excursion to Maplins to pick up some goodies for my ideas on how I am going to install lights in my Dalek. As a result there was not much progress. I did do a quick check fit on the brace blocks: Here are all the electronic components I picked up from Maplins. My ideas are to have two red flashing dome lights and a blue eyestalk light, LEDs seem to be the obvious answer. You can get LEDs that inherently flash but I wanted something that flashed every 4 to 5 seconds or so and these LEDs can't be controlled so after a long discussion with a very knowledgeable and helpful shop assistant I was directed to this little kit that comes with two red LEDs and the ability to vary the flash rate - its amazing what you can get these days. The other thing was a blue LED for the eyestalk. This requires about 3V so some value of resistor will be required with the 9V battery to avoid having to have a separate power supply. I haven't built any electronic stuff for years so I am looking forward to this task. Following the clearly printed instructions and preinstalled biro marks (yes really) on the part I free hand trimmed the edges, there will need some finessing with my baking tray / wet n'dry combo tool: Thankfully the plastic does now appear to be hardening up in those glue affected areas. I try to push back some distorted areas in the race track: But they just ooze back into their distorted shape. Hopefully when the plastic has rehardened I will be able to sand them into their correct profile: Before I made my dinner, as is my normal habbit, I made my lunch box for tomorrow. I have not yet exposed you to this phenomena but now feel confident enough to do so. Tomorrow, for the main part, I will be having grilled king prawns with quinoa, avocado, spinach, basil and spearmint: I kept the leaves separate so that they are not ruined by the dressing and will mix them at work at luchtime for immediate consumption. Here is the rest: That should get me through the day. For my dinner I cooked an Aberdeen Angus burger (not home made) with pancetta, blue cheese (gorgonzola), avocado and English lettuce served in a cheesy roll (also not home made) with a smear of Dijon mustard: It was very nice. Bye for now, Nigel1 point
-
Speaking of TOS 'Trek', if you haven't seen the recent Audi advert featuring the old and new Spock, you MUST: http://www.youtube.com/watch?v=WPkByAkAdZs I think this was posted elswhere here, but you may have missed it. Roy.1 point
-
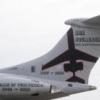
Well another project completed. Revell SR-71A Blackbird based out of Beale Air Force Base, California. My only criticism with this kit is that even with all of the decals they say to put on it for the Beale Air Force Base version it appears slightly plain (no pun intended). To that effect, I am thinking of using some of the decals from the alternate version of this kit (USAF/ USAF Symbol and US Air Force text) to improve the look of it, but the Beale AFB version did not have these decals on it. Opinions on this welcome. Anyway onto the photos. Blackbird head on. Blackbird in its new home (at least until the B-1B is decalled) excuse part of my book collection :-) Comments on this welcome, but again I have to say this one has come out quite nicely, especially as this was one of my earliest model builds after restarting the hobby. Thanks for looking. Rick1 point
-
If they ever get around to making another film with Karl Urban (very unlikely, I know), they really need to have Judge Death in it. That movie would properly rock! Here's hoping... Found the vinyl kit of Judge Death at a model show in July and I just had to have it! Thanks for showing us the gear you've produced so far, fella.... they look very cool, indeed. Cheers. Chris.1 point
-
Oh yes please, I'm up for this one, my missus has bought me the 1/24th Shar for my 65th birthday in March next year and it would be rude not to...."It's a lot less bovver in the hover".................Smudge1 point
-
Hi guys, Here are some pictures after the decals and some panel lines. With the folded wings on but not jet fixed in place. I don't know if the stenciling was on the British version, but I think that if it was builded on the line with the American ones they wouldn't make a difference to both. Exept for the roundels. This is how far I have got sinds the last update. I hope to have her finished next week. Cheers,1 point
-
Well worth the time and effort, I'd say! Great job.1 point
-
It's a Scottish newspaper that comes out every Sunday, but that's not important right now.1 point
-
A few pics of some of the parts. I genuinely don't want to get everything out of the box as I did that yesterday (foolishly!) and it took me an AGE to get it packed away again. As I mentioned, there are 43 trees of plastic parts and loads of other bags of bits. 1059 brass bits, 430 steel bits and 256 bits in 'other' materials - NOT plastic...... It has: Engine internals - working crankshaft/pistons etc via starting handle. Gears and belts etc that turn the fan and generator. (which has a detailed INSIDES, coincidentally!) working steering Working brakes via foot pedal, on all 4 wheels with brake shoes, working handbrake with separate brake shoes. Working steel suspension - made up from umpteen leaves and shackles..... working lights via dashboard switches working windows via handles. working door handles and opening doors fabric drop-head that works. steel wheels separately spoked, each spoke having end nipples. Jaw-dropping stuff. I've ordered a few add-on goodies from 'Pocher-parts' and a DVD ROM that has mega-detailed instructions and tips/help for sorting out the kits dodgy bits - of which there are apparently lots..... I'm going to paint it dark blue/mid grey two-tone. Roy.1 point
-
Yes but this is not that Airfix, now it is Hornby. A great deal else has changed in production methods, and the new team are getting things togeather. I think (hope?) the different (and wrong in different places) TSR 2 incident has been learnt from. Talking to the Airfix people at several shows suggests that they are looking at each range as a separate thing and not just transferring 72nd scale items into 48th for example. For Airfix I suspect the smaller 48th kits are seen as a transition for beginners on the way to the larger and more expensive kits. They are a step in a progression all the new audience will follow. Everytime they build something and enjoy it they'll want to do it again. Some of the old mould offerings may been seen as booby traps, not because of accuracy but because they were hard to assemble well, somebody who got one of these as an early kit will disappear from the hobby. Ease of build get Airfix the cake, accuracy gets the extra icing from us 'forumites' TM keefr221 point
-
Looks wicked cool, nice save!1 point
-
Kev whats the serial No. ZA1481 point
-
Really nice job, great save & beaut scheme, a 100% in my book. Steve.1 point
-
That's impressive progress if you just started last night. That's a months work for me if I'm doing well. I've not seen the Revell kit but it looks pretty good in those pics. Are they all kit parts in the photos? And are the flaps designed to be posed or have you done a bit of cutting?1 point
-
Moebiuos kit. No problems with it. Stripes sprayed on and plenty of weathering1 point
-
nice build .looks great .paint looks great love the scheme1 point
-
Good save ! Really nice build and love the scheme.1 point
-
To be honest, I have no idea why Airfix chose to do a Sea Vixen or Javelin in 1/48. Prop aircraft do well in that scale, but it's honestly too large for jets. Yes, there's an overall trend to larger kits, but I think people forget the question of where you put the blasted things once you build them.1 point
-
Been a busy week so thought I'd take a few snaps to record the progress. Since I last posted, the lower desck has been completed, its roof added and the upper deck added. The figures have been finished and put in place. The wheels have also been attached and the underside weathered using washes and pigments. The underside of the rear deck has been extensively "muddied up has have the wheel arches. I've built up a simple base using an old picture frame with plaster of paris infil, a layer of black emery paper to represent the tarmac road, some milliput to put kerbstones in and then black stained claycrete to represent the tarmac coated pavement. Some leaf litter and grasses have been added to give it a bit more life. The outer panels have been primed, silvered, kleared, hairsprayed, overcoated and then distressed. They have now been assembled around the core and weathered some more. Yet to do: windows need putting in and decals need sorting out. Having some issues witht he decals - the yellow text isn't thick enough to show up over the green paint. I'm goign to try again on the works colour printer on transparency mode to see if I can get it to lay down a thicker payer of ink. So now for the photos - they were taken quickly so alignment is a bit out in a couple of them and the lighting a bit dodgy! This is a seriously dirty bus I think I might have overdone the distressed paintwork on the upper deck panels, but the photos I found really do show the paintwork in as pitiful a condition!1 point
-
Really quick update to finish up today: (I'm too excited to stop) Painted the seat cushions in OD and the belts in black and white. Painted the supports for the seats in OD. Put in the pitch sticks (I may weather them and the other cockpit gubbins later), and did a semi-sloppy paint-job on all that button-y goodness in the middle ;D More to follow tomorrow if I get some free time!1 point
-
I'll bow to your superior knowledge gained from all those times on the jumpseat. I just thought that after 1500 hours flying the things I might know a bit about them. Obviously not.1 point
-
How about a 1/72 Boston you can actually build.....Or a 1/72 Beaufighter you can actually afford?1 point
-
How about some early British helicopters in 48th, eg: Sycamore, Belvedere?1 point
-
As I understand it, Dana Bell does not believe in ANY significant use of ANA colours by the USAAF. This may be a little too restrictive, but I certainly feel that any such introduction would be limited because it could not have reached the production line much in advance of the decision to remove camouflage paint altogether from combat types, which would be some time in advance of these aircraft appearing in the ETO. If you believe that there is some earlier chronological factor in the various appearances of OD, then the answer will lie elsewhere. Given the variety of shades of OD that can be seen on even a single type (note especially C-47) I suspect any differences came from the different paint manufacturers rather than any specific shift in specification. Ideally some US researcher will dig through the records to find which aircraft manufacturer used paint from which supplier for which batches of aircraft, and indeed how the batches of paint from each paint manufacturer varied. Until then the lack of consistent quality control over hues for OD41 is such as to overwhelm other post-facto explanations.1 point
-
Kev whats the serial No.?1 point
-
I think an Airfix Beaufighter in either 1/72 or 1/48 scale, preferably the former, of their later quality & prices that would undercut both Hasegawa & Tamiya by plenty, would blow the eastern brands out of the water, in fact just like the Beaufighter used to do. Steve1 point
-
Washed and flat-coated. In the morning I'll spray the exhaust stain and pull off the masks After being so careful for so long, I finally managed to knock off the stupid blob on the tail. Oh well, it was bound to happen1 point
-
Alvis in Canada showed us that the ESCI V-22 and Hobbycraft Dash-8 are a direct fit. Chord and thickness match at the wing-root is in the >90% range...1 point
-
For my breakfast I made a bacon sandwich with home made spicy tomato ketchup. With a view to resin encapsulation I measured the volume of the base: There are some defects round the edge of the base. I am not sure what to do about these as they do have a certain charm that probably reflects the state of the real Dalek props, however proper real fictional Daleks (if you know what I mean) would no doubt be perfect, its a dilemma that I will have to mull over. I don't have to make a decision just yet: To allow resin ingress, I cut out these V notches - crude but hopefully effective. I also drilled 0.6mm vent holes in the top of the parts in suitable locations: I think the best glue for this job is good old fashioned tube cement. I used about half a tube on this - the smell wafting up to my nostrils certainly evoked happy childhood memories: This is my clamping arrangelent while the glue starts to harden up, the clamps just reached over the lip of the skirt: Look, look, actual tube cement on my fingers, this is really turning into a nostalga fest: On closer inspection I can see why this one split, the walls were abnormally thin, I glued it with liquid poly and backed the hole with a little tube cement just before installation: The rest of the base parts are fitted again with tube cement, I think this is the most enjoyable modelling session I have had in many a long time: To make sure the base sets flat I applied a little weight: I then started on these internal brace parts, giving them a crude trim: The only important thing about these is that the ends are square: as well as the lip they have a slight draft angle which I remove with my heavy duty sanding stick: Thinking about the earlier comment I got on flimsiness I think these should be filled and possibly reinforced in some way. A bit more head scratching to do.1 point
-
I`ve just received a test shot to build for a magazine article and it is fantastic!! The Hurri is my all time favourite aircraft and I have to say that this is the best 1/72nd scale kit of the type that I`ve seen so far and it is on a par with, if not better than the recent Typhoon! The fabric wings are superb although hopefully a metal winged Mk.I may follow? The cockpit detail is nice and the kit includes a 2 bladed Watts prop and a 3 bladed DH prop, separate fuselage undersides and rudders for very early or later variants, unarmoured and early armoured windscreens and a separate sliding canopy, although I don`t know whether it will fit in the opened position yet. Decal options are for an early 111 Sqn a/c and Belgian a/c. Unfortunately I cannot post photos but I hope that I have whetted your appetite for this lovely little kit, Cheers Tony O1 point
-
As ever, thanks for the support and compliments everyone. Just a quick iPhone photo with the flight deck painted, apart from decals for the numbers, everything else is masked and painted, it turned out to be much easier than I expected, and I'm really happy with the result. I'll now mask this before finishing the details and starting the painting and weathering steps.1 point
-
Railings finished off. Various storage lockers, with some 'artistic embelishments' and fitted More to come Cheers Martyn.1 point
-
I agree entirely......................Smudge1 point
-
Hi Simon, You`ve picked a beast of a project, but one which can yield satisfying results. I found that I used Flightpath, Eduard, True Details AND scratchbuilding to get an RAF Sentry AEW.1 as none of the detail sets have all that you need, plus Model Alliance ISTARS decs. Here`s my ARC article on the odyssey that is the Airfix/Heller AWACS build. http://www.google.com/url?sa=t&source=...OHIGavE7ybY06nw All the best with your project, an AWACS just sets off a collection nicely, as long as parking space is planned for the beast in advance. HTH, Cheers Ian PS- You ain`t wrong about the cost Simon...ooh my giddy aunt!!!1 point


.thumb.jpg.d17ff607fc7e89ed057e63fcb6f2a888.jpg)


.thumb.jpeg.2a5a0ae44e3ad82fc22cd64c7474d409.jpeg)


This leaderboard is set to London/GMT+01:00