
Leaderboard


Popular Content
Showing content with the highest reputation on 26/08/13 in all areas
-
This is my latest competion. I posted most of progress in the work in progress section. It has been finished as Wicked Wabbit, the mount of Maj. James C. Hare, 65th Fighter Squadron- " The Fighting Cocks", 57th Fighter group, Alto,Corsica, 1944. It was intended as my entry into the USAAF over Europe group build but over-ran just a tad. Built out of the box with tape seatbelts and decals from Rising Decals.3 points
-
3 points
-
Seeing as we have a long running airfix thread regarding wants.what about other manufacturers? Please add your wants/ dreams of new kits being produced!Doesnt just have to be aircraft either! Fingers crossed for a brand new Dornier Do 17 BOB era by Revell2 points
-
Hi All, One more ship completed this year - it's the USS Dortch, a Fletcher-class destroyer converted to the late-war anti-kamikaze AA configuration of 14x 40mm Bofors guns and 12x 20mm Oerlikons. The model is the Trumpeter "The Sullivans" kit which makes an interesting comparison to the more highly-thought-of Tamiya kit. The Tamiya version is severely limited in how much you can make out of the box, whereas the Trumpeter gives you the option of two different configurations (1943 and 1945) and therefore far more options. Unfortunately it's not the best kit in terms of detail, and I added loads of scratchbuilt bulkhead details and antennae for the mast and ECM rig. I also used L'Arsenal Bofors and Oerlikons plus the GMM PE set for this kit. Paint was WEM Haze Gray 5-H and Navy Blue 5-N enamel with Tamiya XF-17 Sea Blue acrylic for the deck colour . I finally added crew figures from Eduard. The seascape was my favourite recipe - polystyrene base, Acrylic paint and gloss gel, and toilet paper waves. Pics courtesy of IPMS Farnborough website. Cheers, Al2 points
-
Airfix 1/48 scale F.1 kit with Czech Masterkits T.5 conversion. I hate the vac form canopy but until Airfix pull their finger out and produce a T.4/5 kit, it`s the best I`m gonna get. ..... and a couple with it`s F.6 stablemate.2 points
-
Had a great day as usual at the Brunty show, (well who couldn't!), the weather wasn't playing ball to start with but having had a word with the powers above the sun decided to come out after the show got started.... Met up with young Radleigh for the day and spent a lot of time with Colin R and the Bucc boys, playing with the big boys toys......and managed to snag a few bargains too, before we went off to crawl over one of the Buccs..........all in the name of modelling eh ! Just a selection of shots of the wares on show. I know they've been seen many times before but who can ever tire at looking at Lightnings, Buccaneers, Victors etc thundering around the place in wild abandon.... First up the mighty hunter, Then the Bucc, my main reason for being there really... The gorgeous Hunter T7 JP and L-29, Nice little display by one of the JP's... Great flying again, Spit and Hurricane... They got quite close a few times...!! The superb Victor....hmmm ! And of course the main event...both Lightnings ......leaving in their wake, shattered ear drums, screaming offspring and wailing car alarms... John Spencer at the throttles of 'his' aircraft....wonderful stuff ! All that was needed was a vertical rotation at the end of the runway and all would be right with the world !! Then a final run by the Bucc.............. And finally Colin giving us a wave from the back seat of '544.........at least I think it was a wave !! My thanks go to him for letting us look around and clamber over his Bucc..... Cheers all, thanks for looking... Melchie...2 points
-
I haven't had a chance to get any work done the past few days, but I'll be back at the bench today. The goal is to get a primer coat on it and the underside color sprayed and post-faded. Again on the topic of colors, I had considered trying the Akan line of paints, but the customer felt they were too pale and uninteresting so Tamiya mixes it is. And since everyone likes pics, here are some shots of everything masked up and ready to go with the "inside" color sprayed on the clear parts. I'll squeeze some foam in the radiator/oil cooler for the primer and then take it back out. The guns will also be painted along with the rest of the plane, but I'll wait to permanently attach them until the end to avoid snapping off the barrels:2 points
-
Ah, the well-known dessert Harrier! Looks like the cream of the crop - was it a piece of cake? Sorry, couldn't resist. Nice!2 points
-
Well thanks again guys . Well was not satisfied with the deck and resprayed then when dry put a Vallego model wash of dark grey and left to dry. Added planking to the bow section. I think its better . Next it was the boats, as the bottom was just plain plastic I added plastic strips. Then painted and will matt varnish later. These boat will be on the water as I intend to have none on deck. Next its been the masts, here is the mainmast with more blocks and supports for the crew walkrope on the yards. Thanks to Jocko and Smudge for the wire for this. Lots of other things done. Still more blocks to add when I have purchased more from Scale Warship. Cheers foxy2 points
-
Finished today, the nice Tamiya F4U-1D Corsair built as an RNZAF example using Ventura Decals, otherwise OOB with just a couple of bits of wire on the engine. Painted with Gunze,then weathered with True-Earth products, Mig Oil washes, AK Interactive potions and Mig and AK Pigments to try and get the 'i've lived in the Solomon Islands' look. I like how it's turned out, as the Ventura decal instructions state that the dark blue had faded to very close to the intermediate blue and to my eye that's how it's turned out. Build thread is available here Peter1 point
-
Hello all, Here is my recently finished 1/48 Academy OH-6 with the CMK resin conversion to make an AH-6 from the 160th SOAR, the Nightstalkers. Build thread is here Beside my 1/48 MH-60L: Was a really fun little kit to build! Comments welcome, thanks for looking. Dave1 point
-
Hi all, Just thought I'd upload a few pictures of the real space kits I've managed to complete since getting back into kit building. I'm sure everyone's seen them (and probably built them) many times but I enjoyed making them all. They are all mostly out the box with a few modifications here and there (for example I added plume deflectors on the Revell Lunar Module). The Revell kit was the first one I built after finding it on sale in Modelzone. I enjoyed building a Lunar Module so much I followed it with two more from Dragon Models straight away. Then while looking in the Airfix magazine I saw the Hasegawa Shuttle/Hubble kit. . Revell 1/48 LM 01 Revell 1/48 LM 02 Revell 1/48 LM 03 Dragon Models 1/72 First Lunar Landing 01 Dragon Models 1/72 First Lunar Landing 02 Dragon Models 1/72 First Lunar Landing 03 Dragon Models 1/48 LM 01 Dragon Models 1/48 LM 02 Hasegawa 1/200 Shuttle and Hubble Telescope 01 Hasegawa 1/200 Shuttle and Hubble Telescope 02 Hasegawa 1/200 Shuttle and Hubble Telescope 03 Hasegawa 1/200 Shuttle and Hubble Telescope 04 I'm going to upload a few pictures of my completed Sci-Fi kits in a separate post. They can be found here. My current build of Bandai's ISS Space Suit can be found here. Cheers, Stix1 point
-
This car was a real pain, body-wise. I had to glue the upper and lower body shells together, do the body work and paint, and then assemble it like a ship in a bottle. Everything was loaded through the back window and glued in place with water-soluable craft glue. Re-finished in BASF lacquers and DuPont urethane clear coat. Engine was wired and plumbed. By the time I got done with it, I turned it into a skill level 10.1 point
-
This project started off as a quick OOB sanity build just for my own entertainment, but due to the roughness of this kit, which was roundly praised in the early years of this millennium, it got a bit away from the original intent. I guess that just shows how far kits have come in the last 10 or so years. Anyway - it was built using an Eduard PE set (for the Nightfighter) that was going "cheep!" at Hannants, a Master barrel for the BK-5, which is a little stunner, and the new Eduard "fabric" seatbelts, which were hard to do (well), but worth the effort. I scratched the top of the control column, the pitot probe and that little stubby thing under the radio bay (probably another aerial), and amended the engine intake shape, because they looked a little over-inflated to my tired eyes. Fortunately, there was enough thickness of plastic to allow me to do that, which eased the task. Raised panels such as the cannon bay were laid down using masking and high-build primer, and all the rest was done with Lifecolor paints and Alclad metallics. Clear gloss was Alclad Aqua Gloss, and the matt was a mixture of their Matt and Flat varnishes. Pigments and washes were Mig simply because they were close to hand and I have a good stock. Pictures: I could have done better in places, but that's what it's all about - learning from your mistakes. I could also have gone mad and detailed the gear bays, but again, that wasn't within the terms of my build. I love the 262, and it's always been a favourite of mine. Since the start of this build, my stash has increased from 1 to 3 still to build, and I can see another one in my future once I've gathered together a few odds & sods The build thread is here if you're interested, and thanks for watching1 point
-
This was started last Nov 2012 bit too long for me,other ships kept getting in the way Link for build http://www.britmodeller.com/forums/index.php?/topic/234929546-hms-renown-august-1945-1700-trumpeter/ Link for trawler http://www.britmodeller.com/forums/index.php?/topic/234931996-round-table-class-trawler-1700-white-ensign-models/1 point
-
I`m now calling this done, although I still need to order the Abe Lincoln decals. This by far has been my longest ever build, 8 months in total, although there was a 3 month gap inbetween. So with no further ado...., (Dedicated to Stewart - `The old un`s are always the best`)1 point
-
Hi all, Here is my Sea Vixen, in 899 NAS colours. I added the Pavla cockpit set, and Aires wheel wells and air brake sets, plus an Eduard ladder. Dropped a clanger weathering the under side of the outer wings so tried to knock it back a bit by spraying some thinned white, which is why it looks a bit odd. I lost the navigator's side window so had to scratch a replacement, which I'm rather pleased with. I made some FOD guards and ID lights for the nose gear door as well. Its got my first ever attempt at post-shading on it too. Thanks for looking, Gareth1 point
-
Hi everyone this is my latest off the bench,Not much to say about the kit apart from it went together beautifully It is out of the box apart from the seat which was out of the spare box the base is as basic as they come and was added for a bit more realism thanks for lookin this is the out of box interior the finished plane on base i hope you all like it thanks for lookin Regards Chris1 point
-
Nearly there now... Remember the lead shot and PVA nose weight earlier in the build? I stupidly didn't put in the radar backing plat/bulkhead, so when I was wet and dry sanding the forward fuselage and washing the swarf off, the PVA ran into the cockpit and into the windscreen. Luckily, with a bit of coaxing with a cut down damp toothpick, you can barely see the evidence of it having been there. Almost a good thing I hadn't installed the HUD! So, lesson being, if you're going to use PVA to secure the nose weight, make sure you install the bulkhead between the nose and the cockpit! Anyway, here's we we stand tonight. Decals on, matt coated, wheels on. Just the undercarriage doors, weapons, ejection seats, wings, HUD and canopy to go, with some varuous bits to pick out in little bits of colour. I thickened and shortened the steps to make them more realistic. The arrestor hook needs shortening by about 2-3mm to bring it into the correct length. The best place to cut is just after the round 'bumper' on the dorsal side of the hook rod. The fuel tanks are mounted too far forward, by about 4-5mm. This is really noticeable as the tanks then stick out ahead of the intake lip. Make sure you bring the mounting holes rearwards early on in the build (not like this callsign ) The LTS pod is the kits own, the decals are good and adhere well, just use plenty of water. The '21' was cut from the kit decals VF-213 ventral strake decal as it more closely matches the Tomcat I'm trying to model (rather than the silver '17' in the kit decals) And the grimy underneath... Thanks to DaveJL for the extra bomb sway braces, much appreciated. (Hobby Boss frustratingly only provide sufficient sway braces for two BRU's (Bomb Release Units), though they provide four BRU's... )1 point
-
Looks good so far. If you've got sausage fingers, then it doesn't show! The first kit I ever build was a P-51, The Dooley Bird, probably from Matchbox.1 point
-
I'm starting to use Gator's grip now to stick PE it dries clear. gives you more chance to move the part into place and is a little more giving than super glue if you knock the PE when it's dry/fixed in place. Also if you put a little to much on you can wipe the excess off around the part with a wet brush after it's gone off a little to tidy it up.1 point
-
Thanks a lot guys. I'm really glad you like her as I have never considered myself to be a very skilled painter when it comes to this type of paint work. But I have actually tried to build subjects over the last two years or so that should push me much more in that direction. So hopefully I'm learning. Bringing her to UK... Well that was a brave idea. I fear she may be difficult transport inside my house when finished, but who knows. I fitted the deck guns. Or rather I have fitted the number of deck guns that Airfix supply. I have opened up the two missing gun holes on the upper deck towards the stern, so I really need to find two more. I looked at the guns from one of my Revell kits, as it won't need them all with my plans for it, but they are no good match for Airfix guns.1 point
-
Absolutely amazing work , great detailing , but why go to all that effort and then use the wrong colour for the cockpit ? . Andrew1 point
-
I wish I could say that I wanted to be different by painting the one blue but the truth is that I ran out of whit paint at the time i was building it. I was tempted to do it in some form of camo but could not decide what camo to do so just went with the blue1 point
-
Hi all Finished this off this morning. Got the TCAS antennas and normal comms antennas all finished. Here it is Thanks1 point
-
Okay, so about two months since the last post and two holidays later i can call this 100% finished. I have finished all the decals and the paint touch ups. The reg above the wing is gone and iv'e got some half decent pictures this time! So here we go :-) Enjoy!! Next to a KLM Fokker 100 Next to a Germanwings A319 Thanks1 point
-
I don't know for sure what deck code Formidable carried during Iceberg, but I think you are correct to be wary of assuming it was R. I can't find a photo that shows the stern or bow from the right angle for Iceberg. However, when Formidable arrived in Sydney in June 1945, she still had a camouflaged deck (not so for operations off Japan, when R was carried as a deck marking). So, my guess is that during Okinawa operations she was still marked with the Greek Phi. I doubt it would have been X, as Illustrious carried this deck marking. BPF Deck Markings (Fleet Carriers) Formidable: phi?, R Implacable: M Illustrious: X Indefatigable: F, D Indomitable: O, N Victorious: V; S1 point
-
All that will be added before painting has been added All those "other" bits Undercoat and pre-shaded1 point
-
She's a cracker, great inspiration for me. Duncan B1 point
-
I keep hoping that Revell would complete their re-tooling of their Matchbox WWll 4 engine heavies. They've already 'replaced' the B-17, Lancaster and Halifax leaving only the PB4Y-2 Privateer. One can but hope, and wait....1 point
-
Cool "Desert Harrier" - I like the weathering perticualy. -no chance of any profile shots ?1 point
-
The wings went on during the week, which revealed some minor gaps, which I filed with Gator glue thinned with water and run into the gaps. This resulted in nice neat joins which just needed touching in with some RLM 70 & 71. I've also attached the main wheels, having first replaced the the axle I'd managed to knock off! The yellow of the ID panels needed toning down a bit against the the weathered tones of the rest of the camouflage, so got touched in with a faded yellow tone. The rest of the markings will need to be toned down a little as part of the final weathering process, as they are a bit bright at the moment. The Balkan Kreuz have already been faded back with a touch of NATO Black. The engines and props have been assembled and will be attached once I've applied a matt coat and weathering. On the home stretch now, so hoping to finish this in the next few days, particular I got face to face with the real thing today at Hendon. Yes I know it's radial engined, but it's still a Ju 88 in the flesh. Karl1 point
-
I always leave the paint to cure for at least 2 days before masking or applying further paint, I also do not use a primer normally unless some heavy duty filling/sanding has taken place. Cheers Dennis1 point
-
What is the subject of the book? I must have missed that somewhere. Fifty Shades of Ocean Grey? Cheers, Bill1 point
-
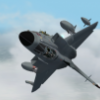
Nice cheap solution, I purchased a couple of sets of schnapps glasses from Ikea to use as supports, also Wilkinsons are currently running a 2 for 1 offer on their 14"x11" 'No Fuss' clip picture frames so that is two glass shelves for £2.25. This is the result: The F-16 is on an upturned CD resting on a CD container cover. Won't suit everyone but it does enable me to get as many models as possible into the generic Ikea display case Michael1 point
-
Railings finished off. Various storage lockers, with some 'artistic embelishments' and fitted More to come Cheers Martyn.1 point
-
It probably blew them off the roads due to the cloud of exhaust smoke billowing out of the rear end! More importantly, the Japkiddies probably let it past as they didn't want to be seen with it! BTW, Aprilia is Italian!!1 point
-
Now "THAT" is pretty!!!1 point
-
Well I buttoned up the two halves and you can see there is not much left of the engine to look at. Thought so. And, unless I want to do some serious cutting (and the plastic is very thick), opening the engine compartment up will be a bit difficult. So, I am left with the tiny bit of exhaust showing and the top of the rotor assembly. (I know, just keep telling myself there is an engine inside done up, and that is what is important. Yeah, right.) I'm just gonna keep working on the seams that, surprisingly, are not good and debate as to the next step.1 point
-
My first one was Blake's 7. Loved it back in the day. Looks a bit tacky by today's standards though I think Star War was the film that got me truly hooked though1 point
-
I don't think you can draw the conclusion that we wish/need a national chain of shops from this. Although you would think a large national chain would have the ability to drive some good deals with suppliers, I think the MZ episode has shown that they couldn't or wouldn't. So, although I would like to see more shops throughout the country, what I don't want to see is a clone of MZ. I'd prefer (though it's unlikely) to see more independent local shops.1 point
-
It's only two months (bar a couple of days) since Mike started this thread with the announcement that MZ was going into administration. Since then this discussion has gone from discussing the whys and wherefores of their plight, hopes that something might be salvaged, concerns for the staff and the future of LHS and then to the various bargains to be had in the sale. Finally here we are, with many of the shops already closed, we are left to pick over a few tins of paint. Sad for for all concerned1 point
-
Last update for a while as we are off to italy tomorrow for a week or so! Started work on the outer wings and painted the wing fold, my scratch detail doesnt look quite as bad as I first thought...1 point
-
More pictures [/url]1 point
-
Paulo is more than a brilliant modeller he is also a good and simple person! Really different from some proud and arrogant modellers whom cover all modelling tricks under "the black magic handkerchief". I can say it because he is helping (actually teaching) me a lot with my projects and everytime when I'm in doubt how to scratch something... Modelling is an individual hobby however if we are sharing our hobby on Internet it means that modelling can be a "collective" hobby as well! Do you dare? So ask Paulo how he does all those wonderful stuffs!1 point
-
why why why does no one make this in 1:48...1 point
-
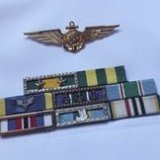
Procopius, That is not exactly just a hat. If is a wolf head with ears and also has arms that her hands fit into ending in fuzzy claws. Her next outfit to the next rave concert we go to. We both share a love for electronic music. Of course, she fits in with that group. I stick out like the pervy old fart. Still Sander van Doorn rules!!1 point
-
My 2 penn'orth.. Personally, i will build anything subject matter wise if it appeals to me, if i open the box and it looks like what.ever it is supposed to and i cant see any discrepancies in terms of shape then i am happy, i will never compare a kit to a plan , partly because if it looks right to me then i am happy with it and partly because i have been a draughtsman/ illustrator in the aero undustry for years and with the exeption of 2 drawings havent seen a truly accurate one.... I actually think theonly thing to blame for the seemingly ever increasing requirement on the behalf of some modellers is simply the internet, ( it is however for many of the same reasons responsible for the amount of large scale kits we have at our disposal) Think back say 25 years or so, the only reference we had as modellers as to what was out and how to build it was Scale Models International and Airfix magazines, i still have the odd one lying around, black and white images, badly brushpainted images with models bult with tube glue and no filler... But we accepted it as the norm as it was what we had available to us, reference would require the purchase of books or plans, allcosting money, now we have billions of reference pics and plans at our fingertips, hundreds of incredibly good modellers suppling articles to sites like this free of charge for us all to learn from, As modellers and consumers we are always one step ahead of the industry that supplies us i. Terms of our requirements, that in essence is what keeps the industry going and'on its toes' Variety is the spice of life, no one is perfect, no company is perfect and no kit is perfect but as modellers we are well catered for and as such think that makes us moan a little more, we are in effect and IMHO .. Spoilt brats;)1 point
-
Once the acrylic paint dried, the outcome had tonality differences and looked like been faded by the sun. I had obviously overdone on highlighting the areas and therefore I had to fix this and make the shades softly blend each other. To do so, I mixed artists oil paint "Red" by MIG Productions “502 Abteilung” series and artists white spirit by "Winson & Newton“ in a ratio of 5% / 95% (actually a filter) and sprayed over the windsock. I hope now it looks better than did before. Meanwhile I found some time to deal with the green grass. Having a couple of different methods in mind to simulate green grass in scale, I found good idea to follow an old fashioned technique! I planted some grass seeds, watered daily and I'm now expecting to grow high grass soon. I’m just kidding of course - watering once every three days, is enough. Kids, don’t try this at home. Progress has been slow for various reasons, including: I'm slower than a turtle trying to climb a muddy creek bank, I always find errors and later trying to develop ways to make model look more realistic, Mid-July heat & expectation of upcoming vacations, caused laziness that lead building process to slow down, Wife visits my bench, holding a hammer and that could possibly means that it's about time to quit 1/18 model for a while and give full attention on 1/1 model. Due to all the above reasons (aka excuses), once the windsock painting process complete, I had to stop for a short relaxing brake and puzzle things out. Next update ETA, late August or early September. Summer is typically the time for vacations and a good chance to relax, unwind & recharge batteries. We all need a break once in a while and I am no exception. I hope you can do the same and enjoy some well deserved time off. I will be back soon, picking up where I left off and complete this project. In the meantime, I plan to unplug, disconnect from anything for a few days, enjoy sunny beaches & crystal waters and hopefully have some SCUBA fun with playful dolphins - as happened last summer.1 point
-
Find on the French forum Master 194 http://www.master194.com/forum/index.php . Lost the direct link New as reliable source for AKAN paints in the EEC: Hobby Colours http://hobbycolours.com/index.php?cPath=132&osCsid=e92d4ad096264a45554bbb98ddc4273e V.P.1 point


This leaderboard is set to London/GMT+01:00