
Leaderboard


Popular Content
Showing content with the highest reputation on 26/07/13 in all areas
-
Here is the final model in the wonderful current Airfix 1/48 Operation Herrick quartet - the Supcat HMT600 "Coyote" Tactical Support Vehicle (Light). I enjoyed this kit as much as the the other three. In my opinion, the only drawbacks with this kit are the inaccurate tyres and the working Jerry can holders, which suffered from some very obvious molding faults (some of the "cross-bars" are missing, requiring fabrication) and the extremely fiddly construction process that allow them to swing down. That aside, the construction process is straightforward and swift. I added towing eyes from the spares box and Jerry cans, oil drums and personal kit from the Tamiya Jerry Cans set . I used Tamiya tape for the towing strop, mud-guards and the webbing straps behind the front doors retaining the day-sacks. I primed the model with Alclad Black and used Humbrol #237 Acrylic as the top coat. After applying the minimal decals, I sprayed Winsor & Newton Matt Varnish, followed by a W&N Raw Umber Wash. Once the wash had dried, I applied a slurry of Mig Gulf War Pigment to the tyres and underside and then a dusting of pigment to other parts of the vehicle and load. In summary - well done Airfix! And finally, the quartet united!3 points
-
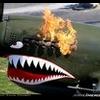
well this is a brief in progress tread, so far the airplane is almost done with the alclad, just need to finish the underside of the wings, then a will go on with the small details, here are a few pictures of how is turning out3 points
-
Greetings One and All Another one of my recent completed ones. This is the ICM 1.144 TU144. This was a nice kit with nice engraved external detail. The plastic was a bit bizzare as to me it resembled bacalite! From what I can remember it went together well but attention does need to be paid to the instructions! It was painted with Halfords appliance white and Halfords Polar grey which were recommended by other BMers and it seems to look ok to my untrained eye. The paints were accidently smuggled out of the UK in my shipping container when I moved from the UK to NS but I think I got away with it!! The one downside was the decals. They were pants, and crumbled when hit with water. The first cheat stripe on the rear was a mess and i ended up brush painting it. The other decals were treated to a coating of decal fix and they behaved after that. So here is my effort! And the offending decal area Cheers now Bob3 points
-
Hello again , recently arrived back from Mallorca to finish off this little kit. I received this kit for my 15th birthday in may and it has been sitting around for a while ,so i decided to build it (the obvious thing for me to do on a rainy day!) Unfortunatley the kit only took me 4 days to complete so i was not occupied for a huge amount of time . The paints are a mixture really , a humbrol white spray for the fuselage followed by the revell 'red' that was suggested in the kit. I decided to use acrylics for the wings (dont ask me why ! ) and masked by photocopying the decals. The kit had no fit issues and literally fell together , a bit of overweathering here and there but oh well.. it adds to the end effect, anyway on with the pictures ... messy fingers Cheers Tom2 points
-
Hi Everyone Thought I`d take the opportunity to show you my very latest effort; Italeris 1/48 scale UH-1N Twin-Huey Finished to represent a Huey from the 20th Special Operations Squadron, The Green Hornets Who operated under the illusion of being a Psy-War Squadron but in fact dropped and supported Studies and Observation Group Commandos in Vietnam and often `Over the Fence` in Laos and Cambodia. The actual kit airframe is built mostly OOB with just some reworked aerial positions but added; CMK Miniguns with scratch built mounts and rocket pods from a Roden T-28 kit with modified kit gun mounts Sort of enjoy not having to bother with decals on these `Special Ops` subjects ( or just getting lazy ) Hope you enjoy looking at Cheers Russ2 points
-
Having now received the kit I can answer my own question and the answer is "No". I've got mixed feelings about this. I'm a little put out that the instructions tell me that if I want to a bomb load then I can buy the Support Set (which I have). But what about those people who wish to add the bombs but don't want, or have, a need for the vehicles? It's a pretty expensive do! I'll be doing a BI/III from the Dambuster kit as well, if I didn't already have some stuff in the loft to use then I'd be looking at either no bombs or having to buy another Support Set. Going down that route I'd have a set of vehicles, etc that would, probably, be no use to me. If Airfix are going to continue down this route Then I think they need to consider selling "weapons sets" i.e. just the bombs, etc. I envisage these might cost considerably less than the Support Set. I mean, when we get a new Wellington, Halifax and Stirling we are going to need an awful lot of bombs!2 points
-
That was my first thought too. It looks right. Bang on.2 points
-
Paint going on! underside finished and a coat of humbrol clear for decals,patchy effect will go when final spray of matt is applied only 1 coat of brown applied I have another hurricane with the second coat applied and I am pleased with the finish,I am trying out vallajio acrylics suitably thinned and brushed on,thanks for looking.2 points
-
here is a brief explanation on how i apply alclad II on my model, i used this alclad tones polished aluminum, duraluminum, airframe aluminum , dark aluminum and stainless steel for the engine area in the fuselage, for the burnt zone in the aft of the fuselage is hotmetal blue, hotmetal violet and transparent yellow, as for the base primer i used Mr surfacer 1200, wet sanded with a 8000 grid sand paper till you get a smooth finish, then model master enamel gloss black, after it cured it was sanded with 12000 grid sand paper for a smooth finish then you play with all the alclad tones normally i airbrushed the hole airplane with polished aluminum, after that i started paneling the airplane with the other metal tones as for the burnt zone of the tail, i used a fine tip on the airbrush and started doing some fine stripes with the blue, the the surounding areas of the blue was airbrushed with the violet after you get the finis you want i sprayed the trasparen yellow diluted 2 to 1 and in light layers because the yellow is to strong in color2 points
-
2 points
-
By all means! I don't claim that my build is 100% accurate by any means, nor any of my other work for that matter. Besides, for me building models is more about art than accuracy. Like my riveting method, for example. I do follow blueprints for the rivet pattern, but I'm no rivet counter and I don't "fully rivet" the plane, but rather create an artistic representation of them for more interest. I do like for my models to look realistic and accurate, but I don't dwell on every little thing. I may have gone off on a tangent there, but you get the idea For example, the old invasion stripe argument. If I were to build a model of this bird, my stripes would be perfectly masked and clean despite this photographic evidence to the contrary:2 points
-
Latest one off the bench (finished today!) Probably the brightest model in my collection Details- Hasegawa 1/48th F-16A kit brought up to MLU standard by borrowing an IP panel from the Hasegawa "C" kit,Pilot and nose IFF bird slicers from the Tamiya F-16 kit and Orion self adhesive scab plates. Scratch built smoke winders and base. Decals from Syhart, main bright orange paint also from this company. The sun was out this afternoon, so took advantage of shooting the model outside in bright natural light No more decal projects for while, this one almost burnt me out I'm pleased with the final model, but it's been an effort to get this one done! Shaun.1 point
-
Back on the dreaded slide scanner....................... The model is the one we had on 899 for the "Land a Harrier" display at Airdays and used a wire passing over the flight deck with a Shar hanging underneath.... Smudge1 point
-
Heinkel He-59D Special Hobby 1:72 Good afternoon colleagues. The machine PP+AO werk num.2794 is constructed. Board really being at war on the Black Sea and participating in "Fall Barbarossa", from 8 Seenotstaffel, being based at the beginning of war in Romania. Fighting career of the machine was rather short, only 9 months. On September 21, 1941 the board arrived on east front from Athens. On October 8, 1941 the Machine PP+AO made an emergency landing at 14.50 about the Romanian coastline, the engine is damaged, 2 Romanian boats (patrol and torpedo) rescued crew, and towed off the airplane in a bay of Varna for repair. Every other day the airplane repaired, and it with crew and 3 passengers returned on the basis to Siutghiol. On May 10, 1942 Weather was bad. Despite of it, He111 from 2х subdividings of III/Kg55 and II/KG55 obtained the order on embarkation. Were lost on weather conditions of 5 He111 from III/Kg55 and 2 He111 from II/Kg55. Losses of crews made 23 persons, 2е survived including the lieutenant of Helmut Ortmann (He111 wer. num.7176) were rescued 8м by Seenotstaffel. During this rescue operation of He59D PP+AO around Ak-Meshmet it was lost. Construction here: http://karopka.ru/forum/forum259/topic7597/1 point
-
The cockpit is now pretty well done and ready for insertion.....(quiet at the back there !!). The seats are a mix of kit parts and scratch built using the Aerofax pictures for reference. The kit instrument details sanded off and replaced with Mike Grant decals then refaced with thin acetate. The throttles and trim wheels were added later. Here's the basic tub pre wash and instrument panel fitted, seat belts made from mix of Eduard USAF set and tape. The new instrument panel, throttle quadrant and yoke, All fitted together, washed with oils and sealed with Vallejo satin varnish. A bit pointless maybe as virtually nothing can be seen through the small side windows but I couldn't just leave it bare Scratch built navigator panel to the right and jammer/radar to the left plus more MK decals. I've added a lot more panel detail to the right of the pilot as the kit parts are wildly inaccurate. Next up is the entrance area. I've scratched out the basic unit, roof, back wall and panel detail and the sides will be fitted to the fuselage halves first using spare PE sheets, Should be painted and fitted tomorrow. Cheers for looking, Melch...1 point
-
There was you with nothing else in the stash to build 'til then as well1 point
-
as you have said not a classic but was it the fault of the organizers , I think not. first the big thing missing was the Americans "any one know why." Secondly you can only ask country's to attend if they say no what more can you do ? We live in an era of shrinking military budgets with not only shrinking air forces but shrinking flying types also many of these country's having aircraft away on operations these country's also have to justify the cost of sending aircraft to shows. There are still a lot of different aircraft types out there but it will take a lot of effort and willing military budgets to get them here. Regards Glenn1 point
-
hmmmm... I don't want to raise any hopes here, but it seems that the old Airfix Beaufighter is now pretty much out of stock in most places...1 point
-
Nice one Russ. Reeeeeally like the gun work especially!1 point
-
Nice! Didn't know that the N was used in Vietnam.1 point
-
Nooooooooooooooooooooooooooooooooooooooooooooooooooooo! Still, suppose that gives me a few months to finish my Fujimi horror story.... Mark.1 point
-
Looks good, like the subtle wear and tear. Nice.1 point
-
Tom, I'm sitting in one of our A320 and your weathering is almost spot on...LOL Cheers, Alex @Daniel...C Check? I'm in TXL :-)1 point
-
Yeah, it's on the basis of that thread and my interpretation of those photos that I decided to go with yellow on mine. http://www.britmodeller.com/forums/index.php?/topic/234942194-148-hp-halifax-fonderie-miniature-friday-13th/?hl=halifax Gaz1 point
-
Lovely job! How did the kit go together?1 point
-
Nice one. Must get on with my dragon machine.1 point
-
Nice to start working on it again, Col. Regarding the Soviet Audax, the only real problem with that is which variant to do - the silver version with the Soviet stars, or the green over blue Aeroflot version. Maybe I need two of these! I'm afraid it will be a while until I get to this one in earnest, although I've started doing cleanup on the parts. Ahead of it are this Hartbees, a British WWII Audax, the Egyptian Audax, and then the Persian/Soviet Audax. At least that's the plan now, which as always is subject to change without further notice. Regards, Jason1 point
-
Thanks guy, I do have loads still to add! A few more for now..1 point
-
MK show were dropping the mass produced diecasts to 50% tonight. No other obvious changes Not sure if there are staff changes, but I didn't know the guy that was discounting the stock and the younger staff members I know weren't there. Paul1 point
-
Hello all, I messaged Fritag with a drawing I did having read through his amazing thread. He was adamant that I should share it with you all so here's my rendition of the FSS logo. Being a commercial artist has it's merits and re-creating things like this is one bonus. It kind of makes up for not having a great deal of time to make models. You might have spotted some of my work over on the vehicle section as I've made decals for a few people making the Revell Routemaster. This particular thread has been exceptionally interesting as it's great to read all the experiences of flying the real thing, especially for those of us who cam only dream of even sitting in a cockpit, let alone actually flying! Wagoneer PS - an edit - use the above if you want it, a bit of sharing never hurt!1 point
-
I've got a little more to post. Finshed the Dark Green and I did some more post shading and blending and here is how it came out. For the post shading of the green, I used these: For the post shading of the Ocean Gray, well, that was a little easier. thanks for looking! Getting closer!1 point
-
Bill, I'd love to see Airfix have another go at the old girl. The basic Demon kit isn't half bad to begin with, and if they could improve it to the extent they improved their new-mould Swordfish over the old one, put me in for twenty or thirty Harts and Demons. As it is, I'm up to my eyeballs in Hart variants - AZ Models, Avis, Amodel, Airfix, and now we have Kora coming out with all the weird and wonderful variants. I've already picked up the Kora Persian Audax (in Soviet markings no less) and the Kora Egyptian Audax (with the Panther engine). Nice kits, albeit in resin, and not cheap (I got mine from Hannants on sale). Supposedly they're going to come out with a Turret Demon - definitely on my must-have list. I shall continue to post as new developments emerge - stay tuned! Regards, Jason1 point
-
Thanks HL10 mate for that idea on the Rigols. I found some soft brass that I once used for making working signals(model railways 00) This turned out like so. This is for the centre hatch covers.16 Rigols in all. I also made the bottom ones the same way but were much easier to make, 32 of them. Also added the ratline bases cut down for brass ratline later. Added brass gratings to lower middle deck. Waiting on wood deck material and eye bolts from Germany. Working on some of the other Airfix bits,lots of tidying up. Have nearly got the stern windows right,just some tweeking and finish painting properly. Thanks Longshanks 'me-ansome' Cheers foxy1 point
-
How about a 1:32 SHAR2? Since their Hawk 100 was the same scale it would be coup if it was.1 point
-
That golden age of modelling just went platinum1 point
-
Panel lines are a little thick in comparison to the Revell Lanc that I built a while ago, but nothing too extreme If you need any more, just let me know.1 point
-
Forgot this one: FROG Shackleton MR.3. In original kit subject markings. I reworked this from when I originally built the kit around 1970. The rework was about 20 years later or maybe a bit less, I don't exactly recall. But I know I used parts from another that was gien to me as a wreck! Luckily, I had a spare decal set and with the help of Modeldecal generic decals was able to make a reasonable job of it. The nose cannon were from the underwing cannon from the first retool of the Hurricane by Airfix. A forgotten/lost tool?? I recall this Hurricane had the same decal choice from their original series 1 bagged kit, an extra set of decals, the rockets, underwing tanks, the cannon and boms and racks. The kit had big rivets but nice fabric effect but the canopy looked a bit squat. Rarely see this issue these days. Anyway back to the Shack, When I took out for an airing on Sunday for a photo shoot of my models I noticed how it has aged but still bearing up. The nose antenna are from the Italeri Dak, and fuselage top whip aerils fro stretched sprue. But some of them have come adrift!!1 point
-
Airfix had a tent at RIAT had my hands on the new Lightning f2a and Harrier gr.1 , They also the sprue's for the harrier they look well worth the wait. As always a form asking us what we want I asked for the same as always VC 10 , Shakelton and Buccaneer all in 72nd scale. hope you all agree with me Glenn.1 point
-
The "backpack" gets his shape. regards Christian1 point
-
Here in the UK we are able to post to the US!1 point
-
To add my 10 pence worth I think we should be glad that there is an imminent new tool kit of the Harrier being released, rather than slating Airfix for any sliding release dates! You can please some of the people.....1 point
-
Totally agree! And a 1/72 VC-10!! . You DO realise of course that it's a Merlin engine Beaufighter Mk II that's REALLY needed! Not one of the Hercules engine variants!! Now, before ANYBODY sounds off about it "being a little known variant with only a small production run", I would just like to point out that the Lancaster Mk II was also a relatively unknown variant with only a small production run................. And yet we have a lovely new kit due soon! It also goes without saying that the Beau MUST be in 1/48!! Worth a try! ps - I'd STILL rather have a SU-7/17/22/9/11, MiG 17/19/23/25/27/31 than a Tornado/Typhoon!! pps A new Tempest might be nice. Sabre or Centaurus engine!! I don't mind! ppps Did I mention a brand new , state of the art DC-3/C-47 and C-130 at all? Yours (even MORE optimistically!) Allan1 point
-
Cough, cough 1/72nd VC10K. Cough, cough1 point
-
Hi again, some more progress on the RSR. Now its almost in the right shape. The front wing needs some work. Some small changes and the main body is done. regards Christian1 point
-
Some putty,than sanding. Some putty and again sanding,and again and again. A bit wider now. I made the air outtakes from the frontbrakes. Thats all i can show.Now i have to use putty and again a lot of sanding. regards Christian1 point
-
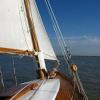
Okay, here she is, I decided to let you guys see her before I go any further. As per my original plan, most of the fittings are scratch built, Vinyl stickers for the markings, the deck is grained rather than "real" wood, simply because I messed up the original ply surface (which I wanted to varnish). She's not perfect and is a mix of several types, having been drowned in references I decided to just build a mix of the bits I liked, not historically or factually accurate, but not bad for a first attempt (I hope) Just a few more bits to do, a test in the bath or my son's paddling pool and it's off to the big lake....pictures of the sink or swim will follow!!!!1 point
-
Echo the sentiments on the meadowhall modelzone, it really is only a glorified toy shop. Luckily we still have a 'traditional' model shop I discovered recently. Marcways in attercliffe. He has been there for 40 odd years, and carries a good range of kits from planes, cars, ships and armour. He even does military figure kits. Mainly most of his stock is revell, tamiya and airfix. E does carry some hassegawa, trumpeter and italeri though. Not only that but he does model railways and slot cars too. I know the prices are close to rrp set by the manufacturers but I try to shop there when ever I can, as only mine and others custom keeps them open.1 point
-
**update 20th May 2013** Hi guys - time for another update! Last time I left you with images of the nose which had been completed inside & also had some metal skinning begun outside. Once I had done the skinning, I moved back to the cockpit area - there were several things I needed to glue in their final positions, finish off etc. First up - the seats: Here they are all painted up - I added some HGW 1/32 US WWII seatbelts. This was the first time I'd used these & I was very impressed - in my opinion they are probably the best you can buy (although I've not tried any alternatives) One thing that I needed to address was the stencilling - each one has 'US Air Corps' on the back cushion and 'Do not remove from aircraft' (or words to that effect) on the seat cushion. The back was fairly easy - I hand-painted the necessary words and immediately dabbed off the excess with a tissue to give a patchy, worn out look. As for the wording on the seat cushions, I made sure the seatbelts were strategically positioned, & then just gave an impression of some text showing in any gaps. Needless to say, it's very hard to actually see anything once the seats are installed & the cockpit roof on.... Next, we go back to the dash over the I.P. - I added all relevant detail from plastic card etc. There's various gauges, as well as the de-icer vents which divert hot air from the engines to various places around the aircraft, including the windscreen: Next up was the cockpit roof, including the window framing (which was particularly hard to make). There are numerous instruments above the pilots' heads - I made the decision not to overdo this bit as it's virtually hidden once the roof is in place - but I gave a good approximation of what's there - I started with this: and ended up with this: I added all the cockpit glass from shaped pieces of clear thermaform. I tried my best to get these as clear as possible, but the trouble with thermaform is that unless you store it correctly it picks up numerous tiny scratches - so out came my canopy polishing system that I bought from little cars at one of the shows - it incorporates polishing pads of varying fineness, and a final polishing paste. After I'd done that, I applied a coat of Future to each clear part. Even then, there were one or two blemishes. In the end I thought 'sod it' - it looks good enough to me. You could theoretically keep finding fault & never be happy, but in the end I came to the realisation that I am scratchbuilding everything - there are bound to be bits I'm not 100% happy with... The hardest parts to form were probably the skylight windows on the top as there are complicated curves involved. Hot water and lots of bending / sanding involved here: A test fit:1 point
-
Next, I finished up the bulkhead at the rear of the nose compartment - again, I had to consider everything that I had to attach before the nose section is glued on permanently - the oxy hoses are glued firmly in place with the requisite sag and angles (they are hooked up to the ceiling on the real plane) - once the nose is on, I'll have to carefully reach in with the tweezers and glue the top bits to the ceiling. Now, finally, we can get to the meat of this update, which is the nose interior. I am happy that it is 99% completed - as I alluded to earlier, debate rages on as to whether it would be natural metal, or bronze green. I did some research, and actual veterans have confirmed that in some aircraft, the nose was green, in some it was natural metal. As I'd already painted the whole thing green by the time I found this information, I decided to leave it! Everything that should be in place, is in place - I had no choice but to glue all of this stuff in permanently as it would be impossible to do it after the nose is on... OK enough chat, here's some pics: Some things to note... the wooden walkways in the real plane were made of plywood - I've used thin mahogany veneer, simply because that's what I had to hand, so it's probably a little too dark to be totally realistic, but I'm happy with how it looks. You should be able to see the wire & pulley system hooked up to the guns - I knew all along that it would be nearly impossible to glue it all in place after the nose was on, so I compromised - I attached the front (ie nose opening) ends and the pulleys that are on the ceiling, and the rear ends I cut notches in the fuselage rim and pulled the wire taut, like this: I then cut off the excess, sacrificing the rearmost pulleys in the process. Fortunately, when looking rearward through the front opening, you can barely see this. Also - the astrodome (kindly supplied by Tom Probert - thanks Tom!) was way too crude for my tastes - full of little air bubbles and quite opaque. I decided to leave it off - on the real plane, it could be removed completely (and at airshows you'll often see a crew member popping his head out to wave at the crowd as the plane taxis down the runway!) - I scratched the details - mount for the navigators compass to the rear, and locking handles. As far as I know this is accurate - please let me know if the locking handles are actually attached to the astrodme's mounting ring, in which case I'll remove them... The hole which the omission of the astrodome leaves also provides another much needed way to view the interior, most of which is very hard to see once the nose is attached to the fuselage... In the previous photo you'll also see that I have taken an important step forwards and begun to 'skin' the aircraft - this was done with pewter sheet and a simple riveting tool. Mine is made by Trumpeter, and I picked it up at Telford last time for less than a tenner. It does the job perfectly well, and comes with several different sizes of riveting wheel. I think the effect is good, and will look really nice under a coat of paint. Here's me measuring up some panels - it was sometimes necessary to make individual panels, other times to cover large areas at once.1 point
-
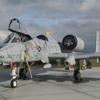
I have got the guns on now and I have finished the prop. I couldn't resist fitting them! I am still finishing off the landing gear and touching up details here and there. Anyway, here is how MH434 looks today:1 point


.thumb.jpg.d17ff607fc7e89ed057e63fcb6f2a888.jpg)


.thumb.jpg.87669a5ffb8b13672a3d675087a46d42.jpg)


.thumb.JPG.3498f40362ff13ebfc4b2e45abbd545e.JPG)


This leaderboard is set to London/GMT+01:00