
Leaderboard


Popular Content
Showing content with the highest reputation on 20/07/13 in all areas
-
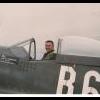
Evening all. This is Trumpeters 1:144 Sabre done up as an RCAF Sabre 5. It was flown by my father in 416 Lynx Squadron based in Grostenquin, France in the 1950's, AS 151 being 'his' aircraft, callsign Boozey-eight-seven. I still need to locate serial numbers in a small enough size for the tail. Fortunately for me, the red canadian flag on the tail was a painted red oblong with details as a sticker. Apparently the stickers came off quickly so it usually appeared just as the red oblong.. Finish is Alclad in various shades. It's not very big. Standard Tamiya paint pot for comparison; And upon leaving the RCAF on to flying these; Thanks for looking, John4 points
-
A friend of mine built this Tamiya F-16 for me. I am thrilled to have it in my display case. Extras include: CrossDelta Scab plates, Aires exhaust, JDAM from Hasegawa weapons set and Afterburner decals.4 points
-
Hello again ,heres another from the completed builds.Its the italeri kit with a couple of resin seats and some Eduard etch.Photos outside in the glorious sunshine between jobs so please excuse the B'n'D workmate in the backgroung !!! Thanks for looking,Frazer3 points
-
Closed. This is not a buy and sell area and the repeated posting of individual kits smacks of advertising and post inflation. If you want to find out the true costs, use ebay as your guide. And just to ensure the point is made ref the advertising of kits and post count inflation, the original poster is now taking a 31 day holiday and his PM ability is gone.3 points
-
Got the Dark Earth base color finished, tomorrow I'll fade it and unmask the blue Then it's on to the Montex masks3 points
-
Hello all, Here is my latest build, of Spitfire G-AISU as raced by Allen Wheeler in 1949 for the Kemsley Trophy and Air League Challenge Cup. I used Tamiya's 1/48 Spitfire Mk.Vb with some modifications. The cannons and radio mast were removed, the tailplane was replaced by a later Mk.IX model by Ultracast, and the windshield was replaced by a PR version from Falcon's Spitfire set. Other aftermarket are the exhausts, wheels and seat by Ultracast. I used no photoetch and had fun making the harness from Tamiya tape. I also altered the shape of the oil cooler and carb intake, two parts that don't look too accurate on Tamiya's kit, and I made resin duplicates of the modified parts, which was a first for me ! The painting was entirely done with paint masks. They were drawn on my computer according to the available pictures and cut by a local shop. The masks were somewhat difficult to apply on some areas like the gun embossings. Next time I will try to use Tamiya masking sheets instead of Oramask, in the hope that it will follow the shape of the surface details more closely. For the colours, only black & white pictures are known, but mention of a blue aircraft and a red racing band are found in period descriptions. The shade of blue was obtained with a mix of Tamiya X-4, X-14 and white. For the stripe and spinner, there was disagreement on various forums whether they were silver, gold or even yellow. I chose dull silver (Alclad Semi-Matte Aluminium) because it is compatible with the black & white pictures while reminding earlier Supermarine racers. I took some pictures next to my Hurricane G-AMAU: http://www.britmodeller.com/forums/index.php?/topic/234936865-hurricane-g-amau-the-last-of-the-many-148/ The two aircraft actually raced together in the 1950 King's Cup, but I preferred the 1949 colours for G-AISU. Today both aircraft are owned by the Battle of Britain Memorial Flight, in military colours, as AB910 and PZ865. Greetings, Adrien2 points
-
I spent a very pleasant few hours at Duxford today, and thought that I would share some of my pictures with you. Thanks for looking.2 points
-
Almost ready to fit all the sub-assemblies....... All I have to do is glue in the wheel bays, then try and get all 20 mainwheels touching the ground at the same time, attach the engine nacelles to the wings - and we're done........ Here's a shot with a MiG-25 for scale....... This is the Modelsvit 1/72 scale kit - with fibreglass resin fuselage, wings, fin and tailplanes. The rest (cockpit, engine nacelles, wheels etc) is injection-moulded plastic. Its so big I had to photograph on the dining room carpet Ken2 points
-
Good afternoon colleagues. The model is executed in an early camouflage of Luftwaffe and has still civil registration. D-AKEK, werk num.553, 1 (Mz. )/186 Bases List 1934-1936. On October 1, 1934 the first subdividing of sea scouts of Luftwaffe 1 (was created by Mz. )/186 . On which arms JIId "Wal" (Dо15) arrived. In 1936. This subdividing got new more recognizable number 2/KuFlGr.106.2 points
-
Hello to everyone my name is George Papanicolaou and i live in Greece..I am a new member on that forum , and i am very happy to be here... So iam posting a kit that completed a few months back,hasagawa's JU-87G STUKA....I finished it out of the box with some handmade mods for more realism and Quickboost's exhausts...2 points
-
Hello to anyone , my name is Dimitris Bitsiaras and i live in Greece . I am a new member on that forum , and i;m very happy to be here . Mirage F1 is the Italeri kit at 1/48 scale . The cockpit comes from Pavla , Decals from Icarus decals , colors from Gunze .. This is an almost out of the box build , scratch build are the exhaust and the landing gear nest .. I'ts nice to be here , hope you like it ......2 points
-
Very very nice, thank you Mr Song! Any chance of a 1/48 SA 330 Puma or Aloutte III in the near future? Please....Please2 points
-
My take on Hasegawa's RAF Sabre finished as XB931 of 4 Squadron Have added CMK Airbrakes and Gunbay detail sets, Legend Cockpit and Control Surfaces, SAC Landing Gear with True Detail wheels and finished with Xtracolor enamels and Xtradecal History of 4 Squadron decals. No major fit issues with either the kit or aftermarket sets although I made the mistake of blindly following the Xtradecal paint instructions so have managed to get the lower camouflage demarcation line too low! Anyway, on with the piccies... HA09567_12 by lanc.supplies, on Flickr HA09567_11 by lanc.supplies, on Flickr HA09567_10 by lanc.supplies, on Flickr HA09567_09 by lanc.supplies, on Flickr HA09567_08 by lanc.supplies, on Flickr HA09567_07 by lanc.supplies, on Flickr HA09567_06 by lanc.supplies, on Flickr HA09567_05 by lanc.supplies, on Flickr HA09567_04 by lanc.supplies, on Flickr HA09567_03 by lanc.supplies, on Flickr HA09567_02 by lanc.supplies, on Flickr HA09567_01 by lanc.supplies, on Flickr HA09567 by lanc.supplies, on Flickr Thanks for looking and as always, comments good or bad are welcome! Tony2 points
-
Not a C-17....... Airbus A-400M........ (I took these from my garden, near Malmesbury).... Ken2 points
-
If you brush painted that with Tamiya acrylics, you've done very well . I've tried and my attempts have been abysmal ! They work a lot better sprayed, if a bit 'grainy'. Incidently, what colours have you used ? Thanks for posting.2 points
-
Inspired by Artur's miniature I decided to build my own Su-22. I used Eduard's kit (in fact KP with some etched parts and resin cockpit interior). OOB, without any modifications,except decals for polish aircraft ..and a few pics from the building:1 point
-
It's done! This will be my first finished build posted here. This is a great little kit and I will happily make another one. Big thanks to Brewer for helping me with a ton of stuff on this build. From future to photographs, thanks dude! PICS: I used Vallejo paints for the RLM colors except the yellow, which was MM enamel. The rest of the colors are mostly Tamiya and citadel acrylics Thanks for looking!1 point
-
Just finished and shipped to Canada. Monogram 1/48 PBY5A. Finished in RCAF markings. Hope you like.1 point
-
Well I think thats this kit finished already! Not a lot of work in it seeing as it was a straight forward out of the box build with no lights, just lots of weathering! Its actually my first attempt at weathering so any hints or tips or suggestions are more than welcome!! Anyway, here she is! Thanks!1 point
-
really nice paint finish there1 point
-
Interesting stuff..thanks for sharing1 point
-
Hi Everyone, just completed my Revell boxing of Monograms 1/48 B-26B Douglas Invader, which I`ve completed to represent an aircraft of GB.1/19, L`Armee DeL`Air, Indochina, Circa 1954-55 Decals are a mix of; kit, spares stash and a Berna decals French Invader sheet Had to resort to a Vac-form canopy (as the kit contained an early framed item) which gave me some headaches and at one point I had to cut it off and start again due to superglue fogging. Apart from decals and canopy the rest is OOB with some wire embellishments around the engines When I purchased the kit in March I intended to do it as a `sanitised` CIA aircraft from operation Millpond but when I saw the kit contained both turrets and rockets and gunpods I just had to do it as a French bomber. so no guesses what my next Invader will be Hope you enjoy looking at...1 point
-
Do you want the extended front gear? I've got 2 FG.1's and one is pencilled in to be Black Mike so I won't be needing it. Sean1 point
-
Woohoooooo..... Here we go then. First off, a big to Enzo... Ok, the usual and mandatory sprue shot just to show its unstarted. There's two versions in the box, an all white UN model, and a Camo version, which i believe is from one of the Folgore regiments. Even though there are 410 parts to this kit, its really not very big, just a smidge over 14cm. Everything starts by joining the two hull halves together, and in Trumpeters usual way, its done in such a way that there will be no visiblejoin lines, which is excellent. The undercarriage goes together quite quickly until you get to this point. This was the point that the chaps at FSM advise that things can go awry, the PE brackets for the swing arms. PE is quite thick, and i didnt have a problem fitting the brackets, but i can see the issue that they were talking about, and it was easily resolved by nipping off the stud on the suspension mount, and then everything fits nice. Now, chaps, those of you that build things with wings, dont have a panic attack, wondering where the wings are, how does that thing fly etc.... this is an AFV, Armoured Fighting Vehicle, drives along the ground, shooting things up, what the real men drive around in, instead of poncing around in the sky like hairy stewardesses..... Hehe More later chaps Steve1 point
-
And a Gazelle, Scout and Wasp if you're taking requests, please!1 point
-
These are the closest calculated FS values to the measured original MAP paint colour standards where 2.0 or less = a close match:- Dark Green = FS 34083 @ 1.14 Ocean Grey = FS 26152 @ 2.70 (the FS is not quite blue enough) Sea Grey, Medium = FS 35237 @ 2.47 (the FS is slightly darker) Sky = FS 34424 @ 2.26 Full size comparisons. No allowance made for 'scale colour'. Nick1 point
-
A new p47 too Let the rumours begin!1 point
-
In your goal of reaching 100 posts, how about not spamming with one line posts? I think it's important how you get to '100'.1 point
-
Hi Everyone, Hope you don`t mind me showing you some pic`s of my Roden 1/48 scale AU-23A Peacemaker from my Special Ops corner that was photographed in sunnier times Done as an COIN evaluation aircraft of 4400th Special Operations Squadro, USAF, circa 1972 Built OOB with just antenna and seat belts added Building the minigun was very fiddley but the rest was a fairly easy build as Roden builds go Hope you enjoy looking at. Happy modelling....1 point
-
Nice work!1 point
-
That's super!1 point
-
...and he's me thinking you were talking about one of my ex-girlfriends Its a very nice build1 point
-
Fantastic job, Really Nice Camoflage1 point
-
That really is a work of art! All the more appreciable as i recently made this kit myself Excellent work, Sir. ~M~1 point
-
Very nice indeed1 point
-
Oh - if they are into Helis they maybe should do a 1:48 Mil Mi-24 Hind1 point
-
And what happens if your men in green the next time have to fight against an enemy that has SAM and fighters and can achieve air superiority? Do you send your A-10 and helicopters with the enemy controlling the airspace for the fun of seeing your slow moving CAS assets being shot down one after the other ? Or wait until some other ally achieves air superiority for you ?1 point
-
Paint is very nicely blended. Great job!1 point
-
Wow, this looks fantastic.1 point
-
Picked one up for $7 on craigslist. After seeing what can be done with it...What a score.1 point
-
Tremendous shots.1 point
-
Thanks for the comments folks... Xtracrylix Gloss Sea Blue1 point
-
There is no time to hang about , So here are some pictures of what is done today. The stages of painting the cockpit. With a wash. Here with some detailed painting. Here are some pictures of the finished cockpit And finaly I have also done some work on the firewall with the frame for the undercarriage/ motor. just painted After some detailed painting and adding the frame. Cheers,1 point
-
I was thinking more of the taking the P bit of your post....1 point
-
I have just read this thread from the start. You have done really well with some unpromising material. What I have also enjoyed is the evident pleasure you have got from this set. Kudos to you Sir! Martin1 point
-
You achieved that in Tamiya acrylics? With a brush? Bloody hell, I couldn't even get that paint to cover detail parts nicely, let alone a whole model! Hats off. I'd have gone back to the enamels for brush painting but you obviously are up to the challenge.1 point
-
I'll say it then...............................NICE JUGS The P47 not too shabby either1 point
-
Great job.1 point
-
At the time I built this I just followed the instructions that came with the decals - I had yet to discover the misery that is internet research1 point
-
Simon, STUNNINGLY GORGEOUS.....1 point


.thumb.jpg.d17ff607fc7e89ed057e63fcb6f2a888.jpg)


This leaderboard is set to London/GMT+01:00