
Leaderboard


Popular Content
Showing content with the highest reputation on 11/07/13 in all areas
-
Highlight for many attending the Waddington International Airshow 2013 must have been the appearance of no less than three vintage Saab aircraft from the Swedish Air Force Historic Flight. Formed in 1998 the Flight's main purpose is to operate and maintain a number of aircraft now retired from the Swedish Air Force. The Flight operates a number of vintage jets including a Saab JAS-37 Viggen; Saab J29F Tunnan; Saab Sk16, Sk50, Sk60 and Sk61.; Hawker Hunter and de Havilland Vampire. It is based at Satenas Air Base, home to a wing of Swedish Air Force JAS-39 Gripens, the current front line fighter. The aircraft performing at Waddo were led by the flagship of the fleet; Saab JAS-37 Viggen 37098/SE-DXN, known as Gustav 52. A type still in service with the Swedish and other air forces around the world is the Saab Sk60 (Saab 105). The aircraft on display, 60140/SE-DXG, was donated to the Air Force Museum and is painted as it was when first in service in the 1960s. The last of the trio is Saab J29F Tunnan 29670/SE-DXB. The type served in the Swedish Air Force between 1951 and 1974 in fighter, recce and attack roles. This example was retired in 1968 and languished for many years in a hangar before returning to flying condition in 2010. The Waddington appearance is thought to be the first flying display of the type on the mainland UK. Representing current frontline Saab aircraft is this JAS-39C Gripen from the Czech Air Force 211 TL Thanks for looking. Mark5 points
-
At last it's done. You can see the wip herehttp://www.britmodeller.com/forums/index.php?/topic/234919531-english-electric-p1/. As a modeller of some years standing, there comes a time that you have to do something like this. It makes you better for it. I'm glad I did it but I shan't rush into something like this again anytime soon. It's nowhere near competition standard, but please have a perusal at the pics.5 points
-
Hi all, Esci 1/48 Saab Viggen. Back end of the 80's I paid £1.98 at Poundstretcher for the kit and its been stashed for almost 26 years so decided to build it. A tin of paint today cost me £1.60 and the ejector seat £6. Brian.5 points
-
Hasegawa kit with Zoom photo-etched parts from Eduard, decals from Eagle Strike Range; except of them, i built my Sabre straight OOB and i had lot of fun. Paint with Gunze's acrylic H330, H331 and H56 for the blu (i know it's not the right PRU blu, but for me looks right!). Hope you like it And now... a couple of Sabres! thanks for looking ciao Ale3 points
-
Hi all, Here's my second completion for 2013: F-4B BuNo 153019 built from the 1/72nd scale Hasegawa kit using a mix of ModelDecal and CAMDecals for the markings. Unfortunately I had some major issues with the CAMDecals silvering and I had to use ModelDecals for the sunburst, sharkmouth and roundels as the CAMDecal ones wouldn't conform to the shape of the model. Next time I use them I'll have to use some serious decal solutions! Mike.2 points
-
This is the Tamiya 1/48 scale A-1H Skyraider. It represents Spad 577 VA 25 attached to the USS Midway and flown by LT. Clinton B. Johnson. Lt. Johnson shared a kill with LT. J.G. Charles W. Hartman when they downed a MiG-17 with 20 mm guns on June 20, 1965.2 points
-
Finished today, painted with Tamiya Acrylics, and weathered with AK Interactive and MIG Productions. Build thread is available here Peter2 points
-
Up until this build I hadn't built a Axis aircraft since I was a kid. And even then I never built more than a couple, why that was I don't know. As an adult I'm still not into German aircraft and I have zero interest in Japanese subjects. That said I don't mind the 109. I'd bought this kit to on sell and have had it a year or so, but despite discounting it to under cost no one seemed interested. I was re reading a Military Illustrated Modeller Magazine and noticed Brett Greens Build of this aircraft. As I was in the middle of a 1/48 F-14 build, which I was losing interest in, I figured why not build this 109 straight from the box. I could even use Brett's build as a reference (OK, I could just copy exactly what he did). So that is what I set out to do. I'm pretty happy how it turned out and I may even do a E3/E4 in the future. I was refreshing just sticking things together, slapping the paint a stickers on and not bothering to much about accuracy or detail. If you're interested there is more on the build at my web site http://a4-alley.x90x.net/models/BF-109E-1.html2 points
-
Hi folks I know there's been a few of these posted since it was launched but I'd like to add mine to the line up if I may. I know (now) that some of the decals are wrongly sized and my post-shading might be a little heavy for some tastes, but it looks great on my display shelves amongst all the greys, greens and browns; and I really enjoyed doing it, which is the whole point isn't it? Thanks for looking J A2 points
-
Here is my tucano. I really enjoyed this build as it was simple but effective. As you can see on the bottom photo, the fuselage of the tucano at the front is uneven. This was an accident were the fuselage was left on the table in a pool of paint. It had melted it so i had to use filler to smooth it out. It looks alot worse on the photos mind.2 points
-
Because the overpaid fools who call themselves management think they know everything and don't listen to the people who usually REALLY know what is needed - ie the workforce!2 points
-
Great find. I watched that a couple of time when I just finished my Natter:2 points
-
My current building model-eduard's Spitfire from 302 sqn of Polish Air Force in 1944. with resin cockpit and exhausts Preshading, first and second coat of Medium Sea Grey1 point
-
Not usually my scale, but I have a soft spot for the Lancaster, and having seen Airfix's latest offering I couldn't resist As I'm sure you know the kit comes as a BIII Special 'Dambuster' but there are all the parts necessary to complete the kit as a 'standard' BI/BIII. All that was needed was to obtain an aftermarket decal sheet, which I duly did from Sky Models. I have completed mine as a BIII of 463 Squadron, RAAF based at Waddington, Lincolnshire towards the close of the war. The level of detail on this kit is exquisite - right down to the oil tanks in the main landing gear bays. As this is a 'Dambuster' kit, there was no payload provided, but all the racks are present to add bombs when Airfix release their payload set. Much has been said about the panel lines being too heavy, but in my personal opinion once they are under a coat of paint they are fine - a fair compromise between breaking up an otherwise blank surface and looking realistic. The fit was ok - the tolerances are so fine in the interior that it is essential everything is lined up perfectly to get the fuselage halves together without problems. I had to remove the paint from the edges of the interior bulkheads to ensure the halves closed perfectly. The only other modifications I made were to the windscreen de-icer units in front of the windshield as Airfix has these placed too close together, and the small bomb aimer's windows on the sides of the nose were replaced with clear acetate as I felt the kit items were a little thick. All in all a fantastic kit, and as far as I'm concerned the best 1/72nd scale Lancaster on the market by quite some margin - bravo Airfix! I'm looking forward to the BII. Tom1 point
-
ATL Carvair, VH-INM, Ansett Airways, late 60's early 70's. Model, 1/72nd scale, scratch-built fibre-glass nose grafted onto a Mach 2 DC-4. Decals are by Hawkeye, a small Australian company but with a large selection of decals. FGH1 point
-
Douglas A-1D, (AD-4) Skyraider Trumpeter 1/32 History The Douglas A-1 Skyraider (formerly AD) was an American single-seat attack aircraft that saw service between the late 1940s and early 1980s. It became a piston-powered, propeller-driven anachronism in the jet age, and was nicknamed "Spad", after the French World War I fighter. The Skyraider had a remarkably long and successful career, even inspiring its straight-winged, slow-flying, jet-powered successor, the A-10 Thunderbolt II. It was operated by the United States Navy (USN), the U.S. Marine Corps (USMC) and the United States Air Force (USAF), and also saw service with the Royal Navy, the French Air Force, the Air Force of the Republic of Vietnam (VNAF), and others. The piston-engined Skyraider was designed during World War II to meet U.S. Naval requirements for a carrier-based, single-seat, long-range, high performance dive/torpedo bomber, to follow-on from earlier types such as the Helldiver and Avenger. Designed by Ed Heinemann of the Douglas Aircraft Company, prototypes were ordered on 6 July 1944 as the XBT2D-1. The XBT2D-1 made its first flight on 18 March 1945 and in April 1945, the USN began evaluation of the aircraft at the Naval Air Test Center (NATC). In December 1946, after a designation change to AD-1, delivery of the first production aircraft to a fleet squadron was made to VA-19A. The low-wing monoplane design started with a Wright R-3350 radial engine, later upgraded several times. Its distinctive feature was large straight wings with seven hard points apiece. These gave the aircraft excellent low-speed manoeuvrability, and enabled it to carry a large amount of ordnance over a considerable combat radius and loiter time for its size, comparable to much heavier subsonic or supersonic jets. The aircraft was optimized for the ground-attack mission and was armoured against ground fire in key locations unlike faster fighters adapted to carry bombs, such as the Vought F4U Corsair or North American P-51 Mustang, which would be retired by U.S. forces before the 1960s. Shortly after Heinemann began design of the XBT2D-1 a study was issued that showed for every 100 lbs of weight reduction the take-off run was decreased by 8 feet, the combat radius increased by 22 miles and the rate of climb increased by 18 feet. Heinemann immediately had his design engineers begin a program of finding weight saving on the XBT2D-1 design no matter how small. 270 lbs was found by simplifying the fuel system; 200 lbs by eliminating an internal bomb bay and hanging the bombs, drop tanks and rockets from the wings or fuselage; 70 lbs by using a fuselage dive brake; and 100 lbs by using an older tail wheel design. In the end Heinemann and his design engineers found over 1800 lbs of weight savings on the original XBT2D-1 design. Navy AD series were initially painted in ANA 623 Glossy Sea Blue, but during the 1950s following the Korean War, the colour scheme was changed to light gull grey (FS26440) and white (FS27875). Initially using the gray and white Navy pattern, by 1967 the USAF began to paint its Skyraiders in a camouflaged pattern using two shades of green, and one of tan. Used by the USN over Korea and Vietnam, the A-1 was a primary close air support aircraft for the USAF and VNAF during the Vietnam War. The A-1 was famous for being able to take hits and keep flying. There was added armour plating around the cockpit area for added pilot protection. It was replaced beginning in the mid-1960s by the Grumman A-6 Intruder as the Navy's primary medium attack plane in super carrier-based air wings; however Skyraiders continued to operate from the smaller Essex class carriers. The Skyraider went through seven versions, starting with the AD-1, then AD-2 and AD-3 with various minor improvements, then the AD-4, (the subject of this kit), with a more powerful R-3350-26WA engine. The AD-5 was significantly widened, (allowing the two crew to sit side-by-side), it also came in a four-seat night-attack version, the AD-5N. The AD-6 was an improved AD-4B with improved low-level bombing equipment, and the final production version AD-7 was upgraded to an R-3350-26WB engine. Skyraider production ended in 1957 with a total of 3,180 built. In 1962, the existing Skyraiders were redesignated A-1D through A-1J and later used by both the USAF and the Navy in the Vietnam War. The Model It is great to see another 1:32 Skyraider on the market giving the modeller a choice of either a complex or relatively simple build, even though the marks are different. This kit is of an earlier version, as used in the Korean War and is certainly the most accessible kit of this aircraft available, and I’m sure Trumpeter will be releasing later versions in the future, certainly going by the number of parts that aren’t used in this kit. The kit comes in quite a large box with an artists representation of the aircraft in flight over a target in Korea. Even with the size of the box, on opening it is stuff full with eighteen sprues of medium grey styrene, one sprue of clear styrene, rubber tyres, a small sheet of etched brass, and two quite large sheets of decals, one for the aircraft and one for the weaponry. All the parts appear very well moulded with no sign of flash and not too many moulding pips. Surface detail is a mixture of engraved and raised lines where appropriate such as strengthening straps and rivets. The instructions, on twenty four pages of landscape A4 are very clear and easy to follow. Despite the size of the kit, construction appears to be fairly simple, yet there is plenty of scope for additional detail to be added as has been seen on this site already. Once good thing about building a carrier borne aircraft in this scale is the useful feature of having the wings folded, thus taking up less space in the display cabinet. Construction starts with the engine build. The front and rear banks of cylinders are in two halves, each bank is then attached to each other and the push rods are fitted, as is the rear engine mounting plate. The crankcase is then built up with the addition of the magnetos and other ancillary parts before fitting to the front of the engine. The air intake manifold is the assembled and fitted to the rear of the engine followed by the complex arrangement of exhaust pipes which look quite fun to assemble and fit to each cylinder. The planetary gear case with the oil tank and sump moulded integrally is fitted with the two part battery and attached to the rear of the engine as are the very sturdy looking engine mounts. With the engine complete, the cockpit is then assembled. To the basic cockpit floor, with the side console shapes pre-moulded, the side console inners and tops are added, along with the seat, joystick, rudder pedals and instrument panel. The panel consists of a backing plate and clear front portion, onto the back of which the instrument decal is positioned. The instrument faces then need to be masked off before painting. When the masking is removed if should give the effect that the dials are behind glass. With the panel in place the rear bulkhead, having had the headrest attached can be fitted to the floor. Etched belts are provided for the lap and over-shoulder positions. To the completed cockpit assembly the main fuselage bulkheads fore and aft are attached. The foreward bulkhead also has the main engine oil tank, oil pump and fire bottle fixed to the front face, whilst the rear bulkhead has the fuselage fuel tank fitted to the rear face. The engine assembly is then attached to the front bulkhead and the whole assembly fitted to one side of the fuselage. The tailwheel bay is made up of the roof, sides and small front bulkhead to which the fuselage tail bulkhead is attached. The tailwheel itself is made up of the oleo, three part wheel support structure and the three part wheel including the rubber tyre. The tailwheel is then fitted into the well and the whole assembly fitted to its position in the fuselage. There are six further bulkheads fitted within the fuselage two of which are attached to the separate lower air brake well. With everything fitted into one half of the fuselage, the other half can be attached closing the fuselage up. With the fuselage closed up work still continues on the nose area. Firstly the two intakes are attached above and below the nose, aft of the engine; the lower intake is fitted with a PE grille. The two side panels aft of the engine are moulded in clear styrene, presumably so that the internal can be seen if one or both panels are left unpainted. The four nose strakes are attached to their respective positions, two per side whilst the cowling mounting ring is fitted over the engine and attached to the fuselage. In the cockpit the two canopy rails are fitted, whilst behind the cockpit two air scopes are attached. The engine cowling has the option of being posed open or closed as do the front and rear cowl flaps. If posed closed there is a very nicely moulded single piece outer cowl, into which parts representing the internal structure and front cowl flaps are fitted. Whilst this is a nice feature, it would be a shame to hide all the great engine detail. For the open cowling there is a separate nose structure into which the front cooling flaps are fitted, the support beam, two hinged panels and their gas struts. Moving back to the cockpit opening the coaming is fitted with a switch box and glued into place. There is a panel fitted behind the headrest and fitted with a support posts. The canopy slide rail is then fitted along with a blade aerial and the windscreen. The single piece canopy, moulded in clear styrene is a very complicated moulding and due to this does suffering from a mould seam which will need some careful sanding and polishing with something like the micromesh system before sealing in Kleer or Alclad aqua gloss before fitting to the fuselage. With the fuselage now complete work moves to the tail with the assembly of the horizontal tailplanes, elevators and rudder, each of which is in two halves. For the elevators to be posed drooped two small tags need to be removed first. The lower wing centre section is then fitted out with the main undercarriage bays box structures with cross bracing between the inboard and outboard sides. The inner wing cannon ammunition boxes are also fitted, as are the fold join ribs. The inner cannon are made up of the breech, with ammunition belt feed and ejector detail and a three part barrel and barrel bracket. The cannon are then attached to the inner wing between the inner and outer fold join ribs. If the wing is to be modelled unfolded then the three piece barrel can be replaced by a single, less detailed one. With the cannon fitted the upper wing parts can be attached. Turning the wing over, the flaps are assembled and attached to the wings by four actuators the choice of parts will depend on whether the flaps are to be modelled up or down. At this point the instructions call for the main undercarriage to be fitted, but it may be prudent to leave this until after the inner wing section is attached to the fuselage to prevent any breakages. As it is, the main undercarriage is each made up of the main oleo, retraction frame, gas strut, and front bay door. The wheels consist of the inner hub with separate brake piston detail, internal axle mount, a choice of spoked or solid outer hub and the rubber tyre. Once fitted to the wing the inner and outer bay doors can be attached. With the inner wing attached to the fuselage the side air brakes are fitted, again with the option of posing them open or closed. If closed then the internal panel and retraction jack can be omitted. The same goes for the underside air brake, just forward of which, on both sides a footstep is fitted. Right aft the two piece arrestor hook is attached, presumably in either retracted or extended position, but it’s not clear just going by the instructions. The propeller is then constructed out of a two part boss and four individual propeller blades. The completed propeller can be fitted once painting and decaling has been finished. The outer wings are now assembled with the wing cannon constructed in the same way as the inner wings guns and fitted into the gun bays built using the front, rear and side bulkheads with the ammunition boxes outboard of the guns. The wing lights, just inboard of the tip is fitted along with the wing join rib which has had the fold mechanisms attached, the type used will depend on whether the model is to be built with wings spread or folded. With the internal parts fitted the upper wing panels are attached, followed by the clear light covers and the ailerons. If the wings are spread then the outer cannon and ammunition bays can be shown with their access panels open. The completed assemblies can then be attached to the inner wings. Again, these can be left off until after painting and decaling, particularly if the wings are to be folded. Final attachments to the wings and fuselage are the various pylons. Alternative pylons are provided for the inner wing, dependent on whether the 2000lb bombs are to be mounted. Each pylon is detailed with separate crutch plates which is an item normally missed on kits, even in this scale. There have been some concerns over the type of pylons fitted to the outer wings, but having done a fair amount of research the kit pylons seem to match those fitted to the AD-4 during Korea. The kit has plenty of weaponry provided, including:- • Four M64 500lb bombs • Eight Mk82 500lb bombs, (not used in Korea) • Two M66 2000lb bombs • Eight Mk81 250lb bombs, (not used in Korea) • Two M-117 750lb bombs, • Eight M-57 250lb bombs • Four LAU-3 rocket pods, (not used in Korea) • Four SUU-14A/A cluster bomb units, (not used in Korea) • Sixteen 5” rockets • Two wing drop tanks • One centreline drop tank • Two toilet bombs, (not used on this model, but another sign of what is to come) So, whilst there is a large stock of weaponry in the box, very little of it can actually be used on an AD-4 in Korea. Still, the modeller should be able to attach a pretty unhealthy load. Etch Of all the parts on the small sheet of etched brass only five are actually used, the two lap straps, two shoulder straps and the intake grille. Although quite a thick sheet, it appears to be malleable enough to use without the need to anneal beforehand. Decals The two large decal sheets, one for the aircraft and one for the weaponry are both very nicely printed, in good register and opacity. They are quite glossy and thin, but some of the backing sheet is quite noticeable, although with a good gloss coat beforehand they should bed down well without silvering. The only real concern is the mottling on the surface, particularly noticeable on the Stars N Bars. Two aircraft schemes are provided, these are for:- • US Navy, VA-95, AD-4NA 515, BuNo127003 • US Marines, VMA-324, AD-4B 2, BuNo132364 The weapon sheet provides the yellow live weapon rings and placards for the M-64, M-66, Mk-82 and M-117 bombs, even though the latter two are not relevant for this era. The rest of the sheet covers the placards for each of the pylons. Conclusion I’ve always like the Skyraider and have been several in 1:72 and 1:48, but never thought I’d see one in 1:32, now we have two. This kit provides excellent value for money in my view, with some lovely moulding on the acres of styrene. The detail is great and should cater for all but the most fastidious of modellers, who can add detail to their hearts content as the basics are definitely here. It’s nice to see an early mark being released but it will be a challenge to weather the aircrafts overall dark blue realistically. Having got the ZM A-1H I think this kit complements the more complex product and as mentioned above is certainly more accessible to casual modellers, yet good enough for the more hardcore brigade. Highly recommended Walkround photos available HERE Review sample courtesy of1 point
-
Hello everyone again. After my fourth build since before time began, the Airfix F-51 in NMF ( http://www.britmodeller.com/forums/index.php?/topic/234939145-172-f-51-mustang-fourth-build-since-holiday/#entry1300965 ), I decided to do another NMF with stars and bars, because they're pretty, and I was on a roll with the NMF. So I chose the overly popular 'Triple Zilch' F-100D kit, made mostly straight out of the Italeri box that I got for £5 in a sale. This build very nearly started my own new shelf of doooooooom! Mess up after mess up. Then a general feeling that in no way did the out of kit decals match any image of the Triple Zilch I'd seen any where. Real life interfering a little too much. A 'crash landing' shortly after attaching the under carriage. Who knew how many extra kit bits you can create when that happens?! Loads of little things that drained any enthusiasm out of it and in the end I just wanted it to be finished.. please... stop... Just.. Be.. Finished. But I gritted my teeth and carried on and here it is, the very nearly a shelf of doom kit, 1/72 Italeri F-100D Super Sabre. Additions included: Master Pitot tube: I just love these things. Rob Taurus Vac formed Canopy: I thought I'd give this a try as they're cheap as chips. Not being used to vac form I messed up the front of the canopy but did better on the main. Zillions of these out there, but I still hope you enjoy looking at my meagre efforts once again. 5D2_1736 by IrritableRabbit, on Flickr 5D2_1759 by IrritableRabbit, on Flickr 5D2_1772 by IrritableRabbit, on Flickr 5D2_1765 by IrritableRabbit, on Flickr 5D2_1761 by IrritableRabbit, on Flickr1 point
-
This is a 1/48 scale Monogram model of the sleek and missile-like F-104 Starfighter. Back in the mid to late 1950's when this astonishing interceptor-fighter first appeared, it certainly looked like a spacecraft from the future, ready to blast off to defend the planet from Ming the Merciless or anyone. It most definitely was my favorite jet fighter when I was a small kid ! Here, it's in a bit later F-104C form with a camo finish which generally succeeded it's initial gleaming silver form. Of course, the Starfighter also served with several air forces and had great capabilities at low-level as a powerful strike fighter. Edited to add a P.S. : After I accidentally broke off the Starfighter's nose pitot tube when taking some snapshots, I painstakingly fabricated a detailed custom one from specially-alloyed aluminum. Ummm, in other words, I cut a length from a paper clip and super-glued it on to act as a stand-in !1 point
-
The stills from this film are what are normally found in various books. http://www.youtube.com/watch?feature=player_detailpage&v=t-P8NjcMemY Tim.1 point
-
The little Humbrol/Airfix/Scalextric/M&S kit. If you can get one from Ebay - buy it. A lovely, easy little kit - 34 parts! I built this one as the Rio 1969 car so had to print my own decals. I will get this little kit again and do another version at some point as I've now got the GT40 bug and fancy a little car park full of them. Apologies for the grotty pictures - new camera on its way..... Roy.1 point
-
Just asking for trouble, picking so many women at the same time. They'll refuse to fly together because they won't want to be wearing the same outfit!1 point
-
Kit: 1/72 Brengun Hawker Typhoon Ib Gun Barrels, Wheels, Rockets, Rails: Vailant RAF, 609. Squadron, Summer 1944 Thanks for your interest. Greetings from Vienna, Austria Roman Schilhart1 point
-
This is another model I've finished recently, Airfix's new tool Spitfire PRXIX. This was built straight out of the box and was a wonderful little kit to put together. I used Xtracolour enamels and Humbrol satin varnish to finish it off. Rob1 point
-
Here are the final pictures.. hope you enjoy them. For the build look here: http://www.britmodeller.com/forums/index.php?/topic/234931114-148-oa-10a-thunderbolt-ii-callsign-sandy/ And for all your comments, good or bad.. Shoot! Guess this on is really my favourite..1 point
-
Excellent work! I nearly missed the two sabres joke!1 point
-
1 point
-
I was thinking more of the taking the P bit of your post....1 point
-
I'm not sure that's always the rule. If the artist is an employee of the manufacturer, the employer owns what he produces; and even where it's a freelance arrangement, it's not unknown for the artist to have to assign ownership (not just reproduction rights) to the manufacturer. Just ask anyone who's worked in comics!1 point
-
Hi everyone, here is one of my builds, im very happy with this one, particularly the weathering. It turned out much better than i thought.1 point
-
I remember when I was first promoted to a job with a management grade. All it meant was I didn't get paid for overtime! Paul1 point
-
Arnold, thats fine by me. cleaning doesnt count (in my opinion any way) and wings together isnt a biggie (well it is cos I always mess it up but you know what I mean)1 point
-
Wanted a change from aircraft, so dug out a nice Panzer IVE, ideal for my favourite period - the western desert. I'll be doing mine as the option from the 5th Leichte Division, early in the siege of Tobruck, so one that was originally Panzer Grey, then sprayed in the field. A couple of hours of cutting, sanding and glueing - the running gear is all built up Then the first problem - managed to lose one of the idler wheel axles, so out with the plastic rod and plasticard and made a replacement. This does of course mean that next weekend i'll find the original piece. Finally for the day, made up the rear bulkhead Peter1 point
-
I didn't ponder too long, as that way leads to a shelved model. I added some Signalbraun and a little white to the basic Lifecolor pot to give it a browner hue, and I think it's kind of worked... it doesn't look as green as it did before anyway I also masked off the wing-roots to get a nice clean demarcation, and also masked off the nose, which I sprayed later, trying to give it a slightly different "style" of edge, to infer the grafting on and subsequent painting of the cannon nose. I tried to keep it subtle though, as no painter would intentionally misalign the edges if you see what I mean I'll play around with the base shade a bit, and then put the RLM82 splinter on the wings & tail. Would they really have been hard-edge, or more likely soft-edged at this stage of the proceedings? Thanks for the effort John Meanwhile the tiny terror has been in the workshop, and the Xtracrylix RLM81 bottle has done a Lord Lucan. I've been trying to find it by looking at the workshop from the perspective of someone that's around 3'4", but haven't turned anything up yet, so it kind of forced my hand. Kids! EDIT: Just found it, and it wasn't the boy - I was maligning him unfairly based upon past performance!1 point
-
Hi Aaron I don't mean to be cheeky by posting a Gazelle I built last Christmas. The floor of the cabin was actually made from lead sheet and it stopped the determined tail sitting dead in it's tracks. There are some gaps under the floor where lead can be attached so hopefully that might help. I hope it might help with the rotor linkage too. That's superb progress on this one so far! Here's the link. http://www.britmodeller.com/forums/index.php?/topic/234933549-airfix-172-westland-gazelle/1 point
-
Hi all Hope you are all well, been a bit busy lately finishing my garage (now fully insulated and lined and will be warm and cosy in the winter), got my beetle ready for sale and been working on my VW Fastback, so not been on properly for a while. I finished this one not that long ago and it is a pleasing kit to build, it goes together well. I have kept the weathering fairly light as this machine apparantly did not last that long before crashing unfortunately. Thanks for looking All the best Chris1 point
-
So after completing the Spitfire, and yet still fumbling about with files and scalpels, the missus finally realised something was afoot, and I had to admit I'd in fact been building two models simultaneously. Now the cast has been removed, I've re-started this one. Tonight's job was pinning the u/c legs and tailplanes. This is a short run kit, and as such there is little in the way of moulded location features. I decided to use brass rod to reinforce these parts, but the problem was how to align everything. I settled on this method which has worked quite well: 1, Drill the tailplane stubs: 2, Glue the tailplane on with dots of cyano: 3, Back-drill the tailplanes using the fuselage stub holes as a jig: 4, Snap the tailplane off, clean up the faces and cyano brass rod into the sockets: Finished, ready for final assembly and filling: The u/c legs and wheel wells were drilled 'freehand': Now to continue doing battle with the vac-formed windscreen which is an absolute bh to profile.1 point
-
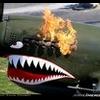
Hi Everyone, whilst I`m between builds, I thought I`d take the chance to show you the last of my Air Apache Strafers Revells boxing of Monograms 1/48 B-25J, done in the markings of the 499th BS, 345th BG AKA `the Bats Outa Hell` based in the Philippines, 1944 99% OOB with just some seat armour, belts and bits of wire here and there Messed up the nose markings first attempt as the instructions were misleading (or I misread them, more like) but luckily had the set left over from doing `Lazy Daisy` from the previous build Hope you enjoy looking at, Russ1 point
-
Great build Russ - that must have been one fearsome aircraft in its day! Always good to see someone creating a fine result from the older kits like this. Cheers, Roger1 point
-
Gorgeous. A set of Schneider racers would make a lovely collection. Cheers John1 point
-
Halifax MKIV, pics thanks to Steve N. This is the Halifax MKIV in the National Air Force Museum of Canada. NA337 was dropping supplies to resistance fighters in Norway in April 1945 when she was hit by German flak. The plane ditched in a lake, with only one of the five crew surviving. The wreck was located in 1991, and recovered in 1995. It was remarkably preserved, and nearly complete. The tail section had separated during the crash, and a section of the aft fuselage was missing. The exact chunk of fuselage needed was found in Scotland, where it was being used as a chicken coop. The museum spent ten years restoring the aircraft as a tribute to the Canadian Halifax crews. As it is a MKIV and used for dropping supplies it is fitted with a ventral hatch and towing gear at the rear wheel.1 point
-
Small world lol Any chance you know any single women in the area too lol1 point
-
53 comes to mind for the A400. They were the Shorts Belfast unit and had Beverleys before that; If you wanted a unit to operate a monstrous prop transport (possibly in quite small numbers), 53 would certainly look like the right number based on that history.1 point
-
HI im no expert mike,but dont you think ive gone over the top,on the weathering on the blue and white one on the right the one with the dull red nosecone?.lol cheers Don1 point
-
This sounds a bit nice & might well see my Tamiya Italeri one being put up for sale. I'd have liked it if they'd done a 15/KG40(?) one, as in "Bloody Biscay" but I guess my couple of sets of Third Hand decals for this should suffice anyway. Steve.1 point
-
Mike, Here you go: That one looks like the Heller box art (and my favourite): For more details access: http://www.dstorm.eu/pages/en/france/jaguar.html1 point
-
Am I correct in believing that KG.51 were using the A1 in September/October 1940.....On October 3rd one attempted to bomb my Aunt Phyll, but missed and hit Dowty MECO instead.1 point
-
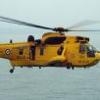
Next is the masking for the green cam. As can be seen, in the image below, I have scanned a side view of a Wessex; scaled it then printed it off. I then cut out the bits for the sand and stuck them to the model. This just left the areas for green exposed The door has been painted up and will be ready to attach once the decals are on. Exhaust outlets and some of the decals added - I mainly used spares from the Sea King kit by Sweet. I have just hit a snag; the decals for the letter 'N' (taken from an old SuperScale 1:72 F-111 sheet) have just disintegrated in while dipping them in the water. I have put a request for help in the Wanted section as I don't have any other source for that pair of letters. cheers Mike1 point
-
One of the first things I'll need done is the jet pipe, so I can make the cut-out for it in the vacformed parts. The metal parts look a bit rough when you start with them, but clean up quite easily:1 point
-
Today's work - first sprayed with AK Worn effects fluid, then sprayed with Desert Sand Then rubbing with them with a wet brush Spraying all the rubber for the wheels Then finally the first filters and washes Peter1 point
-
Okies, got the fuselage together, not rubbed down yet though. I thought I'd have a look and see what the pit looks like with the seats in place. I also painted the canopy sills black as needed and dry brushed them.1 point


.thumb.jpg.d17ff607fc7e89ed057e63fcb6f2a888.jpg)


This leaderboard is set to London/GMT+01:00