
Leaderboard

.thumb.jpg.87669a5ffb8b13672a3d675087a46d42.jpg)


Popular Content
Showing content with the highest reputation on 28/06/13 in all areas
-
Hi there Here's my tweenie. No, not the quick vodka between pints.....It's the monster I'd spend a week or two progressing between other builds. I'd also have a crack at it when a seemingly simple build would get a bit off course.......it would make me appreciate the simplicity of the other build. Planning my 1/48 WWII subjects I obviously needed a British heavy, but I was torn. Everyone's got a Lancaster and they're not cheap. The Halifax is ugly and there's only one very criticised kit available, so not an option I thought until one popped up for a good price on Trademe (local Ebay). I was up for the challenge........ So here she is, my interpretation of Friday the 13th, 2 years or so in the making. It's not perfect, and It's not as heavily weathered as I'd like but I'm scared to touch it again in case I stuff something up. I might dull it down a bit one day but for now, it's finished. Ice cream tub plastic to 1/48 Halifax.......what a journey. And now I quite like the Halibag. I hope you like it. Cheers Gaz Here it is with the recipient of it's spare tail turret.6 points
-
Hi all, I started this while I was finishing off my chippie and fancied having a bit more red & white in the cabinet. This is the second Academy Hunter I have done, apart from the much talked about issues with accuracy its a good kit. I used the Heritage correction set (pit/tail/wheels/seat etc) which is excellent and xtradecals to represent XF526 of 4FTS RAF Valley in the early 70's. My biggest beef with this kit is the intakes, I think I'll scratch build some covers to get over that! I think a Hunter without its sabrinas looks kinda naked! Cheers Simon5 points
-
Just adding to the flock of Vampires here is a little thing I have been working on for the last couple of weeks or so for my club BSK. Wee gem of a kit. Airfix starter set kit markings combined with a few stencils from the standard kit decals. I added handles for the ejection seats from fuse wire, but otherwise it's completely out of the box.4 points
-
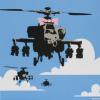
This is an old 1/72 Monogram model of the famous F-105 Thunderchief fighter-bomber. Republic's big craft was a real workhorse and was a capable and powerful airplane with it's Pratt and Whitney J-75 engine.. I completed this one many eons ago and, at the time, long before I owned an airbrush, I decided to brush paint it to my own camoflage scheme ! LOL, and since it still has a rather "jungle foliage" look to it, I decided to justify the look by postulating it's existence as one of a small group of very specially modified Thunderchiefs which undertook a highly-classified secret strike mission against a very high value target right up on the North Vietnamese border with China during the Vietnam War. Mission Accomplished ! But .... all we have are some snaps taken during the operation. Ummm, that's my story and I am sticking to it !4 points
-
This is my take on the Airfix Trafalgar class sub kit. Cut down to the waterline and mounted on one of Wilkinson's £1.00 photo clip frames. I have used Vallejo's acrylic water, Atlantic blue and foam effect..... I have been asked a few times how I do the "sea" in some of my models, so I will post a step by step when I get organized......... Smudge3 points
-
Hi everyone, I usually hang around over at ARC but I thought I'd show this around here a little. This is the Revell kit. I have scratch built a full-length intake, heat exchanger exhaust and many other little things. Aires cockpit and exhausts were added. The perforated intake splitter plate was done by custom-cutting the Eduard bit meant for the Trumpeter kit. The 3 Squadron decals are from Mark One. They are a little thick but the colors of both the squadron insignia and roundels look good to my eye. That said, I did cover the squadron insignia with a very light coat of gray to give them a more faded and hence period-accurate look. Stencils and data were from the excellent Two Bobs sheet. The stencils are far finer than what you get on the kit's decals sheet so in my opinion the Two Bobs sheet is a must for any 1/32 Typhoon, even if you don't do an aircraft covered by the sheet. Some decals were also sourced from the kit's sheet, which is very extensive. Selected decals, such as the warning triangles on the pylons, were again lightly oversprayed with gray in order to tone them down a little. The mission marks were custom printed. I also made 4x Enhanced 1000lb Paveways, these might be available as after-market items soon. Aim-132's are from Oz Mods, Aim-120 is from Cutting Edge. And now with exhausts and white stripes on windscreen: I have just added the exhausts, so the pics are a little exhaust-heavy. Thanks for looking, Marcel3 points
-
Just finished this new release of the Airfix Spitfire PRXIX in 1/48 The kit is fantastic to build with only the need for some small amounts of filler on the underside wing / fuse join,and I am still unsure about the canopy setup. The kit has been sprayed with a mix of Mr Hobby and Tamiya acrylic paint with Vallejo varnish. The decals being made up of a few different sets. Pre-shade was made with a few different shade of brown and green in a grafitti fashion, then German grey for the panel lines. With thanks to JamesV for the time and use of his studio we came away with these shots of the finished item. So for the confused, yes this is a PRXIX in BoB camo, why????? Well in the summer of 1968 a film was being made in England, France and Spain called the Battle Of Britain. Spitfire Productions Ltd had the contract to supply the aircraft for the filming and Spitfire PR XIX PS853 was just one of the XIX's used in the production, though still owned by BBMF at RAF Coltishall. So, instead of the common PRU blue I chose to use this machine as the subject (PS853), but allowing artistic licensing to have Airfix's camera bays open, and chose to spray the propeller set-up marking on the backside of the blades. PS853 shot by Tony Clarke during filming in 1968 Many thanks Mart3 points
-
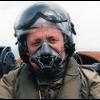
good evening With the last flights of the German F4F planned foron Saturday, June 29, I post a small retrospective(on my level, modestly!!) of certain models of thisfabulous device which will have marked severalgenerations of impassioned… This first this F4C is one from my 6 F4 at the 1/32,model TAM' with corrections of uses: rounded side window panels of avoids breeze,reinforcements canopy house, new seatsetc….painting humbrol 146 with the brush. Thevery beautiful lacquer ADC was perfectly brilliantand very resistant to the bad weatherand maintenance. They was the generations of thebeautiful US planes always very clean,unfortunately not very compatible in the field of airdefense .......3 points
-
Yes it bothers us and no we can't avoid reading it, your posts are everywhere. And please stop talking to us as if we were idiots.3 points
-
Hi All, I have started this new thread because I want to more broadly cover the things that Spitfires rest upon while on the ground. My intention is to cover/discuss the main undercarriage and tail wheel units as fitted to various Spitfire aircraft. While on occasion looking more closely at the specifics of Spitfire legs. To introduce the topic I will list the various types of struts as fitted on Spitfire main undercarriage and tail wheel units. Please note that the following list of main undercarriage and tail wheel unit strut types is incomplete (with some obvious omissions) and may even have unintended errors. This is due to the fact that for the moment this remains a work in progress and will be amended when I have time to complete it. The Struts Main Undercarriage Vickers Oleo Pneumatic Type 90273 (splined ram): Spitfire FI, FIIA, FIIB, FVA, FVB, FVB (T), FVI, PRIV, PRVII, PRXI & PRXIII. Vickers Oleo Pneumatic Type 91244 (splined ram): Spitfire FVA, FVB, FVB (T), FV, FVC (T), FIX, HFIX, LFIX, PRXI & PRXIII. Vickers Oleo Pneumatic Type 91244/L (torque/torsion link): Spitfire FV, FVC (T), FIX, HFIX, LFIX, FXII, PRXI, & PRXIII. Vickers Oleo Pneumatic Type 91545 (splined ram): Spitfire FVII, Spitfire FVIII & LFVIII. Vickers Oleo Pneumatic Type 91776 (forward torque/torsion link): Spitfire F21 Vickers Oleo Pneumatic Type 91901 (aft torque/torsion links): FVA, FVB, FVB (T), FV, FVC (T), FVII, FVIII, LFVIII, HFVIII, FIX, LFIX, FXII, PRXI PRXIII. Vickers Oleo Pneumatic Type 91986 (forward torque/torsion link): Spitfire FVC, FVC (T), FVII, FVIII, HFVIII, FIX, HFIX, LFIX, FXII, LFXVI, Vickers Oleo Pneumatic Type 92216: Vickers Oleo Pneumatic Type 92238: Tail Wheel Unit Vickers Oleo Pneumatic Type 90356: Spitfire FI, FIIA, FIIB, FVA, FVB (T), FVC, FVC (T) FVI, FIX, LFIX, HFIX, FXII, LFXVI, PRIV, PRVII, PRXIII & PRXIII. Vickers Oleo Pneumatic Type 91328: Spitfire FVII, FVIII, LFVIII, HFVIII, FXII, FXIV & PRXI. A Closer Look Spitfire Mk VIII Main Undercarriage Oleo Struts To start I will show some examples of the various main undercarriage oleo struts as fitted to Spitfire Mk VIII aircraft. There were three types fitted to the Spitfire Mk VIII series, they were Vickers Oleo Pneumatic types as follows; 91545 (splined ram), 91901 (aft torque/torsion link) & 91986 (forward torque/torsion link). In terms of fitment the Type 91545, 91901 and 91986 struts were fitted to FVIII and LFVIII Spitfires. While the Type 91986 struts were fitted to HFVIII Spitfires. In terms of scale modeling Spitfires if you intend to represent a Spitfire that featured either the Type 91545 or 91986 struts you will be catered for through kit or aftermarket options. If you intend to represent a Spitfire that featured the Type 91901 struts you will have to undertake some scratch building for no kit or aftermarket manufacturer provides such struts. The following pictures should give you some idea of what you are looking for in terms of identifying the various main undercarriage oleo struts as fitted to Spitfire VIII aircraft. Type 91545 struts feature no torque/torsion links, Type 91901 struts feature aft torque/torsion links plus full bounce cut outs on the upper and lower link sleeves and Type 91986 struts feature forward torque/torsion links. These variations can sometimes be hard to spot, that said what one must look for is the following points: the Type 91545 struts start to taper above the top of the tyre. The Type 91901 struts don't taper above the tyre and can appear as if there's no taper or a slightly larger portion above the tyre which is related to the angle of the observer, also when viewed from the side the full bounce cut outs can be seen. You will not see the aft torque/torsion links at all because they are hidden completely by the wheel and tyre. The Type 91986 are perhaps the easiest to notice since they feature prominent forward torque/torsion links that are visible above the tyre. This unidentified Eastleigh built JF500 series Spitfire VIII from 92 Squadron (Sqn) Royal Air Force (RAF) that first flew sometime between 19 March and 22 June 1943. As shown here was photographed at Triolo, Italy, during 17 November 1943. This aircraft is fitted with Vickers Oleo Pneumatic Type 91545 (splined ram) struts, note the taper on the strut above the tyre. On the far left is the Eastleigh built Spitfire LFVIII JF934/A58-315, which first flew 26 August 1943 and was subsequently received by the RAAF 25 October 1943. While next to it is JG467/A58-405, which was another Eastleigh built Spitfire LFVIII that first flew 21 October 1943 and was subsequently received by the Royal Australian Air Force (RAAF) 9 March 1944. These aircraft are fitted with Vickers Oleo Pneumatic Type 91901 (aft torque/torsion link) struts, please note that the strut doesn't taper and that the torque/torsion links cannot be seen while the full bounce cut outs are just discernible. Third in line from the camera is a Chattis Hill built Spitfire LFVIII JG3777/A58-395, which first flew 19 October 1943 and was subsequently received by the RAAF 7 February 1944. While closest to the camera in this instance is the before mentioned JG467/A58-405. Please note that all Spitfires pictured have Type 91901 (aft torque/torsion link) struts fitted and that the full bounce cut outs are prominent while the larger appearance sleeve for the torque/torsion links is identifiable. This unidentified Eastleigh built JF500 series Spitfire VIII that first flew sometime between 19 March and 22 June 1943. This aircraft as shown here was photographed at Nettuno, Italy, 2 February 1944 with Major (Maj) 0-727434 Virgil C. FIELDS, Jr. the Commanding Officer (CO) of the 307th Fighter Squadron (FS), United States Army Air Force (USAAF) in the cockpit (Fields was killed at Anzio, Italy five days after the above picture was taken). This aircraft is fitted with Vickers Oleo Pneumatic Type 91901 (aft torque/torsion link) struts. Here again the full bounce cut out is prominent on the upper sleeve for the torque/torsion links while the links themselves are not visible since they attach to the sleeve from this sight line below the tyre. Closest to the camera is an Eastleigh built Spitfire LFVIII MT726, was first noted at 9 Maintenance Unit 11 July 1944 and subsequently in India from 28 September 1944. This aircraft is fitted with Vickers Oleo Pneumatic Type 91986 (forward torque/torsion link) struts. Here the torque/torsion links appear prominently above the wheel well making this type rather easy to spot. It should also be noted that the wheel well and main undercarriage doors were modified to accommodate the forward torque/torsion links that would otherwise not had enough room for operation. Close Up Type 91901 Struts Shown below are some pictures of mine that reveal the Vickers Oleo Pneumatic Type 91901 (aft torque/torsion link) struts in close up. At some point in the future I will provide further information here within this discussion, until then I hope you find this post informative and appreciate what I have shared. Cheers, Daniel.2 points
-
Hi all, Some of you might remember the resin Airco 1/144 De Havilland DH-2 I had started on a previous post. I was given it as a birthday present by my sadistic brother in law & fellow modeller (Rince) who demanded that it be fully rigged. The parts, decals and what you could laughingly refer to as "instructions": The "cockpit" was just a round hole drilled into the fuselage, not that there’s much of a fuselage to speak of. I bored and gouged it out to the edge of the resin and fitted a seat, floor compass, pedals and joystick. There was no gun in the kit so I had to scratchbuild one, it's not great but it will do. Unfortunately it is all so small that it can barely be seen but it is there! Starting the rigging: I used invisible thread and had a horrendous job getting it to stick to the CA glue and anything else but no surprise there. The original resin boom parts fell apart so I had to make new ones from styrene. And the finished item (plus gun), painted in Tamiya Acrylics: It's not very big: I've lost count of the number of bits I've broken or lost. There is a crazy amount of rigging on this model and the rigging spiders are now fully on strike and point blank refusing to do any more modelling for me in this insane scale... And so are my eyes. I hope you like it. Constructive comments and criticisms welcome.2 points
-
Returning to the hobby after some 20years, first stop a Spitfire. Lots of catching-up to do, lots of new tools to use and new techniques to adapt to, The depicted model X4474 is one of the latest MK.I to be in BoB, with most obvious feature is the lack of the triangular prong on the antenna I also assumed it had the latest 'plastic' seat. Right of the bench... There are a few mistakes I made that I am aware of, but that is the way to gain experience, got to live with it2 points
-
The FR. IX was the PR version of the Mk. IXc. It is the Airfix new tool kit, with Pavla´s cockpit and exterior detail set. It represents a plane from the 16th Squadron, in France, on september 1944. It was painted with Xtracolor PRU pink with Barracudacals decals. The PR. XIX, also a new tool Airfix kit, was modified for an early version (type 389) and a little of scratch building was made. Humbrol´s PRU blue (230) was used as base color and Xtradecals supplied the markings. Hope you like it. [url=http://s87.photobucket.com/user/citrico/media/Spitfires%20PR/P1000987_zps207fefcb.jpg.html]2 points
-
The canopy's come out really well, especially the blown section. I can't see any sign of the scratch in the pics either. Off topic again! The 10 was much slower low down than other airliners. We could only do about 330 kts and that varied with altitude back to about 320 at 20000ft I think. The Anglo cargo 707s used to whizz away from us in the descent into Akrotiri during the Gulf. Up high we cruised at .86 like the 747 although the powers that be wanted us to do 84 to save fuel. It did burn a bit more at 86 but not as much as the tables as it was more stable so less throttle pumping for the Eng (no auto throttle). Mno was .925 when I joined the fleet but an Mne of .96 was introduced shortly after. The only scenario I could see for using that was possibly the tanker boys running away from a fighter? To make up ground a fighter would probably have to be supersonic and in burner so using horrendous amounts of fuel and hopefully getting short before it could get a shot away. Purely my best guess. We did some IR trials at Bedford for a couple of days flying past monitors at various heights,speeds,configs etc. 300 kts at 100 ft certainly got a few spectators out! A big wing over to about 5000' and back for the next run. Our ex Firebirds skipper was in his element! No idea what the results were but it was fun! Cheers Glen2 points
-
Lest anyone be misled, this is not the view of Parliament. It's a very useful statement of the law by a neutral researcher who is employed to write this sort of stuff to help Parliament understand what it's complaining about. Sometimes they even read it!A very brief summary: a gift voucher is effectively a slow-motion version of a cash transaction. Person A hands over cash to the shop, and in return gets not goods but the right to take some goods away later. Person B is then given this as a gift. This means the shop owes Person B some goods, which means that Person B has in effect lent the shop some money and is now in the position of a creditor. In normal circumstances this resolves itself to nothing at the point of redeeming the voucher. In administration, though, the shop's debts exceed its assets, so it has to sort out what it owes to its creditors before it can go any further ("administration" is the task of administering this process). Holders of gift vouchers are unsecured creditors. This means they have no pre-specified rights to the shop's assets and have to wait their turn, and then take a share of whatever is left once the secured creditors' debts are settled. So they're at the back of a long queue and are at the same time holding the mucky end of the stick. MZ's administrators are well within their rights to decline all gift vouchers. The Great British Public (as proved in the case of Comet) either can't or won't understand that this is legal and complains about it. But being unwelcome doesn't make it unlawful. However, it's not obligatory, and the administrators can treat vouchers differently, so long as it doesn't interfere with the rights of secured creditors. The scheme described earlier seems to be quite imaginative: it simultaneously keeps punters on-side while helping to bring some cashflow in at a time when it's desperately needed. So, the idea is legal, and is a pretty good offer compared with the way some gift voucher schemes have collapsed. On the other hand, if anyone offers you an MZ voucher now, run away.2 points
-
The big problem with running a retail chain of model hobby shops is price vs location. To get the foot fall needed to generate sales you have to be where the public is - and that means shopping centres and malls ( dad/ son go to modelzone while mum/ daughter go clothes shopping). However shopping malls tend to be expensive to lease space in ( or at least more expensive than the shop at the dead end of the high street), so you need a high turnover of product to keep the cash flow going. Models in boxes take up quite a lot of space, never mind large RC tank and car boxes or large train sets, so to offer a decent range you need a biggish space - hence more rent to pay. You also need to shift the stuff quick because old stock sitting on shelves actually has a negative cost for the seller ( it costs money to leave something sitting on the shelves) and if you make repeat visits to a shop and see the same old stuff sitting there it tends to put of buyers ( "nothing new again in Modelzone") Hence you have to get your pricing spot on to encourage sales. To mind mind this is where Modelzone have come a cropper. Initial prices at pretty much full retail - which everyone knows are too high: Followed by ridiculous cut price sales: Ergo - customers know to wait until the sale prices hit. So effectively what you create is an expensive show room for sale priced items. When you couple that varying standards of employee knowledge and interest in each shop, then you have a recipe for disaster. If you try and expand your way out of this you are doomed because all you are doing is repeating the same mistakes at even more, expensive to lease premises. The other big mistake Modelzone have made is to assume that plastic modellers are interested in RC or trains, and vice versa etc etc. Hell most aircraft modellers arent even in interested in AFVs or cars or ships!! So having all these items under one roof just dilutes the appeal for all, You dont get any crossover snap purchases I bet at Modelzone - which of course is what a lot of retail shops want to tempt you into ( Mom went into clothes shop for a dress but came out with new shoes and jeans too: Dad does NOT go to Modelzone to buy the new Airfix Spit XIX and come out with a 1/16th scale RC Tiger tank too. Ever - I bet) just my thoughts Jonners2 points
-
2 points
-
1 point
-
Morning all, this is my latest tiny project, the tamiya uss bouge set as cve 21 uss Block island. The idea came from a picture of the uss Bismarck Sea replenishing aircraft from barges. Picture visible in "escort carriers in action" by squadron , and larger in "aircraft carriers" by Roger Chesneau books. Barge, crane and fresh food trawler are scratch. Just some etching railings and some weathering to add a life, that's all. Calm harbour sea is watercolor card, with a shallow-water effect made with some transparent filters i'm testing.1 point
-
Hey guys! Here's my latest completion, Eduard's Fw190D-9 with the Ta152 tail. WIP here: http://www.britmodeller.com/forums/index.php?/topic/234941449-148-eduard-fw190d-9-late-the-infamous-brown-4/ Okay, a quick rundown of the build: Cockpit: - Ultracast seat - Quickboost control column - Various scratch details - Color PE instrument panel repainted to match cockpit - Coaming pad built up with Mr.Surfacer Exterior: - MDC spinner/prop blades - Quickboost exhaust - Ultracast wheels - Quickboost pitot tube - Aires cowl gun barrels - Hypo tubing for wing root gun barrels - Exhaust shield and wing root stiffeners added from styrene - Tamiya canopy/headrest/armor - Tamiya morane antenna, end replaced with wire - Staple used for DF Loop antenna - Wire used for FuG25 antenna and gear indicators - EZ Line used for aerial antenna wire - Brake lines added from wire - Gun camera drilled out and filled with Krystal Klear for lens - Additional rivets added Paint: - Mr.Color lacquers thinned with Mr.Color Leveling Thinner - Alclads for metal surfaces - Exhaust stain done with Tamiya acrylics - Crosses and swastikas painted on with Montex masks - EagleCals #126 used for remaining markings - Vallejo Matte Varnish for flat coat - Prismacolor colored pencil for light wing root chipping You can also see more here: http://www.facebook.com/BrewerModels1 point
-
Pinned.1 point
-
Yeah, thinking about it Sean, I built one around 1980 something as a lad and thought it was a cool kit then, had this one in the stash for a couple of years so maybe time to dig it out! cheers Simon1 point
-
Oops ... I could be wrong then. I thought it was a 707-120 but now I am not so sure. Apologies for misleading you.1 point
-
Another big mishap occurred.. a piece with CA glue on it flew into my canopy.. in the most forward part of the windshield. Almost impossible to get out, but after breaking off one of the instruments hanging in the windshield I got enough room to remove it. But off course the paint was gone there too. I finally figured I could use some small flakes of black dry transfer and did so. I am not entirely happy about this at all, and I think it really stands out, but I can't make it better than it is now. Normally you hardly see it.. but as for me.. Aaarghh.. drytransfer is very thin and brittle.. the damage on the instrumenet coaming is really really obvious in this picture.. At the arrow I drilled a 0,3 mm in the rivet.. to get the missing part again onto the top of the windshield.. et volia.. easy trick to perfectly align the mirrors.. ACES2 into the tub.. Now with the canopy on.. Altogether Sandy is done.. Final pics will follow soon, since this monster is too big to fit into my mobile photo studio..1 point
-
Closer shots would reveal how hopelessly inadequate I truly am, but which in particular did you want to see?1 point
-
Brilliant model, great looking aircraft.1 point
-
I love a "dirty bird", and this spit looks great. I completely understand where people are coming from if they don't like it as much as it maybe considered less realistic. But, for me, I think it adds so much interest and detail to the model, and gives each model a bit of a story just by looking at it. If I weather a model a bit, I think it looks more realistic than if I do a clean build, which just looks like a toy. I guess there will always be that debate between art and realism, but this model looks great. Keep 'em coming, I'm really enjoying this build!1 point
-
Some update: That's all for while! I'm waiting for the brown paint dry overnight so I can mask if to paint the green colour. Cheers Paulo1 point
-
That's a really nice build of a classic aircraft. Well done. Confession......I had to Google Sabrinas ! Gaz1 point
-
Beautiful finishing Simon. Looks gorgeous.1 point
-
Really nicely done, the scheme pops out the screen!1 point
-
Brilliant finish, especially as it was brushed!1 point
-
That's maxing out the fun for one quid!1 point
-
I believed you. Not half so impressed now Yep - all your fault I've got a mini squadron of JPs in the attic. Aeroclub mk3 and mk5 - Heritage mk3 and Fly mk5. Also got the Airfix mk 5. I still bought a few kits even though I hadn't done any model making for years. I think I will have a go at a JP - it's been fun doing the chippie in 1/72 so I'm thinking at the moment I'll do the Airfix. That said. Chronologically I should do mk3 first. I think there's a resin mk 3 around but not an injection molded one? Oh - I don't know. Decisions - decisions.... On the other hand I've got a little resin 1/48 Cap10b from a french company - which I bought at Telford last year. It's still tiny - but I might do that next in the colours of the Cap10 I used to fly at Sherburn. There's only a few bits and it might be a good intro to resin. Anyroad up. Just had time to take the masking off last night. Off to the Shetland Islands tomorow for a week's walking etc. so been busy at work and packing. Here we are: No creep to speak of so your off the hook Bill (great tip about the klear - never doubted you for a moment!) Haven't had to to clean it up properly yet and as you can see there's a bit of sticky stuff from the Tamiya tape on the clear panels to clean up - not a problem with my trusty micromesh ona stick tool. There is one thing though. See the bottom photo - forward clear panel on the port side. You can just see a vertical scratch. Wasn't there before I masked the canopy - I don't think - looks like a scalpel cut. But it's not a the edge of the panel and the only cutting I did with the scalpel was at the edges of the masking. Don't understand. Not sure I can do anything about it. Might be able to polish it out a bit with micromesh? Don't know whether a dip in Klear will make things better or worse (I was planning to dip it in Klear again anyway). It's a pain because the canopy has survived the masking and painting as well as I could hope for. Steve1 point
-
Gift Vouchers & cards.......Parliament view... http://www.parliament.uk/briefing-papers/SN065401 point
-
A superb job on this terrific-looking Israeli fighter, Brian. A drawn-out construction schedule clearly makes no difference at all in the top quality of your builds ! She is presented here in fine photographic form, with the foliage behind the runway hardstand adding an ideal outdoor look to the whole scene. Mike1 point
-
I built Tamiya's awesome Dragon Wagon straight out of the box except that I just detailed the armoured covers hold back latches with some scrap card, and I replaced the M2 .50 cal with one from Accademy. The kit comes with etched parts and chrome plated light reflector dishes. Also included is chain, cord, and vinyl pipes. The model was painted with Tamiya acrylics and Humbrol enamels. I deliberately went for a mis match of olive drabb between the tractor and trailer to suggest a bringing together of different units. Weathering was a done with washes and filters and pin washes with Raw Umber oil paint. The dried on mud was achieved by stippling on Humbrol model putty thinned with liquid poly. The Sherman came off my shelf of shame. I'd started it for an Ardennes project. It is the Tamiya kit with a partial resin interior. Thanks for looking.1 point
-
LONG awaited update!! Yes, I'm doing some modelling... Very rarely these days get to do any, my work load is just stupid and as it's my own business I have to put 110% towards it.. Anyway, it's primed, I was going to go for an El Salvador scheme but have decided against it and just doing it OOB with kit decals.. Blue on tomorrow hopefully!!1 point
-
That looks great, I spent a big part of my childhood watching these aircraft going round in circles above RAF Valley. Despite its supposed faults, it still looks like a Hunter to me.1 point
-
lovely colour scheme well done Glenn.1 point
-
Cheers goggsy, no, they're not the best fit, needed a bot of fiddling to get them right, I have heard that fixing the wings to the fuselage halves before they are joined helps, may try this on the next one! Si1 point
-
to be honest i'm no business man but for me personally it's the only place I can go and actually physically actually pick up a kit as the local hobby craft doesn't have that big a selection.And as someone as said where do kids go to actually look and want to buy a kit,surely for our hobby any closure is a bad closure!1 point
-
No smoking here, Miggers! Survived cancer once, not much interested in doing it again! The kit just said "buy me!" Cheers, Bill1 point
-
ive got the engine all done and on its bearers and firewall .i used a mix of tamyia red brown and black for the base engine colour , and then black for the hydraulic boxes and some pipes. raf grey for the other piping and cockpit green for the firewall and bearer .... the pipe is a mix of .5 and .3 lead wire .... just a touch up to do and a wash .....1 point
-
Make a set of wing tips you big girl1 point
-
Looks great, just don't mention infra red. I was reading a book on the WW2 Long Range Desert group recently. And, Given that part of Star Wars was filmed in Tunisia. It seems that there was, or still is, a place there called Foum Tatahouine. Not a lot of people know that. Pete1 point
-
Come off it Rod. I thought you were with Cathay? Two words - Kai Tak? I would also bet there were a few storms over the South China Seas, Indian Ocean or South Pacific that made for interesting times? Line shooting - How about the - there I was 90 degrees of bank - head in the cockpit - slewing the moving map display to get it somewhere near reality (GR1 Jag so NAVWASS) when the rad alt low height warner set at 70 ft goes off.........Trouble is every Jag driver/Harrier driver has got one or two of those. Hey Keef. I nearly didn't go back to OT at Cranwell after 2 weeks cos I was homesick and missed my mum! (seriously- first time away from home an 18 years and 2 months old). She obviously wasn't missing me though - cos she sent me back! Anyway - I bet they were good - and not stupid - reasons at the time - and from what I was told by the University types the UAS and the bulldog was great fun. Steve1 point
-
AVRE Churchill, update. Hi all. Well iv'e started. Here are some pics of the first steps. I have found everything has been a very nice fit so far, and the instructions are clear enough. although when it come to the bolt heads, a little more research was needed. going for the early version, so i am pretty sure i have got it right so far. Have had a little trouble with the PE track hangers, found it dificult to get the curve in them. may have to replace these. . going well upto now, so i shall plod on. any comments welcome. Thanks for looking.1 point


.thumb.jpeg.2a5a0ae44e3ad82fc22cd64c7474d409.jpeg)


This leaderboard is set to London/GMT+01:00