
Leaderboard


Popular Content
Showing content with the highest reputation on 11/06/13 in all areas
-
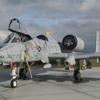
Here’s another of my collection of F-8 Crusaders, a 1/48 Hasegawa F-8E. I finished it in the markings of 'Superheat 210', a jet flown by VF-162 commanding officer CDR. Richard Bellinger from USS Oriskany, when he downed the Navy’s first MiG-21 of the Vietnam War in 1966. I used a mix of Eduard and kit decals, a Cutting Edge cockpit, and Aires resin gear wells and underwing bay. I scratch-built the boarding steps and ladder, and added brake and hydraulic lines to the gear. In the cockpit I added a flap handle and emergency canopy release to the insturment panel, a grab handle and standby compas on the windscreen bow, and added a canopy restraint strap and the canvas cover to the hole in front of the gunsight. As per my research, the jet carries a dissimilar weapons load of an AIM-9B and an AIM-9D, since there was a shortage of the newer sidewinders at that point in the war. While Hasegawa's F-8 is the best in 1:48 scale, I had numerous fit issues, most likely due to all the aftermarket parts I added and my own building errors. It’s no contest winner, but it’s finished, and on the shelf!3 points
-
Finally took a picture of progress now I've finished the cockpit & gear bays. I've also painted up the exhaust too, and using our walkaround, I attempted the latticework pattern that you can see feintly on the pic here: I used some Jammy Dog 0.5mm masking tape laid down in similar pattern to the pic, sprayed a slightly darker colour and then over-sprayed with some of the base colour. The tips were darkened a little with some Alclad Jet Exhaust, and the inner was given some coats of orangy beige to finish off. The rear section at the back will be painted boxy colour later, but for now it's just overspray The cockpit was nice & simple to do, and the decal settled down perfectly with some Gunze Mr Mark Softer. I suspect the pit is a mixture of old & new layout, but can't say for sure, and don't have the time to find out The gear bays are also pretty simple, but the small parts needed some adjustment before they'd fit. I drilled out the lightening holes in the little tirangular parts, but whether it was worth the effort, I don't know. There's a lot more tiny pipework you could put in there, but again, it's a simple build for a simple person I've also painted up the exhaust tube & burner ring which I'm just about to put together, and the outer bays have been given a coat of grey, a wash, and are waiting for a coat of matt - I forgot when I was doing the rest3 points
-
Screw the box art! It's only a painting. They could show the nose painted red & the rest of the aeroplane in McGregor tartan for all I care! Get me to the CONTENTS!!3 points
-
Just made a start on this kit, I did intend to build one for the group build but I ran out of time! The kit looks very nice and looks like it will be a lot less work than the C-17! The main problem with this kit is that despite what it says on the box, it's not a K.2! It is a mix of K.2 and C.1K. Although this kit will be built as a C.1K (XR808), I will point out along the way, the alterations needed for each version and the corrections needed for both. It never ceases to amaze me how Anigrand managed to cram such large aircraft kits into relatively tiny boxes! The kit appears to be based on the A A P Lloyd drawings and matches them very closely...... ..until you get to the nose and cockpit section! The resin is quite thick and very well moulded with only a couple of small air bubbles to fill on my example. There are large locating lugs that will aid positioning and strengthen the joints. The following is a correction needed for both versions. I made a start on the cockpit, it's not too difficult to correct, the outline looks accurate and only requiring a couple of cuts and a small amount of filling and filing. The section above the cut line was removed and raised to match the plans. The cockpit interior acted as a support for the upper section and aided the filling of the resulting gap in the nose section. With the upper nose section raised, the cockpit windows are now at the correct height but the line is wrong. To get the window line right and the roof outline correct, I removed the shaded areas The result is a much better outline and cockpit window position. The fuselage has been positioned off the drawing to compare with the outline. With the exception of extra detail work, as it stands, the fuselage is now correct for a K.2 More to follow tomorrow!2 points
-
Morning all, this is my latest tiny project, the tamiya uss bouge set as cve 21 uss Block island. The idea came from a picture of the uss Bismarck Sea replenishing aircraft from barges. Picture visible in "escort carriers in action" by squadron , and larger in "aircraft carriers" by Roger Chesneau books. Barge, crane and fresh food trawler are scratch. Just some etching railings and some weathering to add a life, that's all. Calm harbour sea is watercolor card, with a shallow-water effect made with some transparent filters i'm testing.2 points
-
...with apologies to Viv Stanshall for the title, I couldn't resist it! If you don't know what I'm talking about see HERE This is the brilliant Wingnut Wings Sopwith Snipe with Pheon Decals 'Post War Sopwith Snipes'. There is a build log Here so I won't repeat anything but to say that The Snipe was a late first world war fighter that went on to serve in the Post War RAF. 'Bonzo' was entered by RAF Halton in the 1923 Duke of Yorks Air race, as part of the winning team. A Bristol Fighter and Avro 504 were the other team members. It is one of many options on the Pheon sheet, which you will want to treat yourself to if you either plan to get, or already have in the stash. Here she is, one of the most enjoyable builds I've had in a while, I hope you like her. I bought a lovely resin pilot figure from the MDC stand a this years Cosford show, and have painted him up to stand with the Snipe. This is a bit scary because the photo is bigger than than the real life size of the pilot. Ready to climb in and fly! Thanks for looking. John2 points
-
Hello again everyone Here's my Revell 1/72 Dambuster Lancaster, finished as ED906 AJ-J, the one flown by David Maltby on the Dams Raid. His Navigator was F/Sgt Vivian Nicholson DFM, who was from Sherburn, County Durham, about 2 miles from where I grew up. Paints are airbrushed Xtracrylix, decals from the kit and Xtradecals. All the walkways were masked and airbrushed. The kit has a new cockpit, new turret interiors with gun barrels from Quickboost, bomb bay rear from the Airfix kit, and last but not least, new intakes to replace the horrible wide ones in the Revell kit. What is it with Revell and RAF WW2 heavy bomber intakes... New rear turret interior: and the front turret interior: The revised engine intakes: As you can see, the Revell ones are waaayyyyy out. I chopped an Airfix one in half, added an insert and cast new ones. I've never done casting before, but found it a very satisfying exercise! Replacement intake in situ: And on the finished model: One thing I didn't correct was the supposedly questionable dihedral of the wings - I think it looks fine, and to be honest I'd had enough by then!! All in all, about a year's worth of work. Blooming typical that soon after I finished it Airfix announce a state-of-the-art, and accurate, Dambuster Lanc... Regards Simon2 points
-
Hi Folks, here is my Hasegawa 1/72 Fw190 A5 built a few months ago alongside my Fw190A6 but only finished today. I had problems with the kit's decals so had to source replacements for the red markings on the top cowlings hence the delay. Painting using Mr Hobby Acrylics, I've added gun barrels from brass rod and an aerial other than that it is OOB. The resin air intakes came with the kit. And with another of Graf's aircraft Duncan B2 points
-
A few more pics,showing the added sidewall detail. Now to get the fuselage closed up and make some progress on the airframe Shaun.2 points
-
Hey Ho ! So I borrowed a camera from work over the weekend and tried to have a better crack at taking pics of my builds.......still getting to grips with it all. Here are my first 2 (or 3 !) Hawks. XX188 and XX233 (pre and post the respray to mostly red). 188 has the Eduard photo etch treatment while both 233s are mostly OOB except for a couple of minor correctional modifications and Xtradecal bits. I had to buy 2 red arrow kits so that I could cobble the white stripe decals together so as to make the line solid on the side of the fuse like they were in the good old days. I had a wee attempt at doing the canopy MDC on the first one and wasn't happy with the result so I left it.....and of course the others have followed suit. I've got an Airfix one as well, but to be honest I prefer the crisper detail of the Italeri version. Comments welcome, good or bad.......enjoy. Cheers Gaz1 point
-
hi guys here is tamiyas redbull rb6 2010 f1 car done and finished started in jan finished this morning here is the porn i tried to do th eabu dhabi car but didnt do enough research on it before hand so there are some bits not quite right on it also due to a little angle on of the hub decals is a bit messy but the wheels are stayin on so it doesnt matter to me the colour is ts51 i think it was the old telefonica blue but i like this better than the actual colour its ment to be as tamiya recommend a colour that is rarer than hens teeth in the uk overall im happy with it and will make a fine addition to my ferrari f10 all comments/critisism welcome so feel free1 point
-
Evening everyone Well Ive completed my 2nd ever build and as the title suggests its the fabulous Eduard 1:48 Spitfire Mk IXc. Its been built OOB except for the Brassin wheels and the addition of fuse wire to areas of the cockpit. The build was fairly painless but I do think that items like the exhausts are over engineered (in my opinion) but once completed they really look the part. I did make some mistakes during the build, but they were my fault not the kits and I'm going to keep them to myself. The build thread can be found here http://www.britmodeller.com/forums/index.php?/topic/234940732-another-eduard-spitfire-mk-ixc/ Would I build another? In a heart beat! Everything about it oozes quality its certainly on par with anything the other major manufacturers can produce. What would I change? The only thing would be not to use Citadel paints for painting of the major parts as it lifted when I removed any masks and that was after I'd applied a gloss coat to seal it, but apart from that nothing springs to mind. Hope you like what you see and please give any feed back as you see fit. Yours aye Iain1 point
-
Well it's been a long old build but here she is! This Annie depicts a late war Air Transport Auxiliary bird that flew ferry missions throughout the war and eventually flew to the continent, picking up a lot of wear and tear during its career. It is based on Anson N5334 which (I think) was at White Waltham. Ansons used by the ATA were worked extremely hard and never really got any lime light for their efforts. They ferried ATA pilots all over the UK, without radio or instrument flying capability. Following D-Day many Ansons were stripped out and used to fly medicine, newspapers, ferry pilots and even champagne to the continent. On their return leg they would bring back ferry pilots, POW's and the occasional "duty-free" item when no-one was looking (motorbikes, bicycles, cigarettes, etc...) I'm going to put this a/c in a diorama that will be to follow... Ben.1 point
-
Greetings from Italy! Here you are few pictures of my last job. It is the nice Italeri Macchi C.200 2a serie built OB with just some additional detail on cockpit and engine. The model represents an aircraft from 386a Squadriglia, 157° Gruppo, based at Torino Caselle airport in summer 1940. The cosed cockpit is typical of early building series of the Macchi C.200, but due to complaints from pilots soon it was modified into a semi-opened one that became the most popular configuration. "Next one please" is more or less the translation of the motto written on the fuselage together with the emblem of the 157° Gruppo. Please apologize the poor quality of the pictures... I've just a very basic camera... Comments and suggestions for improvements are most welcome. Ciao1 point
-
Standard kit http://www.airfix.com/shop/productimage/?ImageID=235627 Also decal options, No 1 Squadron and No 20 Squadron http://www.airfix.com/shop/new-for-2013/aircraft/a03003-hawker-siddeley-harrier-gr1-172/ And No 3 Squadron in the starter set http://www.airfix.com/shop/new-for-2013/aircraft/a55205-hawker-harrier-gr1-starter-set-172/1 point
-
This is how they appeared at the finish line at the 1966 Le Mans. The kits used were Revell (Fujimi), refinished in PPG, DuPont, and Plasti-Kote laquers; after market gumball and stripe decals; painted on ID graphics; clear coated in Du-Pont urethane; wheels were done in metalizers and gold floquil paints. The most time consuming job was detailing 700+ seat gromets. It was a record brekaing two weeks build for all three cars. 1st Place Shelby American Inc. Chassis #1046 Driven by: Bruce McLaren and Chris Amon 2nd Place Shelby American Inc. Chassis #1015 Driven by: Denis Hulme and Ken Miles 3rd Place Holman and Moody Chassi #1016 Driven by: Dick Hutcherson and Ronnie Bucknam1 point
-
Just finished this bird. Building tread http://www.britmodeller.com/forums/index.php?/topic/234938099-148-fw-190a8-italeri/ Hope you like it1 point
-
Jog on!!,that's never a 1/72nd scale La-7 . That is seriously,seriously nice,an aeroplane that we certainly don't see enough of. I hope your wife/girlfriend didn't mind that you'd ruined her stockings for the antenna wire .1 point
-
Wonderful, I actually had read your post twice to make sure you had said 1/72. Together they make a lovely pair, Sean1 point
-
Managed to do a bit more work on the lower fuselage this morning, I plugged the holes for the centre-line tank with some stretched sprue. The photos of this aircraft show it as not fitted. I also made a start on repairing the damage to the side........... ...... and added a box to house the searchlight, then used a Little Cars lens for the light.1 point
-
Let's NOT get into another slanging match over box art after the way the HU-16 topic went off the rails.1 point
-
great job, one of my favorite aircraft.1 point
-
The 388 arrived!!!!! :yahoo: :yahoo: am in love with it! no matter what IT WILL BE build next year, either as a GB or as a WIP, judging by the size an beauty it may become an epic WIP build to do it justice. Which means I need more resin if this build gets up!!!1 point
-
It depends on wind or gravity or both, which ever is strongest. Most birds parked in hanger have rudders that drop outwards as the hyd pressure drops. Shaun.1 point
-
Thanks All it was fun and one Mosquito is almost done Les1 point
-
1 point
-
Around Christmas/new year is normal. Trevor1 point
-
Very nice, my favourite is white over red, all good though.1 point
-
Now I do like that, lovely job......... Dave1 point
-
Very nice work1 point
-
Hi folks, after years of resting partially built I finally finished this bird. It's older 1/72 CMR kit done in marking of 802.NAS, HMS Glorious. Being one of their early effort the built was challenging at places and some things were beyond my patience to be corrected (e.g. sit of the upper wing). The paints are Alclad II Semi-Matte Aluminium for Al Dope and the same paint mixed with Gunze H324 Light Grey to create the Anodic Grey. Cheers Libor1 point
-
Ah, a Crusader...what a beautiful aircraft! And a right beautiful model too! Excellent detailing in the gear wells. And the boarding step is cool, I've not seen one of those before. Cheers, Bill1 point
-
Gaz, Very nice! Congratulations. CF1 point
-
Lovely, especially the Valley one. Pete1 point
-
Indeed! It's been lay on its back in the English Channel for over seventy years. I doubt I'd look as good in similar circumstances.1 point
-
Lovely Hawks!1 point
-
great composition and a great finish' 10/10. regards oz!1 point
-
1 point
-
Thank you1 point
-
looks great1 point
-
Nice collection. Like the Red and White one especially. Good work.1 point
-
Very nice indeed.1 point
-
The only thing considerable around here is my waist! It will be a challenge for me as I'm not much of a biplane nut. I figured why not start with a big one? If you're going to go down, make the flames big and show them on a public forum! Cheers, Bill1 point
-
Excellent build/finish and displayed Centurion1 point
-
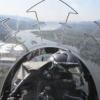
Alright. I've been unable to do much the last few days due to a family loss. However I did detail the seats. So this is what I'm going for: (image courtesy of ejection seats.org) Here is a lineup of the seats: I believe its academy-fujimi - Hasegawa - and modified hasegawa I don't like the flanges at the top I added so I'll probably replace them with a thinner version. Then I added some "fabric" using my favorite putty, Mori-mori. It goes on in a way that makes it easy to make it look organic (ie fabric-y) And here is them after some sanding. Next up is priming, painting and seatbelts, and then the pits themselves. Thanks for looking.1 point
-
Right chaps. The 2S1 is on both tracks now, only a couple of parts left to add such as the headlights and tow/recovery ropes. Quite a lot of titivation left to do but I can almost smell the primer Don't take this build as being anywhere close to accurate, it's not. I could of done more. It just gives you an idea of what you need to do to make a Skif kit somewhere close to being acceptable. On to the pictures, hopefully the last in the bare plastic. Hope you enjoy the pictures Dan1 point
-
Colleagues on the other forum raised question re the panel lines of our models. I can bring you today photos of our Mi-24 model in 1/87 scale. (this model is being manufactured here for our customer in Germany) Panel lines that you can see on the photos are 0,1 mm deep and 0,18mm wide. Our Cobras´ panel lines will be 0,1 deep and 0,12 mm wide. (The lines may seem too much prominent on the close-up photo. They are not in reality)1 point
-
Some more pix now:1 point
-
A retool Vulcan must be on the cards soon. With the Lancaster retools for 2013, I don't think its beyond the realms of possibility.1 point
-
To bring this back "on message" I would agree that military aircraft, past and present, have more popular appeal and thus will sell in much greater quantity than civil light aircraft kits. That said there is a surprisingly large number of civil light aircraft kits out there if one is prepared to look for them - including a 1:48 Miles Falcon (started but not yet completed). Academy have produced 1:48/1:50 scale model kits of the Cessna 150, Piper Cherokee 140 and the Beech Bonanza and Minicraft the Cessna 172. All of which gives me an excuse to re-post these pictures. Darius1 point


.thumb.jpg.87669a5ffb8b13672a3d675087a46d42.jpg)


.thumb.jpg.0cb281983c298f55509ab7d9a06994bd.jpg)


This leaderboard is set to London/GMT+01:00