
Leaderboard


Popular Content
Showing content with the highest reputation on 29/05/13 in all areas
-
Shocking. Positively shocking. A Trumpeter kit with silly, easily avoidable basic problems. I'm shocked beyond words. The factory station diagrams for the F-100 family are a closely guarded national secret, and only if you have access to the internet and five minutes to search can you possibly hope to ever see them.5 points
-
Well this one was ten years in the making. I started it and then went to university, New Zealand etc. and only finished it last month! I must have had a very relaxed approach to sanding and filling back then as the seams are awful but I painted it up anyway. I did attempt a scratchbuilt engine rear/oil header in place of the incorrect 'dimply' wheel wells. Historical accuracy is out of the window - I had some EagleCals decals for a D-11/13 and I really liked the scheme so did it despite the kit being a D-9. Paints are all humbrol/xtracolor enamels and some oil wash, with white for the fabric control surfaces. Radio mast long broken off in storage and haven't bothered to replace it! The decals sheet reckoned top colours of Dunkelgrun and Grauviolett on the wings although I reckon that is rubbish considering the fuselage colours so went with Grauviolett and Lichtgrau. Feel free to correct my wild guesses! Thanks, Chris3 points
-
Hi folks, Brian Cauchi's interesting book inspired my latest build, the Mk VB of the Malta ace George F. Beurling. The kit is old good Tamiya with few extra items as replacement canopy from Rob Taurus, Eduard seatbelts and Quickboost gunsight. The Hamilton Hydromatic propeller was sourced from Sword kit.The decals come from excellent Rising Decals sheet. The colors and weathering are my interpretation of the EP706; the Dark Bluegrey color is mixed from Extra Dark Sea Grey and Roundel Blue sprayed on base Dark Earth and Middle Stone. The paint scratches are done with "hair spray technique" using AK Interactive Worn effects solution. Cheers Libor3 points
-
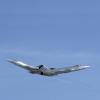
Hi all, A couple of photos of the 48th scale Airfix TSR2 built from the box. Brian.3 points
-
Hello Folks, Having built this model over on `Work In Progress' from the new 1/48th scale Airfix Spitfire PR.19 kit with upper wing and other parts from an ICM Spitfire Mk.IX and spares box items which included the decals,(Linky;http://www.britmodeller.com/forums/index.php?/topic/234940087-airfix-spitfire-pr19-converted-to-spitfire-xiv-fighter-in-148th-scale-icm-wings/ here is the finished model, built as RM727, AE-P of 402 (Canadian) Sqn, 2nd TAF based in NW Europe during 1945 Edit; Here is a photo of the subject aircraft, The `A' on my model is incorrect but it was the best that I could find in the spares box; Plus,....here is a photo of the basic Spitfire PR.19 kit just to highlight the differences; Plus,......a Spitfire F.21 made using an Aeroclub fuselage and Airfix Seafire 46 wings; I hope that you like it, plus the two additional Spits added later All the best PPS- Thanks to Andrew for noticing that I`d neglected to install the correct shorter ailerons and for advising me accordingly at just the right time,....I`m very grateful,..cheers mate.2 points
-
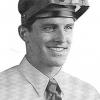
If this doesn't bring a smile to your face and/or a tear to your eye, you're made of some tough stuff...2 points
-
You don't see many....so. Just finished this. No problems except the decals were just crumbs, so I had to improvise.2 points
-
Harrier AV-8C - 158706 / XE-27 of VX-5 "Vampires", US Navy Air Test & Evaluation Squadron, September 1981 After a brief interlude away from Harriers (see here if interested), I've returned to complete the latest model in my Harrier Project - that of a Harrier AV-C flown by the US Navy Air Test and Evaluation Squadron, VX-5 "Vampires", operating out of NAWS China Lake, California. I've seen a couple of photos of this aircraft and thought it would be nice to build, showing as it does the aircraft in the low visibility colours worn by the AV-8Cs (and the AV-8As late in their service life) and a Harrier flying with a US Navy unit rather than the US Marines. It's also sporting an asymmetric dummy AGM-122 "Sidearm" missile (a converted AIM-9C), presumably as part of one of the first air test trials referred to here. I didn't have a Monogram Harrier AV-8A kit, and I wouldn't use the Tamiya version, so I used an Airfix Harrier GR3 and set about converting it back - or is it forward or sideways? - to the Harrier AV-8C. For you modelling experts out there it's easy: just saw off the LRMTS nose; remove the RWR from the front of the tail fin and reduce the height of the tail; throw away the rear tail cone (or use as base for new one); and chuck out the kit seat (which you probably would anyway). Add a GR.1 / AV-8A nose minus the camera fairing as it was removed (I had one in resin from previously), find a Stencel seat (I used a Harrier AV-8B one - tut tut, but close enough), add the RWR mods to the tail cone and wing tips, find / create the large blade aerial, pitot tube and, if adding gun pods as I did, create some plasticard strakes to go on them. No air dam was required as these are not open when the aircraft is at dispersal. Depending on your penchant for detail, various cockpit and instrument panel mods are required. I used some Heritage Aviation dropped auxiliary door intakes and nozzles. The rest of the build is pretty much the usual mods I do to the Airfix kit - as ever, I used Nick Greenall's Harrier SIG guides as a base for my efforts - and this detail has been covered elsewhere before. She's brush painted of course, using Life colour's acrylics: "Dark Green" (FS34079) and "Dark Grey" (FS36118) for the upper surface camouflage and "Light Gull Grey" (FS36440) for the undersides. I doubt these are the real colours, but as you will see, I was trying to mimic the weathering on the aircraft, so an approximation was good enough for me (Purists and Harrier rivet counters can tut loudly here). I left off the final coat of paint (these normally require 4 / 3 / 4 coats respectively for me) so creating a patchy / weathered appearance, though sadly some bits just might look like dodgy painting. My fellow members at West Middlesex Scale Model Club will no doubt say that was not deliberate, just usual for my brush work and I should stop making excuses. The aircraft carries a single dummy AIM-9 as per the photos I have. Not having full views from all sides, there's been some interpretation! I used the new Humbrol Clear in preparation for the decals. I found this best applied sparingly with a wide flat brush - the Humbrol video shows it done with a small round brush, but I found it simply pooled on the aircraft and it was really difficult to get flat. This is especially true anyway if you over-load the brush, whatever the size and shape. Aside from a few stencils from the spares box, I made all the low visibility insignia, unit markings and serials myself. I still haven't mastered this home decal making, but these were better than my last efforts (problem = getting ink to sit / spread evenly). Weathering from Tamiya powders, Zig brushables, pencils and old smudged up cotton buds with various colours on! The MDC was done with a gel silver pen on the inside, the template mask taped to the outside. Not bad, could be better. I rounded off with a spray of Humbrol matt varnish to seal the weathering and then Vallejo matt varnish brushed on to get a good flat finish. Does it resemble the real thing? In spirit if not in practice ... Enough waffle (sorry), here she is ... Comments welcome, as ever. More photos of this model, and the rest of my Harrier collection, can be found here for those who find themselves struggling with insomnia.2 points
-
Airfix P51 Mustang knocked up over 3 nights for a MACRO photography course this Friday (I wanted something cheap and cheerful that didn't matter if it got broken) Eagle Cals Decals used and a bit of wine bottle foil for the seats but otherwise OTB. Rushed it so there is a bit of a lack of polishing and hence not the smoothest paint finish ever but will do the job.2 points
-
Hi All, Here is my latest build, which I am happy to say was terrific fun from start to finish. In fact it was such fun that I didn’t even bother to photograph the sprues (absent the fuselage halves which a previous owner had untidily liberated from those same sprues). The fun was so great that I also didn’t bother to take any work in progress shots either, since it was a simple “Matchbox”® kit from a 1973 boxing, which saw it built rather rapidly. Now that it’s complete I can share my musings on this kit, which I first experienced through a 1974/75-style boxing as a child of 8. Although I no longer have any of the many kits I built as a child, I have been fortunate enough to acquire a number of old “Matchbox”® kits, many which I built as a child as well as a few that my father built which I couldn’t help but covet at the time. If this keeps up though I can see myself ending up with some old Airfix, Crown, Otaki, and Hasegawa kits as well which is fine of course as long as I build them. Anyway onto the kit I have decided that the best way to review it as such is to list the kits advantages counterpointed by its disadvantages to give a more comprehensive picture of what is on offer as follows below. Advantages This kit offers a little something for everyone, since it has various features from a variety of F4U Corsair sub types. If you like the F4U-4 you get a terrific port wing with quite accomplished renderings of its details like the gun panels, three machine gun ejection ports, recognition lights and more. All of this is represented by recessed panel lines that are equal to the state of the art from Airfix® today. If you like the early F4U-4 or the F4U-1D, the canopy has you and the pilot figure covered there. As to pilot figures this kit has one which is better than having none since it is not unreasonable for a modeller to be given the option to glue someone’s bum to a seat if they are so inclined. The cockpit is floorless which is also perfect for the all F4U aircraft except the F2G and F4U-4 and beyond of course. Then there’s the cowling if you like the F4U-4 it features the chin carburettor intake while if you like the F4U-1D or FG-1D the lower cowling is round instead of flattened like on the F4U-4. As a bonus if the F4U-4B or F4U-5 amongst others is more to your tastes you get the wing-mounted 20mm canons to stick on the front of the wings. Although the pitot tube with a dongle on the end and aft fuselage upper antenna mast is provided. You don’t have to bother with IFF, radio altimeter antennas, pylons or any other appendages, which would only get broken if one used such things, so that right there is a terrific feature amongst many! Disadvantages This kit offers a little something for everyone, since it has various features from a variety of F4U Corsair sub types. This can be a bit disappointing if you were after something more representative of the type listed on the box. One could note the fact that the port starboard wing is a copy of the port wing down to its recognition lights. Or otherwise spot the fact that recessed panel lines represent the flap footstep on both wings instead of featuring a cut out on the starboard wing only. Not to mention all of the other features that may not be your cup of tea if you have Kinzey’s, Sullivan’s, Maki’s Yamada’s, Kuroki’s, Hards’, and others work on the Corsair. Advantages The tail plane and elevators features recessed details that represent quite well albeit heavily the details found on the real thing. Disadvantages Those same tail planes and elevators feature the above-mentioned details upon the upper surfaces only. This is in error since the details should be present on the port side upper surfaces and starboard side lower surfaces only. The trim tab control rods have also been omitted. Advantages The transfers, considering in this instance are circa 40 years old performed admirably well. To the point where they conformed quite well, which is not bad considering scissors then tweezers, plus hot water in a teacup and tissue paper were the only aids used. Disadvantages The fuselage "Marines" markings were somewhat oversize in this instance, which if I recall correctly was never a problem in my first build of this kit in 1979. Advantages According to “Matchbox”® no painting is necessary which is terrific if you like clean builds. Disadvantages According to “Matchbox”® no painting is necessary which is disappointing if you like the smell of enamel paint and were wanting to have dark blue fingers. Advantages It comes with a stand that features a ball and socket assembly, which cleverly allows the modeller to display their work in a variety of dramatic attitudes. Disadvantages The socket that comes with the stand is a bit too agricultural in appearance for such enlightened times. Advantages This kit has 41 part if you include the display stand which allows one to undertake a timely build which will allow you to fly it around the house under control of course, while terrorising the cat (please note: that no cats were permanently harmed during this build). Not to mention it’s great for a beginner to cut his or her teeth on and can also be fun to build again, for someone who had the pleasure a long time ago. Disadvantages It’s not the “Matchbox”® Zero-Sen kit which has 32 parts including the display stand! Advantages The kit is moulded with oxford and azure blue plastic, which is terrific since it, looks quite fetching in combination with the willow green transfers that feature in one of the build options. Disadvantages The kit is molded with oxford and azure blue plastic, which can be a bit disappointing if one, wants to paint the kit more easily in order to make it look even more splendid. Advantages It is a 1-72nd scale kit, which is considered by some to be the perfect scale for aeroplane kits. It is also ideally sized to allow more to fit on the shelf or if one is really interested in displaying their model at its best. It also allows more to be hung from the ceiling with some fishing line to roar over ones bedroom by day and night. Disadvantages It is a 1-72nd scale kit, which is considered by some to be too small for an aeroplane kit. What were “Matchbox”® thinking? Did they not realize that the optically challenged might have to don ridiculous implements like glasses or heaven forbid even an optiVISOR in order to glue the bits together! Advantages If you assemble it right the propeller can spin! Disadvantages If you assemble it wrong the propeller won’t spin! Advantages It is made in England; it says so on the box, on the instructions and even on the sprues as well. Disadvantages It was made in England; so now it isn’t anymore. That doesn’t mean that things aren’t still made in England! Fortunately Lancashire Cheese is still made in England. Unfortunately you can’t get it in a small Australian town on the edge of the outback where I type this review. Or for that matter even the largest Australian city where I used to live or anywhere else in Australia, this apparently has something to do with customs and dairy imports! Advantages It’s not Lancashire Cheese! Disadvantages It’s not Lancashire Cheese! Advantages It is a perfect companion for the before mentioned “Matchbox”® 1-72nd scale Mitsubishi Zero-Sen kit which was molded in a splendid orange and white combination which made it ideal for the occasional aerial encounter while watching Black Sheep Squadron on’tele. Disadvantages It isn’t a perfect companion for that Zero-Sen kit in the occasional aerial encounter while watching Victory at Sea on’tele, something about them both doesn’t look quite right. Summary The “Matchbox”® 1/72nd scale F4U-4 Corsair is a terrific kit to build and I would heartily recommend it to the beginner for a great introduction and the advanced builder alike for a fun diversion. I still think it’s a shame these kits aren’t still in circulation in the style they once were with all that lovely coloured plastic inside a box that let you peak inside at the back while a dramatic scene on the top inspired one to give it a go. Though it’s great Airfix is revamping its range I can’t help but wonder what will happen to those more simple kits that provided the best training for those wanting to learn the hobby of plastic model kit assembly. Matchbox were very good at providing kits for the newcomer that were easy enough to keep one keen while generally assembling much more easily than most other brands in the 1970’s. Not to mention I still like the subjects they chose. Unfortunately though there weren’t enough of us to keep it going. Even I moved on to better things via Otaki, Hasegawa, Tamiya and many others. If you have any Matchbox kits I encourage you to have fun and build one or if you know someone you’d like to introduce to the hobby get them to have a go at one. Who knows they might even like it, like my wife Jo (who has built a Hellcat) my son Aeddan (who has built a Zero-Sen) and daughter Isabella (who has built a Mustang “Doolybird”) did. As to what’s next, shown above is my personal Matchbox to do pile, I intend to get them all done this year and will even paint some of them along the way. So whichever I pick next I will share some of my progress from start to finish here on Britmodeller, so till then… Cheers, Daniel. P.S. If anyone is looking to undertake a Matchbox group build on Britmodeller, please count me in as well as my family. References: Fighter Bomber Team, Air Ace, Picture Library, All Action, Holiday Special, IPC Magazines Ltd., 1980. “Matchbox”® 1/72nd scale F4U-4 Corsair Instructions, Lesney Products & Co. Ltd., 1972. All images Copyright ©2013 Daniel Cox.2 points
-
Here are a couple of my 46 builds on permanent display at the USS Lexington Museum in Corpus Christi Texas. The exhibit opened 05/27/13. Here is a link to the museum's web site www.usslexington.com2 points
-
Ok so I think this is one of my favourite builds so far this year and since I got back in to the hobby in 2012. It is the Academy kit - OOB with no extras and although its far from perfect I really like it. It was an easy build with no real issues and I used Tamiya paints for the camo, Alcald for the exhaust and wing pylons and Model master for the cockpit colour. I used Alcad Matte varnish to finish it off and I have to say I am becoming a big fan of their varnishes. Most of the build went according to plan although I some paint got inside the canopy (causing a lot of bad language!) and I am sure you will spot the other blunders. Overall though it is a great kit and I love this particular colour scheme. As ever i sought advice from BM during the build so thanks to those for the help/input This formed one of my Cold War 'triple build' challenge that I decided to embark on at Christmas - the others being the Airfix 1:48 Lightning and Italeri Hunter - both of which can be seen in the photo's! I consider myself a keen rookie so happy for criticism in whatever form! Chris2 points
-
Hello, I picked up this OEZ kit for real cheap in a model show swap meet and wanted to build it as an SMT varaiant.I build it in camo used by SMTs in Afghanistan. For this, I had to remove the existing spine and paste the provided SMT spine. This was quite a challenge as the fit was horrible and also the same goes to the rudder.So lots of putty and standing. The decals were another horror story. But I managed to complete it atlast this weekend. Any comments , criticisms welcome.The pilot figure is CMK warsaw pact pilot.2 points
-
Not the first time Trumpeter has goofed like this. Dare I mention the EE Lightning...2 points
-
This is supposed to be an F-104A from the 58th FTW 1959. Of course it's a 'C' but it looks near enough..... I can't find my 1/48th RBF tags! If they turn up tonight, I may take another pic. This is my third build in a year and my first try with Alclad. The WIP thread is here: http://www.britmodeller.com/forums/index.php?/topic/234936100-148-f-104-starfighter/ Many thanks to Bob (Gingerbob) for his honest critiscism of the wings, which I then changed...Very glad I did! and maany thanks to JefferyK who made a fantastic F-104J and was a great help with the build... His Build is here: http://www.britmodeller.com/forums/index.php?/topic/234915138-f-104j/?hl=f-104j I really enjoyed using Alclad, if treated with respect, it makes a great BMF... I'm quite pleased with the way it turned out. I love 50's/ 60's American jets... they always remind me of the great 'Space race' days and Apollo (the era of my childhood)... Anyway, here are the pics... I hope you like it... any questions about the build... please ask1 point
-
Having remastered the nose section and cockpit tub, I decided to remove the nose from my last 3/4 built model - http://www.britmodeller.com/forums/index.php?/topic/234924266-124th-buccaneer-detailed-and-picture-heavy-build/ -and replace it with the remastered version. It was a traumatic moment, but I took a saw to the model and hacked off the nose. I think I can rescue the nose undercarriage, intakes and also everything behind the saw cut. It would be easier if I could remove the main undercarriage meantime, but it's too firmly fixed to remove without causing more damage, so I'll try to work carefully around it. I'm not entirely sure I wouldn't have been better starting over completely, but what the heck - it's only time, money and my sanity at stake. Anyway, below is the revised nose shape, on the left with the previous version alongside for comparison. The revised components in the raw: And after cleaning up and surgery to the model:1 point
-
Started today - Work starts with the cockpit as is normal - it paints up quite nicely Then separated and cleaned up all the parts that needed spraying glossy white, and sprayed them Then closed up the fuselage - there's a few places where the fit could be better, but nothing horrible that can't be sorted. Some Mr Dissolved Putty on the joints, ready to clean back tomorrow Peter1 point
-
Got the wings finished off today and the engines on. As a result of altering the angle of the engines, the angle of the radiator intakes had changed. Instead of having the charismatic upwards facing inlets, they were slightly downwards facing and just didn't look right. To overcome this, small plastic strips which tapered at each end were glued to the inlet to restore the correct angle. These were then faired with miliput which is where I'm at now. Once the miliput dries, I'll do some more blending with filler before scribing some panel lines in. The carburettor intakes were cut off to make fettling easier, I'll use some Lanc ones from the spares box to replace them later on.1 point
-
If PCM do send the kit (and they wouldn't, for a time, when there was a U.K. importer,) ask them to include the commodity code 9503003000 on the green label; this will (or should) stop you being charged any import duty, since "reduced-size (scale) model assembly kits" don't attract duty. Edgar1 point
-
Here follows some general detail shots as well as some pictures of the completed model in its entirety: The guns came from Aeries: The nose-art was my own doing: The elevators and rudder were scratch-built: All paints were automotive acrylics straight from a spray can. This picture also shows my scribing efforts to good effect - there was no surface detail whatsoever on the model: And to give a sense of scale to this model... this is a 6-seater dining room table! Although it threw some challenges my way, this was by far the most enjoyable and fulfilling build I've completed to date. Many thanks to those who helped me out with the engines and main wheels - you know who you are! As always, your feedback is welcome - good or bad Tom Probert, 29th May 2013.1 point
-
Well, she's finally done. Clear nose has been detailed and painted along with the propellers and final details such as aerials and guns. The finishing touch was a scratch-built crew ladder, added to the nose wheel bay. Here's a sneak preview... More pictures will be uploaded to 'Ready for Inspection' soon. It's been a long journey, and thank you for you kind words of encouragement along the way... it's been a pleasure sharing my progress with you all! Tom1 point
-
I don't remember any fit issues but the weight, doh! - I have some roofers lead flashing so I can cut bits to shape and I certainly put plenty around the cockpit during assembly, including behind the rear bulkhead and still found I needed to fill the nosewheel well after assembly. Unfortunately the model is stored elsewhere but I remember building a cradle from an expanded polystyrene ceiling tile for transportation so I must have been worried about the weight vs strength of undercarriage. The other big problem is the etched aerials for the option I chose do not naturally fold into the correct shape and I broke a couple - thanks went to Wooksta for helping me out as he had built the other option.1 point
-
Back in Stock shortly at http://www.relishmodels.co.uk/pacific-coast-models.html UK stockist at £60 Send Graham an email and ask when. P1 point
-
You should be able to get it from PCM: http://www.pacmodelscatalog.com/mm5/merchant.mvc?Screen=PROD&Store_Code=PCM&Product_Code=PCM+32015&Category_Code=pcm NPL1 point
-
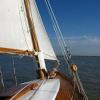
HI all, I Wasn`t sure weather to post this in the what-if forum! but i thought I`d post it here anyway! this is the result of a discussion some of us had about weather the Westland Whirlwind had ever been considered for FAA use! I was so curious as to what it would have looked like if it had! I built one!! so here it is!!.1 point
-
I finished mine in the late 90's using the Falcon/Squadron A-0 canopy and the Cooper Details cockpit. There were no major issues with parts fit or fidelity of shape. It survived one house move and I later put it up hanging from the ceiling in my shop, where it eventually lost parts of the antennae, but gave some rest to this hummingbird that flew in one day.1 point
-
Gun is loaded my friend.....gun is loaded!!! Lol Now go & wash your mouth out......say 5 Our Fathers & 6 Hail Mary's........devil child!!! Lol ATB mate.............1 point
-
A little background - THe first model I've ever been truly happy with was a Revel-Monogram F-15E. It's the only model I've managed to get the preshading, weather and washes to look 'right' on. This was over 4 years ago now and despite numerous attempts, I've not managed to finish a kit since, including a 2 year hiatus. Here she is - The tail numbers are painted on and incorrect, the reason being I the F-15 in Lockon/DCS and wanted it to reflect my tail number (LN, 003) In order to try and get myself back in gear, I'm doing another F-15, this time a C to try and get back up and running! It's the Academy set which I managed to pick up for £19.99 in the Modelzone sale. It comes with a small PE fret and a decent weapons loadout. The airframe goes together in a front cockpit and radar section, pancake fuselage and then the wings are mounted flush to the body. There have been a few issues as the build has gone along - The front wheel well didn't fit at all. The instructions call the nose to be joined, the cockpit to be mounted on top of the wheel bay and then slid into place. The cockpit however doesn't sit right! To get around this, I first trimmed the bottom to allow the wheel bay to fit. This was then glued into place and left. Once it was firm, the mounting pegs where sanded flush and I manually lined the cockpit up inside the chassis. The intakes are quite frankly rubbish. For some reason, they leave some 1cm square holes once completely built up if you don't card them over! As I'm posing the intakes in the powered down position, it's hardly hard to see into this section. Wing fitment has been poor however I accrue 50% of this down to poor building technique (yeah, I rushed putting the pan cake together). Quite a lot of Milliput and Green stuff later and I've just about recovered the seams along with the re-scribing. I'll get some pictures up soon of the current build. Currently can't decide on the paint scheme though, I'm torn 50/50 been accurate and making a desert aggressor colouring!1 point
-
Hi Mike, Thanks for showing your Typhoon it looks terrific. Cheers, Daniel.1 point
-
Lovely paint job1 point
-
Top notch as usual from you without a single flaw1 point
-
Awesome advice, thanks Duncan. Noted about the paper towel, and already have a set of cleaning brushes from Airbrush Company. I clean my needle in the same way using the towel I've been spraying on to. Will grab some of the cleaning products you mention. I don't mind how much thinners and cleaning products I burn through as long as it keeps me from hitting problems I consider it a good investment. Cheers1 point
-
Lovely job! I built this many years ago I think as USS Montrose.1 point
-
Hi Mish, Though I have my own table there I will bring a few things for the BM display. Try this http://www.hamex.co.uk/smallspace/smallspace-gen.html Cheers, Warren1 point
-
Bit more progress to report on , have joined the fuselage halves , removed the cockpit door area, [seemed easier to cut it out than scribe it in ], removed the PR type hood rails and added the wings. With a little trimming of the fuselage root fairing the wings fit remarkably well. A liittle bit of laminated plastic sheet to fill the gap between the F22 wing and PRXIX fuselage , then a smidgen of filler and its coming together nicely . Will report more later Andrew1 point
-
Hello to all, decals are on: More to come.1 point
-
I built this one a while back as a Finnish Air Force jet. I found panel decals from the spares box for mine. The kit goes together quite easily1 point
-
Hi this is my Tamiya 1:32 spitfire ixc, I've spent the last 7 weeks building it, the markings are from kagero top colours polish spitfires, I chose EN179 SZ-J flown by F/L Wladslaw Gnys while with no.316 squadron at northholt in the spring of 1943. The name Jasia was painted below the windscreen on the port side.1 point
-
Looking good. Steve1 point
-
Wow - that's a stunning model! Everything looks exactly right and very realistic on it. Not only should you be proud, but everyone you're crediting with help should be proud by association as well. Splendid work! John1 point
-
hello everybody, decaling is done and a coat of clear was applied. I will start weathering this week..... I don´t really know why, but the pictures are terrible... Hopefully the next ones will be better... This pictures was supplied with the Kit: I Hope my P-51A will look a little bit like this ;-) Comments and critics are welcome Cheers Peter1 point
-
How many times have we had people say a kits "unbuildable" the Airfix kit might be a bit long in the tooth, but unbuildable its not. I have seen some really bad kits in my time but never yet an unbuildable one! Julien1 point
-
Would only need half the bomb load Jennings as the RAF would put them in the right place first time.1 point
-
Who's F-4B are we talking about? Back off topic. W1 point
-
Here's the latest in my projects this year. I got this from a modelling mate for rather less than what they go for so I was pleased before I even got started. I managed to pick up the Neomega cockpit at SMW 2012 with a bit of future planning purchasing. This is my first ever 1/48 Bucc so I'd put a few hours in on others builds and how to build it easily which wasn't a problem at all. The only difference I did was the lugs that make up the intakes most people seem to cut them off and then cement to the whole kit, I applied the same theory as per the body and just glue (well MEK actually) in small steps and I got a great join which required no filler what so ever. The kit came together very well and there isn't much filler on the kit at all. I inserted plasticard at the forward most end of the fin where it is way thinner that the spine part that makes the join. Airwaves wing joins were used but I could find any for the airbrake so detailed it a bit with plasticard again and filled in the extra holes, using the Aeroguide as a guide!. I did put a pile of weight in the nose just to be on the safe side and the build came together. I've used an article in MAI about the build and thought I'd try the paints listed in there, but the green is wrong, so I when I sprayed it it was immediately obvious it must have been a typo, so the grey is Tamiya X-54 & the green is Xtracrylix RAF green. Decals on, most were the kit but some of them were way out of register so the spares box was raided. Thanks to Dr Evil for the XV decals . All finished off with a dark wash for the panel lines as I didn't want to go to arty on it as they're just not like that, then finished off with Windsor & Newton Matt varnish. Once dry just the exhaust staining added then I added the wings, which the etch join wouldn't take the weight of the wings so I was forced into doing the stay bars, which once painted (in situ) I think I've got the center section a bit thick. Anyway one more to go then I can reveal my project finale.1 point
-
To which you could add that if manufacturers were to produce kits to the standard that the accuracy fanatics seem to want, they'd probably be so expensive as to be unaffordable for most of us. Even then, I reckon someone would find something to complain about1 point
-
Lol! A very healthy attitude & I'm right with you on this!! . In any case, we haven't even SEEN the actual kit yet!! Personally, I think there's a great deal of amusemment to be had witnessing people getting so worked up over what are usually utterly trivial issues. I'm sure though that no mattter how good the model is, there will be some individuals who are determined to find fault somewhere. I'm really looking forward to this one & I hope that K H can find it within themselves to also produce the photo-recon version along with a MiG 31, SU9/SU-11/SU-7/17/22, Yak 25/Yak 28 series............ Allan1 point
-
Spot on. This'll be a beaut' when you're done. Keep it up.1 point
-
I had an idea for this kit some time ago and manage to pick up the kit from ebay at £28, I also got some goodies from Heritage at SMW 2011 and so the project began in January 12. I met and emailed NG899 (Nick) who was absolutely fantastic in his view to release info on the aircraft I intended to build and along the line when questions came to light along the way. I'll point out now I'm not into photography so the shots are quite basic. I wanted to do ZA192 (the one that got hit on day one) flown by Dave Morgan with the famous photo of him stood beside his wounded cab and subsequently repaired. I can't recall anybody else doing one so though that's the one, also I wanted to bomb it up just to be different. I've used Heritage cockpit and seat into the basic build with cockpit reference photo's pretty thin but I found one eventually on page 1million in google then found a good image in Modern Combat Aircraft - Harrier which I found in the loft!. Intake again are a Heritage buy and they do look the part with minimal sanding and the obvious filling for the gaps. The build is basic enough so I won't bore everyone but I can confirm the general census that it's a fight all the way. I filled in all the rivets which took a week alone after applying primer and finding some that I'd missed or weren't filled enough. The panels have been raised with either 5 or 10 thou plasticard and the bacon slicers again are 10 thou, also adding some weight to the area around the top engine panel which absorbed nearly a 1/3 of a tube of filler - which meant a lesson in scribing (nice). The 10th vortex generator has been added and rib detail inside the out riggers. The elevator cut out has been done which is closed off in the kit and all the RCV's have been cut out and constructed and mesh added to all the vents. The fin patch panel is 10thou card with rod over the top and again on the other side but obviously a smaller patch covering the entry hole. Painting is with xtracrylix paints and I used the Marmite method to reveal the wear which came out quite nicely I think. The tanks have had a good sanding to the profile and rescribed the panel lines. The AOA probe is from a 1/32 Hunter which has been tappered the base reduced in diameter. Bombs were modified kit jobbies and these are VT fuses which were used at the time. I matted off the front portion and left the tail units satin which gives a good demarcation between the 2. I had painted some messages onto the bombs ("Happy Easter", All the best 800 xx", "Warm Welcome from Hermes") these are not factual so just my interpretation but you get the idea. Decalling was a right pain as all the decals were out of register. I handed painted the white areas of the roundel which unpainted looked weird at first but once blued out it really looked the part. The engine markings are DIY as they were unusable which was pretty disappointing. I've hand painted over decals or where they would have been ie the ROYAL NAVY was painted as a block but on others its the individual letters; as Nick said there's no right or wrong if you can't find a photo. I'd like to thank Nick (NG899) as he has been an absolute gent in passing over the info and my wife for suggesting to get the pylon sway bolts from an opticians which was a fantastic idea and saved scratchbuilding them!. Anyway enjoy just like I've done: Steve.1 point
-
Put the roundels and fin flases on this afternoon. Spotted future where the decal was to go. Blob of microset then a blob of future a few hours later. Also my first use of pre-painted etched seatbelts. These are bloody ace.I love em.1 point


This leaderboard is set to London/GMT+01:00