
Leaderboard
.thumb.JPG.3498f40362ff13ebfc4b2e45abbd545e.JPG)

Popular Content
Showing content with the highest reputation on 24/04/13 in all areas
-
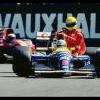
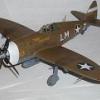
The craft was flown by Wojciech Kołaczkowski in Polish 303SQ. Kołaczkowski flew well known RF-Krysia Spitfires later on and being excellent pilot and officer he promoted to CO of 303rd. But in spring 1941 RF-W for Wojtek was his mount. This very Spitfire was used by legendary CO of first Polish Fighter Wing Witold Urbanowicz on two missions, when he led the unit over France. Leaving Polish squadron the craft entered service in Australian 452SQ and helped Irish ace Brendan 'Paddy' Finucane to score three of his kills. It wouldn't be possible to build this model without always extraordinary help of Edgar. I want to thank You here very much for placing light on shadowed mysteries of Spitfire construction and history. You've done wonderfully, I only did my best. Unfortunately when I have started this build in 2007 I wanted quick and easy Spitfire to please myself. My modelling preferences changed soon which forced me to perform many surgical corrections in already existing and fixed elements. This and my poor original planning shows up here and there.6 points
-
Ok, shes finally done, had a few problems along the way but nothing major. I had to replace the cannons with True details items as I knocked one of the kit ones off and lost it, and the decals were deffo over bright so they were replaced with items from Aeromaster. The kit was basically built oob with just the above items used, I also used the following: The kit (obviously ) Mr color (gunze) acrylics Model master enamel varnish. I'll start with a word about the kit itself, I reckon Eduard have raised the bar considerably with this kit, it really is that good. The amount and finesse of the surface detail is outstanding and really needs to be seen in the flesh to appreciate how good it just is. The fit is first class with minimal filling in of the joins and the overall quality of the plastic used is as good as you'll see anywhere. the accuracy looks just about spot on to me with a nice "bulbous" look to the nose which is due to the "humped" upper engine cowling being replicated properly. The props and spinner also look to correct also and make the whole front end look right. The wings also have a slight twist (wing wash out) which was used by the real thing to prevent the wingtips from stalling (hence theres not many aircraft that could out turn a Spit). This also makes the wing look right when viewed from certain angles. The instructions are very clear and precise and cover all aspects of the assembly nicely and I certainly don't recall any problems originating from them, which brings me on to the decals.... Imho the roundels are over bright going by what I've seen in various publications and photos and really need to be replaced with after market items. I think this over bright color usage is due to very late in the war the roundel color was lightened somewhat and appeared brighter, but I'm quite happy to be proved wrong, anyway, the darker roundels look right to me. Which brings me onto the rest of the decals, these being very thin and when applied have a tendency to allow the color underneath them to show through, almost going semi transparent, this is really bad when a white decal is placed over a black and white stripe 'frinstance. Again this could be solved by using after market jobbies as I did. The big question for me is....would build another?.....too damn right I would, I reckon this would benefit immensely from a bucketload of Eduard Brassin/ Aires slung at it, engine, gunbays, wheels, cockpit, etc, it'd make into an astounding model....and I'm already getting the urge to do one. Final conclusion, this is one hell of kit that deserves to built and if anyone likes spits and wants a collection, this HAS to be one to go for. On a side note I've noticed some of the parts that aren't used appear to be from an earlier version, Mk V maybe? If anyone has any questions regarding this kit, just post here and I'll me best to answer them, and oops, just realised I haven't washed and weathered the gun barrels! No biggie though and the paint needs to cure a bit anyway.5 points
-
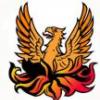
Revell 1:72. Lots and lots of love and labour went into this one. I consider it my best effort as far as NMF is concerned. The only use of airbrush was aplying the primer, yellow and OD antiglare areas and exhaust stains.. All the rest was painted and lacquered with paintbrushes. Model master metalizers rule! Oh, allmost forgot to mention that the parrot head is handpainted. Enjoy the pics! Josip Josip4 points
-
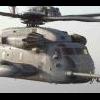
The Russian AF has just taken delivery of the Su-30SM - to be used as a lead-in trainer for the Su-35S. Here's my conversion of the Trumpeter 1/72 scale Su-30MKK into a Su-30SM. It involved adding canards and their mounting shoulders, modifying the rudders and making Thrust Vector Control (TVC) nozzles..... I also added two pilots plus the prominent blind flying curtain over the front students cockpit.... Closeup of the TVC nozzles..... The blind flying curtain and holographic HUD..... The model is finished in the latest dark grey camo scheme now being adopted by the RusAF - together with red/white/blue stars and 'VVS Russia' titles on the fin.... Ken PS - If you ever wondered where your BBC licence fee goes - it funds the Russian Air Force......3 points
-
Posted this elsewhere. Nothing special just a quick and relatively relaxing build Kit: Tamiya Prop: Ultracast Seat: Ultracast Wheels:Barrcudacast Decals: Ventura and Fundekkals (stencils) Paint: Tamiya AS12 and Alclad3 points
-
Hi All! After some struggle with the parts of this kit I just finished with this beautiful mature Lady... The kit is published by Eastern Express and the scale is 1/144 as most of commercial planes too. As you know I like the russian planes very much that's why is no surprise this job from me. When I was a young child I often saw these type of planes at Budapest airport. As I can remember I have seen once a polar coloured Iljushin too... So the kit is the EE IL-18D kit and it's same as the other IL-18V kit. In real life the difference between two version is mostly the range as the letter "D" (dalnij) is shown that. And almost all of these planes had different numbers and different kind of antennas on their fuselages reason of their special tasks like reconnaisance or mil. transportations. The different (red) colors is sign of the Aeroflot polar fleet what is operate over the arctic line of the Soviet Union and now Russia. The reason of the red colours on the wings and tail section is simple. There is always snow everywhere and it is more simple to see the planes there... Reason of the pure conditions of their real home they seemed to be always dirty and strongly weathered... And that is my favourite part of commercial modelling... :-) The sisters...: http://www.britmodeller.com/forums/index.php?/topic/234927804-an-24-#entry1143625 http://www.britmodeller.com/forums/index.php?/topic/234921520-iljushin-il-18v-done/#entry1067579 I hope you will like this as I love too... Feel free to comments.... Cheers Daniel With Her sister...2 points
-
The 'Nieuport Scout' was the predominant single-seat machine of the Royal Flying Corps during April of 1917, a period which has passed into Great War aviation lore as 'Bloody April'. 60 Squadron, with an establishment of 18 pilots, suffered 23 casualties that month, the great preponderance of them killed over the German rear areas. This was not unusual, but rather typical of the toll taken on RFC units participating in the Battle of Arras. It is from the RFC in this period that the commonly cited factoid 'the life expectancy of a fighter pilot on the Western Front was three weeks' stems, along with the classic movie cliche of the repeated waves of eager replacements straight from basic the C.O. mournfully commits to a first mission he knows they will never return from. And in that month in the RFC these things were true enough; after the initial losses, casualties were disproportionately new arrivals, and many who arrived as replacements during 'Bloody April' never saw the coming May. When first introduced, in the form of the 80hp N.11 'bebe', the sesquiplane single-seat Nieuport was a superb fighting machine, clearly superior to anything else operating in the skies over France. The type reached its apogee in mid-1916 with the introduction of the larger 'fifteen meter' design (so called from the square area of its wings), powered by a 110 hp motor. The most usual 'fifteen meter' type was the N.17, but there were also the N.21, with an 80 hp motor, and the N.23, which employed a different synchronizer for a Vickers gun than that used on the N.17, but was otherwise almost identical. By autumn of 1916, however, the French were already beginning to replace the type with the SPAD VII, and the appearance that autumn of the German Albatros fighter, with its good speed and heavy armament, left the Nieuport sesquiplanes at a disadvantage. The 'Nieuport Scout' remained, however, about the best single-seat machine available in reliable quantity to the Royal Flying Corps as 1917 began. England's aviation industry had been very small when the Great War began, and its expansion during 1916 had been achieved by concentration on existing, standardized designs. New fighting types certainly were appearing as the year began, but in small number, and machines the French were finding surplus to their own requirements had to remain a great portion of RFC single-seat strength. When received by the RFC, these 'fifteen meter' machines had their synchronized Vickers removed, and replaced with the earlier armament of a Lewis gun on the upper wing, firing over the propeller. Primitive in appearance, and introducing difficulties of aim, this arrangement did give a superior rate of fire, and broke about even on reliability, as the exposed gun was susceptible to cold, while the synchronized gun, though warmed on the cowling, was prey to a variety of malfunctions in the intricate linkages governing its fire. Over the Battle of Arras in April, 1917, the obsolescence of English equipment collided with operational necessities and tactical doctrines, and the result was something of a mangle. The battle itself was conceived as an assistance to the great push planned by the French, the 'Neville Offensive' at Chemin des Dames, projected to be the blow that would collapse the German front and end the war in speedy victory at last. RFC commander Gen. Trenchard's conviction his men should always take the fight to the enemy over his rear areas sent aircrew in large numbers into circumstances of great disadvantage, in generally poor equipment, in order to meet the needs of the ground battle for reconnaissance and direction of artillery fire. At heavy cost, the RFC did what was required by the men on the ground --- and as it turned out, even this was hideously futile, because when the 'Neville Offensive' went in in late April, it collapsed in a bloody welter that set the French Army to mutiny, which continued throughout the summer. This particular 'Nieuport Scout' of 60 Sqdn, A6766, was an N.23 'fifteen meter' type. This differed from the N.17 at production in that its synchronizing gear required the Vickers gun to be off-set a little to the right, rather than being on the center-line, which in turn required a small alteration in the arrangement of cabane flight wires, so the one to the starboard longeron would clear the gun. When taken over by the RFC, as A6766 was in mid-March, 1917, replacement of the Vickers with an over-wing Lewis rendered the machine indistinguishable from a standard N.17, although it received, in common with many RFC 'Nieuport Scouts', a new pattern windscreen, very different from the French factory fitted one. A6766 went to 60 Sqdn on 26 March, 1917, where it was assigned to 2nd Lt. Charles Sidney Hall, of 'A' Flight. Lieutenant Hall then was a young man. eighteen going on nineteen. He was born in Ashington, Northumberland, in 1898, to a fairly prosperous family. He was an athletic youth, coming to hold an honorary instructor's certificate and medallion from the Royal Lifesaving Society, and resolved on a career as a mining engineer, towards which he took up studies at Armstrong College of the University of Dunham. With two older brothers in service, the eldest a Captain in the R.F.C. assigned as a flight instructor, and the other with the Royal Engineers, Charles signed on to the O.T.C. at his college, and enlisted after he turned eighteen, while the Battle of the Somme was in full spate. He followed the course of his eldest brother, going directly into the Royal Flying Corps. By early 1917 he was a trained pilot, and posted to France. The date of his arrival at 60 Sqdn is not recorded, but 60 Sqdn had had a pair of pilots killed or injured in March, 1917, after a long spell of inactivity owing to poor flying weather, and Lt. Hall may well have been assigned there as replacement for one of these men. In any case, the young man made a good impression for himself, and proved popular both with his fellow officers and the ground crew of the unit. On the morning of April 2nd, 1917, 60 Sqdn was given a 'special' assignment, for which one Nieuport was fitted with a camera to take photographs of particular value. 'A' Flight had the camera Nieuport, and Lt. Hall piloted one of the three escorts accompanied it when the mission took off at 7:15 in the morning from Filescamp Farm aerodrome. At a quarter to eight, they ran into Albatros Scouts from Jasta 2, over Fontaine-les-Croisilles. In the melee, Lt. Hall engaged one Albatros closely, and sent it spinning down out of the fight, for which he was awarded an OOC (out of control) victory credit. It was something, at least, to balance the death of an 'A' flight pilot down in flames in that fight. Late in the afternoon of April 7, Lt Hall was again one of the escorts on a 'special' camera mission, taking off from Filescamp Farm at 16:40. An hour later, the flight was on its way back when they were attacked at 17:45 over Mercatel by four Albatros Scouts of Rtmtr. von Richtofen's Jasta 11. Under attack, 'A' flight pilots found their Lewis guns sporadically inoperative due to freezing. Lt. Hall was one of two 60 Sqdn pilots shot down and killed in this fight, which went on for some time, and only ended when the melee fetched up to the English lines. Survivors reported one Albatros spinning down from the fight, but none claimed it, and this was awarded to Lt. Hall and Lt. Smart, the other pilot killed, as a shared OOC victory credit. The model is an Eduard N.17 (in 1/72) built without much incident (it is a very good kit), with a scratch-built windscreen, and home-made markings. The tactical markings are pieced together from white decal strip and white dry-transfer 'L' and 'O' letters; the rudder markings are home-print decals wife was kind enough to lay out for me (she is quite the witch at that sort of thing). A photograph of A6766 (with Lt. Hall standing beside it) appearing in Mr. Revell's recent 60 Squadron history establishes the machine was in camouflage finish with white letters, not aluminum dope with black markings, and I have employed the usual French green and brown of 1916, as the date is too early for the five-color treatment, and refinishing in P.C.10 is highly unlikely. The photograph shows no white surround on the fuselage roundel, which I have taken to indicate its absence on the upper wing as well. The build began on a whim; I simply wanted to do a camouflaged Nieuport Scout, and found the photograph directly at hand. I became curious, though, about the pilot named as flying it, and as I found out more, the young fellow emerged as a character, and came to seem to me a fair type for the experience of the Royal Flying Corps in 'Bloody April'. I would like to thank the gentlemen over at 'The Great War Forum', who provided me with a great deal of information on Lt. Hall, and also Mr. Revell for answering several questions, and Mr. Russ Gannon, for looking into details of the two air fights Lt. Hall is recorded as participating in.2 points
-
Supermarine Spitfire Mk.XII 1:48 Special Hobby The Griffon engine Spitfire can trace its lineage back as far back as 1939 when it was decided that a second-line of engines would be a good plan to develop the Spitfire's performance further in the long run after the Merlin ran out of development potential. The XII was the first Griffon engine Spit to see service in 1942, with clipped wings becoming standard for the low level duties that the single-stage Griffon was suited for. The Luftwaffe were wary of the Spitfire at lower altitudes, so the high speed XIIs rarely got the opportunity to "mix it up" with 109s and 190s where they would have been at a distinct advantage, having a much higher top speed and an improved rate of roll due to the clipped wings. It did have a lot of luck with V1 Doodlebugs, where its speed and twin 20mm cannon would catch and destroy them with impunity. The Kit This is a new tool from Special Hobby, and it arrives in their small blue and white box with a painting of an XII banking to show off its clipped wings. Inside are three full-sized sprues and one small sprue in mid-grey styrene, a clear sprue, a small fret of Photo-Etch (PE) brass, decal sheet and of course a small (read compact) instruction booklet with painting and decaling instructions in greyscale on the rear pages. The initial impression is of a good quality kit, with plenty of detail present on the sprues, no flash and some interesting overlapping panels on the fuselage parts. A full cockpit is included, which extends to ribbing that is moulded into the top of the fuselage interior, and an insert that provides the lower detail. The frame behind the pilot's seat is included, and has recessed lightening holes that can be drilled through if you wish. The seat with its back armour is installed on this frame on a bracket, and a full set of seatbelts are supplied in PE. The head armour and headrest pad are installed to the same frame, with only sidewall detail present aft of this frame, which includes the two large tanks on the port side. The instrument panel is moulded into the frame is sits on, but this raised detail can be removed and replaced by a sandwich of printed acetate film and PE parts to give a more realistic appearance. The firewall visible through the footwell is supplied to finish off the cockpit, and a set of detailed rudders sit within the well, which have PE straps, and sit on the busy floor that is so typical of the Spit. The control stick with its linkage is added to the floor, and a separate circular grip is installed at the top at any angle that suits you. The clear gunsight is glued to its mount on the top of the instrument panel, and the rearmost frame behind the seat is depicted as a small section that fixes to the rear of the cockpit opening, and is joined to the back of the seat by the tensioning reel of the harness. Once all of this is complete, the fuselage can be closed up with the addition of the filler-cap forward of the windscreen. The wings are traditional in construction, having a full-width lower with boxed in landing gear bays added before installing the two upper halves, which have drop-in sections of skin that contain the cannon bulges appropriate to this mark. Other larger bulges are also found on the sprue, which are for other projects & surplus in this boxing. The ailerons are separate, so can be posed, and cleverly, the wingtips are supplied as completely clear, so that there is no awkward gap between the tip and the tip-lights A small insert is added at the chin area and the fuselage, with moulded in fillets, can be inserted into the gap, remembering to paint the lower central section interior green beforehand, in case any of it can still be seen in the cockpit opening. The tail has a separate rudder with the small trim-tab also separate, to give options for offsetting it, while the elevators are moulded into the horizontal tails. A small rudder actuator is added under the port elevator, which has some confusing (to me at least) instructions regarding removal of the moulded in fairings beforehand. The large Griffon engine required some structural modifications to the Spitfire fuselage, and even then, a pair of power-bulges above the intakes were needed to streamline the large engine block. A further teardrop fairing sits at the top of the cowling just aft of the four-bladed prop, and all of these parts are supplied as add-ons to the basic nose shape. The prop itself is made up from a central rear part with keyed blades and spinner added to the base. The short peg on the rear then fits into a receiving hole in the nose, although you'll need to trim a pair of ejector pin marks off the back-plate before it will sit snug against the fuselage. Under the wings are the usual intakes for the oil cooler and radiator, plus the chin intake that has a PE debris guard. All of these are fitted to pre-defined points, and the radiator has a pair of mesh surface parts, the detail of which will disappear under all but the most careful painting. In the centre, the modeller has a choice of three conformal extra fuel tanks of varying capacities to improve the painfully short range of the Mark 12, and a scrap diagram shows their correct location points of these against the underside. Moving aft, you have a choice of a fuselage insert and fixed tail wheel for early airframes, or a pair of doors and retractable tail-wheel for later models. The main gear is simple, and the gear legs have the retraction struts moulded in, with the four spoked Dunlop wheels and tyres made up from a complete back, and separate parts for the hub and tyre at the front. Sometimes a blank hub cover was added, and this is supplied for use as you see fit, or your references dictate. The gear leg covers are attached along their deeply dished recesses that run down the inside leg of the cover, but the cover itself is flat. An optional quartet of hooks sit to the rear of the fuel tanks, although I'm not personally clear on their purpose. The IFF aerial is of the later type without the T-shaped top that was seen on earlier Spitfires. The cockpit is finished off by adding the three-part glazing, which is clear and commendably thin, and choosing either the open or closed access door on the port side. A PE grab-handle is fitted to the inside of the sliding hood, and a rear-view mirror is set on the peak of the windscreen, with the familiar aerial base just aft of the canopy. The inboard cannon stations receive the long fairings that helped prevent icing, and the outer ones are blanked off with a small hemispherical fairing as is appropriate. The engine exhausts are added from the outside to simplify painting, and although they are well moulded, the ports are solid, so either some aftermarket hollow exhausts or a little drill-work is on the cards if this bothers you. Markings A generous four aircraft can be modelled using the kit decals, and a number of stencils are included on the second sheet, which is handled on a separate page of the painting guide to avoid confusing lines going everywhere. From the box you can build one of the following aircraft: MB854, No.41 Squadron, Aug 1944-Jan 1945 - Dark Green/Ocean Grey over Medium Sea Grey with D-Day stripes on the undersides. MB882No.41 Squadron, F/o Donald H Smith (RAAF), Friston, Apr 1944 - Dark Green/Ocean Grey over Medium Sea Grey, sky spinner & tail band. MB840, No.41 Squadron, Friston, Apr 1944 - Dark Green/Ocean Grey over Medium Sea Grey, sky spinner & tail band. MB832 No.91 Squadron, Hawkinge, May 1943 - Dark Green/Ocean Grey over Medium Sea Grey, sky spinner & tail band. Decals are printed by AVIPrint in the Czech Republic, and are in good register apart from the black, which has drifted off a little. This only shows on the tiny roundel red circles that have black text on them, and the single white "100 Octane" stencil decal. All the rest of the black is in isolation from the other colours, so it doesn't ruin the sheet. Carrier film is minimal and colour density seems good on the sheet. Conclusion This is a nice kit of a less well known mark, if any mark of the Spit can be considered thus? There is plenty of detail in the box, and some interesting spare fuel tanks and wheel hubs for the inveterate Spitfire builder. Special Hobby have tried to depict some of the lapped panels on the fuselage, which has turned out quite well, and adds a little realism to the finished product. Panel lines are refined and not over-large, and should look good under a coat of primer, paint and varnish. Highly recommended. Review sample courtesy of2 points
-
For the proper size tube I usually use a metric or standard inch size socket from my garage. Very round chrome smooth. And the deep well sockets are three to five inches long and you can snap an extension bar into it and chuck it into a bench vise for a solid work die. Just a thought. MP2 points
-
2 engines arnt enough lol2 points
-
Hi all, A post this evening on using foam with large vac models has prompted the thought that I should post work to date here so that: a. It's more accessible b: I might actually extract a digit and crack on as she has become a bit of a running joke (well - the lack of progress anyway!) Early foto's quite poor I'm afraid - only digital camera I had to hand at the time - but you should get the gist... So - going back to Jan 2000 - in a Galaxy far, far away... Let me introduce you all to Connie - an elegant lady that I'm sure I'll be spending quite some time with ) Connie is the ID Models 1:32nd scale Lockheed EC121 Constellation kit (kit used in the loosest of senses - more a case of a set of reasonably accurate (so it would seem so far!) basic airframe shapes). This aeroplane is one of my all time favourites and when I came across the kit I had to have it. Needless to say, my fiancé Anne and myself are now house hunting - we need more space!! When finished she'll be resplendent in US Navy blue and white colours as an EC121K Warning Star. The moldings are reasonably cleanly formed on two huge sheets of polystyrene, roughly 60 thou thick. The box of Milliput placed next to the lower port mainplane should give you all a sense of size. This is the second of the two sheets. The first step is to fill the larger of the shapes with Polyurethane Foam, on order to provide some strength and rigidity, both during construction and once completed. Here's John Wilkes helping out by mixing up some foam - only use the two pack stuff, as the air drying type can continue expanding for a long period, causing real problems later! This was a big job and it's at times like these you need your friends (not just for the extra pair of hands, but also for the moral support and encouragement you need when starting a project this BIG!) First pour - port fuselage half. Don't use too much, this stuff expands like crazy! Starboard fuselage half - with foam in the process of expanding. All of this was done outside in sub-zero temperatures which slowed the process down and, we think, led to a denser foam. All the major components - fuselage halves, tip tanks, nose and radomes filled and curing. More foam was needed later! Port fuselage half and other bits removed from the backing sheet. Photo taken on my kitchen worktop on Sunday 9th Jan 2000 - UK readers will be able to compare Connie's size with the plug socket on the wall. Iain1 point
-
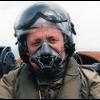
I've have the good fortune to shoot of the Blue Angels team at MCAS Miramar, NAF El Centro, and NAS Lemoore over the recent seasons. Below is a compilation of (I think) the better images in the order they would appear in the airshow routine (were I able to shoot from multiple locations in the same performance). EDIT - Sequence of images re-arranged in sequence with names added. Critiques and especially advice are absolutely welcome! Morning Light At Rest* Fat Albert Launch@ Fat Albert Fat Albert Pass* Fat Albert Overhead@ Fat Albert Getting Down# Fat Albert 2 Man-up Anticipation Narration All ready*1 point
-
The first details of the 2013 Cockpit-Fest event have just been added to the Newark Air Museum website. The reports include details of 8 cockpits already booked in; a host of associated displays and activities, including the Aeroboot / Aerojumble; some book signings / launches; and a new event supporter announced. Full details in here! More information will follow as and when it comes through.1 point
-
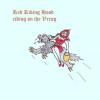
And a few more from my Polish collection wearing khaki... Fokker DVII. Revell kit. Restored and repainted and decalled with Techmod decals and lozenge fro Almark. Nieuport-Spad C5(?) AZ Models kit and decals. PZL P-7a. PZW kit. PZL P-11c Heller kit. PZL P-37 Los/ ZTS kit(?)Or even Mikro??? PZL P-23 Karas Heller kit. Hurricane Mk.1 AZ Models kit. Again these are all fairly vintage models. Except the Fokker DVII, Spad C5 and Hurricane that were built over the last few years. The Hurricane was the earlier issue and was quite bad to put together especially the canopy cover and the resin well....I made the cockpit fit with lots of shaving of plastic!1 point
-
Another Tamiya kit and it's pretty good. From start to finish it took me about a week. This aircraft was flown by Karl Hier in 1/JG 76 and fell into French hands on November 22 1939. It was given to the RAF in May 1940 and ended up being flown by 1426 Enemy Aircraft Flight at its establishment. Sent to Wright Field in the USA, it crashed on November 3rd 1942. All the decals were from my spares box.1 point
-
They called me "Spad". The old dirty "slow mover". In the hot humid sky There was no place to live but to fight He fought against me on the take-off and with me in flight. He was a stick'n'rudder guy.... Almost 44 years ago, on April 26, 1969 A-1J "Skyraider" 52-142029 from 602nd Special Operations Squadron USAF was shot down attacking mortar position somewhere in Laos. Pilot Maj. James B. East, callsign "Sandy 06" KIA...... No guts and no glory..... ....This is my tribute to all who flew it..... .....Build this one just one week ago. Did not use aftermarket product except "RBF" tags List of mods applied (from prop to tail) - bellcrank to propeller governor - ignition sparks wiring on the engine - sighting rod on portside of fuselage - modified gunsight (various dials were added) - standby magnetic compass - T/O and bomb director light indicators on the instrument shroud - Yankee Extraction System rocket behind the headrest (note it's red warning triangle on the fuselage) - an FM 622 whip antenna - an AN/ARN-22 aerial wire - pitot tube and cannons are made from syringe needles - safing/arming wires attached to the bomb fuses - bomb racks sway braces - RBF tags - hydraulic lines on the main struts - various hoses and rods in the wheel wells and so on It took about 60 days out of last six months... Best regards, Eugene Hope you liked it1 point
-
All but finished now. Just the exhaust tailpipes to fit. This has been a really enjoyable build. The car is a Group 44 'might-have-been' as they never raced an E Type coupe (as far as I know!) I bodgellated a little 1/24 version a while back and you can see it in one of the pics below. I added lots of wiring/pipework/plumbing according to Googled images and a few Jaguar books and catalogues, and I printed all the engine and body decals myself. A roadster is on my 'to do' list as soon as I can get another 1/8 kit..... Roy.1 point
-
MyTEMPEST is finished here the pics give me your impressions I have decorate with adapted "figures" and I made the camera with Evergreen profile here the progress http://www.britmodeller.com/forums/index.php?/topic/234935032-hawker-tempest-mk-v-at-132-scale/ regards topper711 point
-
Nope, because that is in effect an RFI. It is not carried out elsewhere within the forum genres, nor tolerated. I will also remind both yourself and Cuprar that there was no "Old layout", nor "Old Way", the requirement of posting RFI's and WIP's in the correct forum area was to enable a common location for the majority of the BM membership to find aircraft RFI's and WIP's instead of trawling through multiple areas was there all along. I was just conveniently ignored by the Airliner modellers until the Airliners section was so jumbled up with RFI's, WIP's, questions about paint, schemes, conversions, requests for parts, etc that that considerable Moderator time ended up having to be used to tidy it up in order to conform to the rest of the forum layout. Myself and Mike are unwilling to waste further time opening up individual threads in this or any other area to move them to the correct areas. Time that we could have more fruitfully employed trying to get that perfect metallic/weathered/mottled finish on whatever kit we were building instead of sweeping up in here..... I will say for one final time. We are not going to alter our stance on this unless there is evidence that the Civil Airliner contingent are generating enough builds and throughput to warrant one. Civil aircraft will remain under the overall umbrella of aircraft WIP and RFI. That is the final decision on the matter unless there is a very and I mean very significant change in circumstances.1 point
-
I reckon a SAL -300 would do the job, then with the spare pieces a cheeky little Emirates skycargo too.1 point
-
Everybody build more airliners1 point
-
Yes, just an exercise kill, but of an aircraft that is not easy to kill: an F-15C VF-111 engaged in exercises with the Kadena based aircrafts of 18th TFW during a 1983 cruise and a number of tomcats were later seen with kill markings of that type. It's very likely that the Hasegawa research team saw the aircraft in Japan right after the exercise1 point
-
Fair enough, this aircraft is looking more and more Russian each time I see it lol Be interesting to see it in Aeroflot colours.1 point
-
Hi all, isn´t a real beauty, this blue Jaguar? Thanks to Martin Pfeifer, who has built the Planet Model resin kit and to my oppinion did wonderful job. So, enjoy the photos:1 point
-
I regret to say that search NEVER worked for me properly and I can't find a way to search for tags. I joined this forum because it had one of the best Airliners sub-forums with everything I was interested in just two sub-forums. Regretfully, I now find it very difficult to follow the topics of my interest. Yes, anyone can move away without notice, as anyone can also create his/her own forum if they like. Why is that even mentioned? Is that something illegal, or you fear that you may loose to the competition? It's just that some of us may not be interested in all the other military aircraft, so we are pointing out that this layout does not work for the users. It works for the moderators and that's understood, but don't involve the other 99.9% of the members. You don't know how they feel or what they like. Make a poll if you like and let that decide. Hear, evaluate and decide.1 point
-
Republic RC-3 Seabee. 1/48 Glencoe kit. Humbrol Metalcoat silver. Kit decals. £1.00 Wilkinsons clip photo frame base with Valejo Acylic "sea". Blood, sweat and tears all my own... Build link...... http://www.britmodeller.com/forums/index.php?/topic/234937400-republic-rc3-seabee/ Smudge1 point
-
There are other photo(s) of 30 Sq Hurricanes, because I was planning on using them as reference for a "Tropical Land" piece that never got sorted out. They appear to be in the DG/MS scheme, and the serials do fall into the timescale where this was officially required, before the mistake was corrected. I'm likely to be busy today, but will go digging into Hurricane At War and other likely sources. Edit: just realised that what I said was ambiguous. The aircraft above have fairly clearly been repainted into TLS - but it may not have been the Desert scheme they were repainted from.1 point
-
Hi all, I work for Modelzone (in Eastbourne), and would like to apologize to SMD70 for the damaged kit he bought from one of our stores, but would like to say in our defense that our policy for damaged kits is to return them to the suppliers, on no account do they go back on sale!. I can only assume the kit SMD70 purchased had been opened for a customer to look at ,unfortunately when this happened the warped parts were not noticed. I would suggest that instead of returning kit to the shop (save fuel)drop an email to Revell they should be able to supply replacement part.1 point
-
David... yes the model comes with those "Y" shaped decals. Of course they broke int 50 pcs when I dipped them. The model has three coats of future on it and pre-shaded panel lines. I may dull coat the entire model when its finished. Michael & Roger ... I can't take credit for the scheme. I am sorta cloning the work of Fotios Rousch. Lawnguylander...hey buddy good to hear from you. Don't let the canopy put you off. Mine was cracked and had a corner missing. You can do it. From the photos I've seen of this bird it was indeed a big one. I figure another 2-3 days and it should be finished. I can't upload photos now (thanks Photobucket), but the decals are all on. The kit decals (wing walks) have bubbled up something horrid. I hope they settle down. All the cobbled together markings came out perfect. No silvering. I got lucky.1 point
-
Yes, the A50 was done by Eduardo. I just had started to scratchbuild one when the kit was released. I have one, and I'll post pics tomorrow if you want, Cliff. Paul, thanks for the tip on the Aero. That's a good idea, I'll follow it.1 point
-
Almost forgot this one. Polish 'Spark'!! Mikro kit or someone like that. I don't recall now.1 point
-
I'm sure there something in the blokes manual about admitting to such things, 'twas surely just a "momentary lapse" Steve.1 point
-
Yup, but reality is - boring... But here you have IMHO very nice Spit from new Eduard kit - with very realistic weathering... http://modelforum.cz/viewtopic.php?f=6&t=754551 point
-
yeah, why not! They have several on order. I would like to do a Revell A380 in emirates, but im stuggling to find it..1 point
-
Hasegawa 1/72 F4U-1 Corsair 'Birdcage' VF 17 USS Bunkerhill August 1943 This is my first attempt at scribing, the wings came ouut fine but the fuselage is a little 'matchbox'-like!1 point
-
My practice buils after 30 years out of the hobby. It's an Academy. Damn, I shouldnt be posting these, but this is as she stands now. Told you I was rusty. Plenty stillto be done, but this is a bitch of a kit. Had loads of trimming to do, and the fit is aweful (Maybe my skills) Well here goes. I'm done with this "dirty bird". I know there is a LOT of room for improvement, but this is my 1st build in YEARS and considered it a practice build. I even dirtied her up a bit with a pastel wash before matt clear coat. I also dipped the main rotor blades in boiling hot water to get a droop effect. They were way to straight and looked unnatural. Yes that is a magnifying glass in the background on the last pic. My oë is nie meer so lekker nie. It was a terrible kit with lots of flaws in the molding and the instructions were at times very unclear. But anyways, the next one can only be better.1 point
-
Another of my not too old kits. This one was made around 4 years ago. Hasegawa kit and decals. Also just before they were priced out of my pocket money range! Just love this kit. I've got one more built and will show that soon when I've done the photos.1 point
-
Here's a long awaited update for my little project... Remember I was talking about thickening up the front plate and adding the welds, well, I've done it.. This consists of two pieces of 0.060" card added either side of the front plate. This photograph is an attempt to grab the same angle as Mike has with his 131 pic. As far as the extended forward side plates go, I have looked at many pictures of Tigers and have seen variations. I also have plans which show the side plates as I have them?? Hope you like it...1 point
-
Quick update, Lots of little detail work on going. Final fitting of emergency canopy open handle. Cockpit sill work is done. By popular demand another video is in the works. That's it for now, Timmy!1 point
-
Nice artwork, however I suppose we can all strike out a new tool Mossie for 2014. Hopefully Airfix may have decided to offer us one of the other great British twins - like a New tool Beaufighter or (and) Blenheim perhaps??? Cheers.. Dave.1 point
-
Only just realised this GB is up and running. I've got an Airfix 1/48 Tornado ADV with decals for Red Zebra. Might have cockpit completed - it's been in my loft for years, so I'll have to check. Currently steaming ahead with a float-plane - but hope to join you soon. Edited 21 April. Zebra F3 has been retrieved from the loft. Unstarted and has Aeroclub white metal undercarriage parts. Missiles are probably in another box - but looks OK otherwise. I'll be with you soon.1 point
-
1:144 bike, okaaaaaaayyyyyy. Nice one1 point
-
Thanks Guys, I'll do my best! Looks like it's going to be big!! Heard mixed reviews about the build quality, but i'm not too concerned. If it looks right to me, I'll be happy! Dave1 point
-
Revell will be releasing a 787 kits. No batteries included of course!1 point
-
Hello all. I thought that, after being a member for a quite few years, it's about time I posted something. I've just finished this for a former 74 Sqn pilot and thought I'd like to share it with you all. Tamiya kit, obviously (not as good as it's been bigged up to be, in my view); Avionix (formerly Black Box) cockpit; Aires jet pipes; Flightpath Sidewinders and Houchin; some American company's gun, who's name escapes me; scratchbuilt ladder, chocks and one or two other little bits. Anyway, enough spiel, here are the pictures, if I can get it to work! Please feel free to criticise, as it's by no means perfect. Thanks for looking. Stew1 point
-
Smoke ON, Ready, BREAK! Back-lit* Father & son's day in the park Solos low pass Solos over the neighborhood Tuck-over roll Sneak-pass This is cool, Dad!* Awaiting their return Blue Angel & Snowbirds Taxi-in Scanning the crowd Pivot Turn SMILE Boss! March Back@ Heads in Hornets* Plane Captain's Attention1 point
-
Diamond Pass# Diamond Overhead Fortus@ Diamond Dirty Loop@ Solo 5 Double Farvel@ In the stack* BUUURN-ERS!* Diamond & Fat Albert Left Echelon@ Solos Pass Low Flat Break@ Planform@ Delta* Delta over 7 High Alpha*1 point
-
Comm cart with Centennial Emblem Parade Rest Business End# Chocks Pulled On the run Smoke On@ Taxi out* PEACE! Hand Salute1 point
-
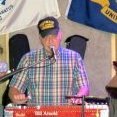
Hi Richard, that montage looks absolutely stunning, and evocative. I'm sure that it will be a show-stopper if you display it at any of the model shows next year, during the 30th Anniversary celebrations. I've watched this thread with interest, especially at some of the comments about dress and equipment issues. The point is that each service/corps/regiment had different styles of kit at various times due to whichever theatre they had operated in previously. My unit had just returned from 3 months in Norway and much of our kit was 'enhanced' with Arctic clothing such as snow gaiters, Halle-Hansen ski-mitts and mountain boots. As to the discussion on Bergens. All our (Royal Marines) bergens were of the Arctic warfare type and were olive green all over, except for the frame which was a sort of brass looking metal. Although the bergens were olive green, many servicemen of all forces sometimes obtained spare DPM material (same as the jackets) and would cover their bergens with this material. This wasn't official but it did help with camouflage. I'm posting a couple of images below to try to show you some examples of equipment worn during the Falklands campaign Mike My hotel room on Mt Kent - the brass looking base of the bergen frame can be seen beside my left leg. Note mountain boots and Gortex gaiters being worn. at Port San Carlos - I am wearing NI gloves Passing Moody Brook during advance on Stanley - blue Halle-Hansen ski-mitts worn by Robbie (rear left) Entrance to Stanley Airfield - GPMG gunner on right has snow-gaiters over standard boots. Me on left with NI gloves and arctic waterproof over-trousers1 point
-
Part - the fourth... The plastic strikes back! (Dec 2000) OK, so it's been a long time, but I never said it would be quick! The Christmas break has given me a few hours to work on her airframe and I thought some pictures would be in order... Working here on the horizontal stabiliser. The top and bottom halves, Port and Starboard, have been joined together, with a 20 thou polystyrene sheet insert sandwiched between the two halves at the tip to mark out the correct shape (the parts were incorrect as moulded). The correct tip profiles were then built up with super glue. The Port and Starboard sides have then been joined to give the correct overall span (according to dimensions given on original Lockheed drawings) using a miniature 'torsion box' made from 60 thou polystyrene sheet to ensure a strong join. Next, the central section was 'skinned' using 40 thou sheet, shaped according to plans and joined to the inner box and outer panels with a medium viscosity super glue for added strength. The picture at right shows the assembly after initial shaping. The gaps have been filled with super glue and now await a session on the bench sander to smooth everything off prior to priming with Halfords Grey Primer and subsequent panel engraving. This assembly is extremely strong! The ruler is just over 30cm/12 inches in length!! Meanwhile, back with that huge fuselage, the foam used to fill the mouldings in Part I has been removed from the fuselage halves and the tail cut off on each side in line with the internal pressure bulkhead on the original aeroplane. These two tail halves have been bonded together with super glue and the forward face sanded to produce a flat, true, surface, to which a 40 thou skin has been bonded to form the smooth bulkhead. You will notice that as well as adding strength, the foam also provides an exact representation of the shapes required for bulkheads, without having to use a profile gauge. The forward foam sections have been split horizontally, in line with the fuselage floor, and the Port and Starboard sections below floor level joined, prior to sanding the top surface to make it perfectly level (done on the bench sander) prior to bonding a 40 thou floor in place. Again, the foam forms a really easy way of establishing the exact shape of the floor. Work has now commenced on marking out the positions of windows and the nose gear bay, in preparation for fuselage detailing. I use a lot of tape and careful measurement here - using the old saying, 'measure twice (at least!) - cut once. A couple of quick 'general arrangement' pictures here that give a good idea of the shape and size of this beauty! Iain1 point


This leaderboard is set to London/GMT+01:00