
Leaderboard


Popular Content
Showing content with the highest reputation on 22/04/13 in all areas
-
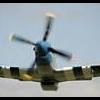
- In 48 scale as usual in both single and two seater - Hope you like it3 points
-
Recently finished this one. The kit is the 1/48 Hasegawa F-4G, it has a True Details seats, painted with Lifecolor paints and the decals are from Afterburner.2 points
-
Avro Lancaster B.III (Special) the Dambusters 1:72 Airfix Few aircraft have the ability to capture the imagination and affection of the public, but the Lancaster surely ranks as one of them. The basic design of the Lancaster evolved from the less than successful Avro Manchester. Although the design of the aircraft was sound, its performance in service was significantly undermined by its chronically unreliable and underpowered Rolls Royce Vulture engines. Avro's Chief Designer resolved the problem by proposing an improved version with a larger wing and four of the less powerful, but far more reliable, Rolls Royce Merlin engines. Initially designated the Manchester III, the aircraft was renamed the Lancaster and entered service in 1942, the same year that the Manchester was retired from front line service. Once in service, the Lancaster proved to be an excellent aircraft. Its vast bomb bay could accommodate any bomb in the RAF's wartime inventory, right up to the 12,000lb blockbuster. Later in the war the aircraft was adapted to carry a range of special weapons, including the innovative Upkeep mine and the huge 22,000lb Grand Slam bomb, both designed by scientist and engineer Barnes Wallis. The Lancaster's place in history was secured on the night of the 16th/17th May 1943. On this date, a force of 19 Lancasters of the specially formed 617 Squadron attacked a group of four dams in the heart of Germany's Ruhr Valley. The aircraft carried the unique Upkeep mine, popularly referred to as the bouncing bomb. This weapon was the brainchild of Barnes Wallis and was designed specifically for use against these dams. As a result of the raids the Möhne and Edersee dams were breached, causing massive flooding and the loss of electrical power for hundreds of factories in the region. Eight of the participating aircraft failed to return, and of the 133 crew who took part, 53 were lost. It is estimated that around 1,600 individuals were killed on the ground. 34 of the survivors were decorated, with the leader of the raid, Wing Commander Guy Gibson, awarded the Victoria Cross. When Airfix announced their release schedule for 2013 just before Christmas, it was the cause of much celebration and excitement around these parts. One of the many cherries on the cake was a new tool Lancaster, promised in both Hercules-engined B.II and Merlin-engined B.III special versions. First to be released is this, the B.III special version. The kit is presented in a fairly large top-opening box adorned with an atmospheric image of a Lancaster cutting through the moonlight skies of the Ruhr Valley. Six sprues of plastic have been crammed into the box, and together they hold a total of 265 parts. Four sprues are given over to the Lancaster B.III itself, the fifth is for the Upkeep mine, its trolley and the conversion parts for the airframe, while the last sprue contains the transparent parts. The kit is nicely moulded. Whilst I've seen finer panel lines in my time as a reviewer, the panel lines on the external surfaces of this kit don't stand out as being overly trench-like. The overall shape of the model looks good and I couldn't detect any serious shape errors from examining the parts on the sprue. Those hoping for a richly detailed kit will not be disappointed with this model. The interior is very well appointed, providing plenty of interest where needed. Assembly begins with the roof of the bomb bay and the spars for the wing. The rest of the model builds up around this core structure. The bomb bay itself is very nicely detailed, although little of it will be seen unless you choose to finish the model as a standard B.III (and if you choose to do this, you'll need to provide your own decals and ordnance). Onto this part are added the spars for the wings. The spars form internal bulkheads at their centre, and extend as far as the main landing gear bays in the inner engine nacelles. The flight deck is comprised of a raised floor, a two-part pilot's seat, a folding seat for the flight engineer, a control column and a two-part instrument panel. Forward of the cockpit is the bomb aimer's position, for which a nicely moulded bomb sight is included. Aft of the cockpit are the navigator's and radio operator's stations. Sidewall detail is moulded in place on the inside of the fuselage halves and in my opinion it looks excellent. An optional ventral gunner's position is provided too. Before you join the fuselage halves together youll need to drill a couple of small holes in pre-marked positions. These are required in order to fit the mechanism for the Upkeep mine later on. The fuselage window glazing must be installed at this stage too. I for one dont fancy masking all of these windows, so I'm hoping that Eduard will release a set of masks for this kit before too long! Once the fuselage halves have been joined, assembly moves on to the wings. I have to doff my cap to Airfix at this point, as they have been very clever indeed. Not only do the two wing spars mentioned above aid with the alignment of the wings and strengthen the structure of the model, but they also form the fore and aft walls of the main landing gear bays. To complete the structures, you just need to add the rib and frame details which run parallel to the fuselage. The end result should be a pair of landing gear bays which are superbly detailed as well as nice and strong. The ailerons are moulded in place but the landing flaps are separate assemblies, and very nice they look too. The elevators and rudders are all moulded as separate pieces and so can be posed in a variety of positions if so desired. The engine nacelles are fairly simple, but the front faces of the radiator intakes are moulded as separate parts. This means that you wont have troublesome seams to clean up, which is always a plus. The struts which connect the landing gear doors to the undercarriage legs are moulded in place. This means that, should you build the kit with the gear down, you should be able to achieve a good, strong fit at the first time of asking. If you wish to build the kit with the gear up, then you just need to cut them off. I really like this approach and I hope it works as well in practice as the instructions suggest. The landing gear legs themselves are well moulded and nicely detailed and the wheels have flat spots moulded in place. At this stage you are required to add the assembly for the Upkeep mine. If you paid attention and remembered to drill the required holes at the start of the build, then this should be straightforward. The mechanism itself is very nicely detailed, as is the large, drum-shaped mine. As mentioned above, there is a very nice loading trolley included. If you want to build the model as the centrepiece of a diorama, this feature will be a real boon. All that remains to do now is add a few small parts such as the DF loop and elevator actuators, the propellers and the transparent parts. Airfix have suggested that you assemble the turrets last of all, but you could just as easily build them at the outset and set them to one side. The frame lines on the transparent parts are clearly marked and there are some spare turrets included which hint at future options. A choice of two schemes is provided on the decal sheet: Avro Lancaster B.III Special E0825/G, reserve aircraft flown by Flight Lieutenant Joseph Charles McCarthy DFC (Royal Canadian Air Force), No. 617 Squadron, Operation Chastise, Scampton, 16/17th May 1943; and Avro Lancaster B.III Special E0927, flown by Flight Lieutenant Robert Norman George Barlow DFC (Royal Australian Air Force), No. 617 Squadron, Operation Chastise, Scampton, 16/17th May 1943. This aircraft and the crew were lost in action. The decal sheet is nicely printed and includes a small selection of stencils, as well as a decal for the instrument panel and a rather nifty little map for the navigator's table. Conclusion Lancaster fans already have a reasonable choice of relatively modern kits from Hasegawa and Revell. Although neither kit is flawless, both are pretty good. In light of this, some may be surprised that Airfix have chosen to go to the expense of tooling yet another new Lancaster. They shouldn't. Airfix sell kits of Lancasters like Ford sell cars; it's simply what they do and a decent Lancaster is essential to their continued success. Happily, this kit looks to be a real gem. It is nicely detailed, well moulded, cleverly designed and combines detail and buildability in a single, clever package. I can't wait to get stuck in! Review sample courtesy of1 point
-
Finished this one over the weekend. RetrokiT's lovely little resin rendition of the Aircar from Cloud City on Bespin in the Empire Strikes Back. Fairly simple kit with 21 parts. With a bit of orange paint and then some detailing it ends up like this. If you don't know RetrokiT it's worth a look, they do some nice 1/144 aircraft upgrade kits as well as a number of Sci-Fi kits and upgrades. Link Here I have nothing to do with them other than liking the stuff they make. Cheers, Warren1 point
-
Let me present to you my old model: F6F-3 white 17 of Lt. Richard Stambook, VF-27, USS Princeton, October 1944. I used an additional set of parts from Aires, decals - Italeri F6F-3. Paints Tamiya, Revell, lacquer Tikurilla. Antenna cable is Nylon thread, wing navigation lights - clear plastic. Details of the fuel tank, machine guns, spark plug wires and hydraulic landing gear - beer tin + brass wire Lion Roar, medical needles and self-adhesive foil. List of references: 1. Squadron - Aircraft # 1036 F6F Hellcat 2. Aero_Detail_17_F6F_Hellcat 3. Bert_Kinzey_26_Detail & Scale Series_F6F_Hellcat 4. Bert_Kinzey_49_Detail & Scale Series 49 F6F Hellcat 5. Bunrin Do Famous Airplanes of the world 035 Grummann F4F_ F6F_ F8F 6. Kagero Monografie 10 Grumman F6F Hellcat 7. Master_Modelers_034 - F6F-3 Hellcat 8. Osprey - Aircraft of the Aces Series # 010. Barrett Tillman. Hellcat Aces of World War 2 9. F6F-5K Hellcat Walk Around1 point
-
After a looong hiatus while I got to grips with masking & painting, I finally finished this kit tonight, depsite my old techniques coming back to haunt me on the canopy. It's not my best model ever, but looks quite striking as long as you don't have a magnifying glass with you Build thread is here if you're interested. The cockpit was a pleasant surprise, as it was painted over 2 years ago, and has been hidden by the masking tape ever since Comments & critiques welcomed as usual.1 point
-
Hi. Here is my attempt at these excellent kits I got for a few pounds. Please let me know what you think. Thanks Ian1 point
-
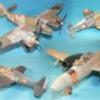
A couple more spitfires for my collection. Firstly a Mk.XVIII made from an Academy FR.XIVe and a Falcon vacform fuselage (thanks to my Dad for cutting and sanding the bits) Probably the most difficult model I have made. Getting the fuselage to the wing was fraught and involved lots of trimming, cutting and poor language. Finished in the markings of 60 Sqn RAF in Malaya. Decals from Aeromaster sheet 48-527. The decals for the nose stripes were a bit hopeless so I masked and painted them. Anyway, here it is. Next is an attempt at the new Airfix PR.XIX. An altogether easier build. Finished with Xtracrlyix and using Xtradecal deacls. I've added a full set on invasion stripes.The are a tad on the wide side but I used 10mm Tamiya tape and 18inch stripes in 1/48 scale turns out to be 9.5mm or something like that so I thought it would be near enough. Anyway, here it is.1 point
-
Hello I'd like to show you the model I've recently finished. Short WIP. LaGG-3 series11, Cap. V. Mironow 609 IAP, Afriikanda airfield (Murmansk area), sammer 1942. Familiy: enjoy watching, comments welcome.1 point
-
1 point
-
Hello, Here some pictures from my De Havilland Venom MK-4, from Classic Airframes in scale 1:48. Swiss Air force, Sommer 19781 point
-
Cockpit grey-green was a top coat, not a primer, and Supermarine (plus other manufacturers) used grey primer undercoats. There was a stores number, so, presumably, there was a wartime shade card, normally issued by Farnborough. Surviving parts appear to be closer, in shade, to the cap of XF-71, rather than the contents; one day, maybe, a modeller will go into the cellars of a paint manufacturer and discover a pile of WWII sample cards, which is the thing dreams are made of. Edgar1 point
-
A technique somebody suggested to me that I have found helpful is to use a a small amount of white glue (like Elmer's or Gator Glue) to maneuver the piece into place, and then seal the edge with a small amount of cyano for a permanent fix. This is especially helpful when dealing with those pesky 2-part instrument panels, and tends to dramatically cut down the amount of 'colorful metaphors' reaching the ears of other family members by giving you enough time to line the dumb things up....I've heard of others using a touch of Future in the same way, followed by a sealing of cyano once the part was in place. HTH Byron1 point
-
Truly stunning.1 point
-
Hello, Here you are my last built, this is the Hasegawa B26 C MARAUDER in french marking in 1945. I used super metallic gunze paint and decals from PT DECALS I hope you will like it You can see more on my web site http://aviapassionmaquette.free.fr/Aviapassion%20Maquette%20montage%20B26%20MARAUDER.html @bientôt Thierry1 point
-
No, as I did not get far and the people at the hotel were rather rude1 point
-
I'm old enough to remember them (probably both from "my" generation). Good old Morph and Chas loved them, they kinda speak how the "yooth" of today do now I thinks about it Kind Regards Dazz1 point
-
Hi all This is my last project. I realy wanted to make something like this: but it turned out like this1 point
-
I've got a number of models that are approaching the finish line, though since I'm starting a few weeks of temp work tomorrow there's no telling when they will actually get finished and displayed. This is the AModel Global Flyer, which is a descendant of the Rutan Voyager. The two kits are a good example of how AModel has improved their operation over the years. The Global Flyer has a much smoother surface, the sprue attachments are smaller, and fit was pretty decent. But never forget that they are short-run kits, and devise your approach accordingly. With these huge wings (all butt-joined), you don't really want to be picking them up by a wingtip. No issues with the kit decals, which is a good thing since I don't know what you'd do if you nuked one of the decals. Not like there are any aftermarket options. I've included a shot of the Global Flyer and Voyager together. Just need the White Knight / Spaceship One to complete the set. This is completed model #426 (#7 for the year), finished in April of 2013.1 point
-
I think you'll find that should be "Are you Mike's long lost brother?"1 point
-
Hi Enzo Matrix, the Bengals with black tails and tiger-striped rudders had serve on combat OIF when they were basaded at Al Asad in Iraq during 2005. Their misions were in direct support of Marine, Army and Coalition ground units. The weapons to use are different type of mission usually bombs and rockets, plus SideWinder missiles for auto defence, and two pod under engine. Don't forget that, the Bengals took part in the missions on the Balkans from the Aviano base during the years '90. Also in those sorties there was an aircraft with rudders striped in orange / black, but the tails were in gray, and NI in hight vis, this was paint in Aviano during 1997. I had see this airplane many time during these years. I'm member of AAFG. Good job guy. Cheers Linus1 point
-
This is the 1/48 Revell USA kit, straight out of the box. I used the kit markings for an aircraft from the 51st Fighter Interceptor Wing based on Formosa in 1955.1 point
-
Finished of scratch building and painting the interior detailing, using photos I have as a guide but with some artistic license for 1/72 scale, tried to emulate the wooden cupboards as much as I could, but anyway these are the photos before closing up the 2 halves, I have also added some nose weight to stop it being a tail sitter. As I have to make a master for the clear cockpit I have left out the pilots seats and control column until last1 point
-
And this is Me 262B-1aU11 point
-
A bundle of pics showing progress of the Piper Cub I'm working on. Assembling and fitting the floats was a fiddly job! Had no end of fun with it in trying to get it place!! That square piece of 'wrinkly stuff is a piece of material that I use to work with at a previous job and is a polymer of high shrink. The sample was to test the shrink rate. At the time I thought it would make a good representation of water for a base. Found it among some stuff in a tidy up and so am going to try it.1 point
-
Good afternoon everybody Here is my last built I used a PE set for detailling the cockpit and Humbrol Metalcote brush painted , decals come from a Aims decals sheet . Uploaded with ImageShack.us Uploaded with ImageShack.us Uploaded with ImageShack.us Uploaded with ImageShack.us Patrice1 point
-
I love it! Nice to see a Me 109 in a very different paint scheme! Well done!1 point
-
Too late for the gallery I fear, so I've put the pair of them here instead.1 point
-
http://www.impdb.org/index.php?title=The_Expendables_2 Look at the first plane after the BO-105. Unless the producers thought it was a cool looking plane and decided not to change it's paintwork?! The "landing" they do in it is pretty... far fetched tho. Not too sure if the Mil-8 is an nod to Rambo with its Mil-24 wannabe Puma with the Mil-24 prototype cockpit? Either way, it's a cool plane, one I must get myself. Kind Regards Dazz1 point
-
Thanks Duncan, now I feel much better !!1 point
-
Nice model, mate, i never got the prue stretching right, i now use human hair. With long haired ladies in the house there is abundant supply..1 point
-
And so we move on. As per the instructions, the interior is starting to come together. I had to miss off one piece as it should have been put on before the stage suggested by the instructions. No matter, I am becoming more convinced that this interior is going to be a bit of a waste as there seems to be very little to see. as more detail is added, I noticed that the instructions seem to call for black a heck of a lot, a quick look round the 'net shows me that the interior is indeed black. This must have been designed by the same bloke who did the famous "coal hole" on the Sea Vixen! Maybe his eyes worked on different wavelengths, or perhaps he was very depressed. So far:- I used a bit of artistic license in giving the floor a grey colour, and the rear bulkhead is certainly a bit brighter than it should be, also to add (hidden) interest i out a chart on the table and tried to add some colour to the screens. The first bit of bright colour has been added, and in order to increase the light inside, I have modded the back door so that it is open, though i don't think this will help matters. Still, chin up and keep on modelling! Thanks for looking.1 point
-
Some assembly done now. The enfine fitted together very nicely, although I secured the top of each pushrod to its rocker with a dot of cyano. I've just noticed I still need to do the ignition wires. Cockpit. Maxima Chameleon fishing line used for internal bracing and rudder pedal wires. Apart from that, everything else is what comes in the box. Thanks for looking, John1 point
-
Thanks Dave! Got a bit more done, all the decals are on. I know in the picture it looks like there's just a few red stars and nothing else, but there are actually quite a lot of small stencils, especially on the engines. Here's how it is now: Due to the issues I've had with the spray can (the finish is still fairly rough) and also due to the fact that I haven't given this build the time and energy it deserves (i.e. sanding and buffing like mad to make it all smooth), I'm a bit concerned about how the wash will go. I think if I do my normal pro-modeller wash it'll just mucky up the whole airframe (the wash works much better on a glossy surface). So, I'm going to do a gloss coat in a couple of mins, and I might even do another one (that'll be the 4th) to make it as glossy as possible, to help the wash. At least it's standing on the undercarriage now, so it'll make putting it down after the gloss coat a lot easier! I've got a week left to finish this, and even though I'm very busy this week, and won't get to the bench much at all, I think I should be fine. Most of the other bits (props, wheels etc.) are either done, or very nearly done. So all going well I should make the deadline. Thanks... J.1 point
-
I have 2 777-200's I'd like to get two of the EE 777-300's though1 point
-
I've sprayed the nosecone etc and masked it off. Then done the wetcoats for the fuselage. The Alclad black gloss seems thinner then the Tamiya gloss - so I will polish it with a cutting compound. As can be seen the coat has a soft sheen to it. I want to polish that to a high gloss. I may need to re-touch, don't know yet so will see how it goes. I won't touch it for at least two day's now. In the mean time I'll do the exhaust.... I won't show a picture yet because I think it looks crap!...1 point
-
Hi All, a quick build between GBs. You can argue about the SCW colours all you want, there are all sorts of discussions about RLM63, but this is how I did it for a Condor Legion 109E from 2.J/88 in 1939. Kit: Hasegawa 1/72 Bf109E acquired at the Huddersfield show for £2:50 Decals: Exact-a-cal acquired from ebay for £2:20 (1968 vintage!) Uppers: Tamiya Sky Grey Lowers: Lifecolor RLM65 Other colours: Vallejo model colour and model air, xtracrylix, Tamiya, Humbrol metalcote. Final finish: W&N satin varnish Additions: Tamiya tape belts with scratched fine wire buckles, Revi gunsight from plastic strip/acetate, lead wire brake lines, aerial from stretched cotton bud plastic, rudder offset (doesn't really show in the pics). The decals are very thick and the wing roundels are white circles with the black over the top so they are extra thick. Decals were provided for the wing and fuselage black areas, but they are impervious to Micro decal solutions so I masked and sprayed them. I sprayed the fuselage roundels as well, hence the slightly ragged edge. The rudder cross is a decal. Pre and post shading was applied to break up the block colour but no more weathering was added, just Paynes Grey watercolour to accentuate the panel lines. Update: It was only when I reviewed the photos this morning I realised that I had left the masking on the small triangular windows at the bottom front of the canopy. This is now rectified. That's one less in the stash......1 point
-
Hi folks, Here is my attempt to update the old Matchbox Beau as a sacrifice to ensure that Airfix give us a new tool kit in 2014. I made a few changes / mods to the kit as I went along: Removed the fin fillet Removed the D/F loop opening Scratchbuilt a basic interior Substituted FROG long tailplanes for the kit ones Substituted Hasegawa cannon tray and radar nose for the kit ones Used Aeroclub Hercules cowls / engines / props (thanks, John!) Removed a couple of completely wrong panel lines, de-emphasised the others and rescribed tailplanes and machine gun panels on the upper wings, Reduced the dihedral on the outer wing panels by at least half Added gratings to the oil cooler intakes Substituted Hasegawa / scratch built carburettor intakes, Used aftermarket decals for HU-P ND221 of 406(Canadian) Sqn, from the profile in the Operation Overlord AIRFILE, Vol. 1 After that lot, I reckon we're definitely going to get a Beau from Airfix next year! regards, Martin1 point
-
I found the Revell 1/32 Hawk in Hobbycraft for £6.50, and decided that was too good a bargain to miss. Xtradecal 30th anniversary decals, Eduard PE for the cockpit and a metal pitot were the only extras, other than wire brakelines. Unfortunately the kit was cursed and suffered more disasters per square inch than any other build I've ever done. No fault of the kit, I just had an attack of the clumsies. I was really pleased with the shine I'd achieved on the black gloss paint, (Tamiya), when the thing took a nosedive off the bench onto the floor. The forward fuselage/wing joint became dislodged and left a step I could do nothing with. The seats were a really tight fit and when pushing one of them into place I managed to push the cockpit tub down into the nose, needing a self-tapping screw to be used in the seat locating hole and pulled with a pair of pliers to relocate it, (nearly). I lost count of the number of parts that refused to stick together, yet glued themselves firmly to the carpet/cat/trouser leg when they pinged away. A coat of Klear reacted with the paint and created an effect like crocodile skin in places. If Hawks are ever built from old handbags this effect will look really good. A coat or several of the new Humbrol Clear has rescued it a bit, but I don't think this one will be appearing on any show tables. I only post it here to prove I haven't been doing nothing for the past month. I like the big scale though, and I'm looking forward to (hopefully) making a better job of the Hunter I picked up at Hinckley. Cheers, Paul1 point
-
Very cool, finished one of these myself about two weeks ago. Not as good as yours mind. Thank you for sharing. Would it be possible to see the undercarriage? I'd be insterested to see what you done with that. Kind Regards Dazz1 point
-
Oh, it will be the Swedish version in green and grey. It's an ex-Luftwaffe machine, so the engines should be correct. Even so, there are some areas where it could be made more accurate, but I don't think I will do that - I'm a little bit short on time as we expect a baby next month.1 point
-
Its been awhile since ive been able to touch this one but i now have wings fitted and the rear wings fitted too no real fit issues but like most spitfires theres a bloody great hole that needs filling i best get sanding and filling.1 point
-
It's finished! More pics in RFI1 point
-
Hi all This is my first effort in 20 years, I made a few schoolboy errors with the decals like leaving in the water too long and had a couple of breakages but I am quite happy with the results considering....... I have realised that I have not attached the rockets to the wings, so my excuse is that its just come back from a mission lol I hope you like my efforts, and please feel free with your constructive criticism Nubbs1 point
-
Thanks, Duncan. In the future, please refrain from using the words "back" and "bashing" in the same sentence, especially when used one right after the other. Gives me a bit of a shiver when I read that. Cheers, Bill1 point
-
I heard a good tip, probably on here - after masking, spray a coat of the colour you are trying to protect. That way, any bleed will be hidden. A coat of clear varnish should also work.1 point
-
Free Gracemeria!!! Gotta love an Republic of Emmeria plane eh? Thats the top picture btw from Ace Combat 6 : Fires of Liberation. As for the model, very very nice Gotta love the camo, must of taken a while to mask that bugger up? Kind Regards, Dazz1 point
-
Hi Marko ??, Sorry if that isn't your name. Based on the research I did, I came to that conclusion. You're absolutely right, we all have personal preferences. I wasn't trying to start an argument or a debate. I (or perhaps we, all at Britmodeller) write reviews as a hobby, balancing family, work, modelling and of course reviewing. I really wish I had more time to do more in depth analysis, but I don't I'm afraid. Hence, I'm always welcoming of other peoples experience and knoweldge as Giorgio did above if it adds value to the review I appreciate that this way of working may not be good enough for some people, that is something we just have to accept. Cheers Neil1 point
-
Very nice indeed,especially RAF Leuchars Duncan ,havent tried Alcad yet ,better practice before i do my 48th Leuchars machine!!,1 point
-
Last time I saw them they was on their bellies sat in high grass. I got some funny looks of the builders, but it is worth asking as I'm sure they would help.1 point


.thumb.JPG.3498f40362ff13ebfc4b2e45abbd545e.JPG)


This leaderboard is set to London/GMT+01:00