
Leaderboard


Popular Content
Showing content with the highest reputation on 21/04/13 in all areas
-
Hi Folks Being 'The Last' I thought this deserved something a little different, so with the help of an Airfix 1/24 motor and stand... And finally, a couple of shots alongside the rest of my 1/48 Spitfire collection... Regards JA5 points
-
Avro Lancaster B.III (Special) the Dambusters 1:72 Airfix Few aircraft have the ability to capture the imagination and affection of the public, but the Lancaster surely ranks as one of them. The basic design of the Lancaster evolved from the less than successful Avro Manchester. Although the design of the aircraft was sound, its performance in service was significantly undermined by its chronically unreliable and underpowered Rolls Royce Vulture engines. Avro's Chief Designer resolved the problem by proposing an improved version with a larger wing and four of the less powerful, but far more reliable, Rolls Royce Merlin engines. Initially designated the Manchester III, the aircraft was renamed the Lancaster and entered service in 1942, the same year that the Manchester was retired from front line service. Once in service, the Lancaster proved to be an excellent aircraft. Its vast bomb bay could accommodate any bomb in the RAF's wartime inventory, right up to the 12,000lb blockbuster. Later in the war the aircraft was adapted to carry a range of special weapons, including the innovative Upkeep mine and the huge 22,000lb Grand Slam bomb, both designed by scientist and engineer Barnes Wallis. The Lancaster's place in history was secured on the night of the 16th/17th May 1943. On this date, a force of 19 Lancasters of the specially formed 617 Squadron attacked a group of four dams in the heart of Germany's Ruhr Valley. The aircraft carried the unique Upkeep mine, popularly referred to as the bouncing bomb. This weapon was the brainchild of Barnes Wallis and was designed specifically for use against these dams. As a result of the raids the Möhne and Edersee dams were breached, causing massive flooding and the loss of electrical power for hundreds of factories in the region. Eight of the participating aircraft failed to return, and of the 133 crew who took part, 53 were lost. It is estimated that around 1,600 individuals were killed on the ground. 34 of the survivors were decorated, with the leader of the raid, Wing Commander Guy Gibson, awarded the Victoria Cross. When Airfix announced their release schedule for 2013 just before Christmas, it was the cause of much celebration and excitement around these parts. One of the many cherries on the cake was a new tool Lancaster, promised in both Hercules-engined B.II and Merlin-engined B.III special versions. First to be released is this, the B.III special version. The kit is presented in a fairly large top-opening box adorned with an atmospheric image of a Lancaster cutting through the moonlight skies of the Ruhr Valley. Six sprues of plastic have been crammed into the box, and together they hold a total of 265 parts. Four sprues are given over to the Lancaster B.III itself, the fifth is for the Upkeep mine, its trolley and the conversion parts for the airframe, while the last sprue contains the transparent parts. The kit is nicely moulded. Whilst I've seen finer panel lines in my time as a reviewer, the panel lines on the external surfaces of this kit don't stand out as being overly trench-like. The overall shape of the model looks good and I couldn't detect any serious shape errors from examining the parts on the sprue. Those hoping for a richly detailed kit will not be disappointed with this model. The interior is very well appointed, providing plenty of interest where needed. Assembly begins with the roof of the bomb bay and the spars for the wing. The rest of the model builds up around this core structure. The bomb bay itself is very nicely detailed, although little of it will be seen unless you choose to finish the model as a standard B.III (and if you choose to do this, you'll need to provide your own decals and ordnance). Onto this part are added the spars for the wings. The spars form internal bulkheads at their centre, and extend as far as the main landing gear bays in the inner engine nacelles. The flight deck is comprised of a raised floor, a two-part pilot's seat, a folding seat for the flight engineer, a control column and a two-part instrument panel. Forward of the cockpit is the bomb aimer's position, for which a nicely moulded bomb sight is included. Aft of the cockpit are the navigator's and radio operator's stations. Sidewall detail is moulded in place on the inside of the fuselage halves and in my opinion it looks excellent. An optional ventral gunner's position is provided too. Before you join the fuselage halves together youll need to drill a couple of small holes in pre-marked positions. These are required in order to fit the mechanism for the Upkeep mine later on. The fuselage window glazing must be installed at this stage too. I for one dont fancy masking all of these windows, so I'm hoping that Eduard will release a set of masks for this kit before too long! Once the fuselage halves have been joined, assembly moves on to the wings. I have to doff my cap to Airfix at this point, as they have been very clever indeed. Not only do the two wing spars mentioned above aid with the alignment of the wings and strengthen the structure of the model, but they also form the fore and aft walls of the main landing gear bays. To complete the structures, you just need to add the rib and frame details which run parallel to the fuselage. The end result should be a pair of landing gear bays which are superbly detailed as well as nice and strong. The ailerons are moulded in place but the landing flaps are separate assemblies, and very nice they look too. The elevators and rudders are all moulded as separate pieces and so can be posed in a variety of positions if so desired. The engine nacelles are fairly simple, but the front faces of the radiator intakes are moulded as separate parts. This means that you wont have troublesome seams to clean up, which is always a plus. The struts which connect the landing gear doors to the undercarriage legs are moulded in place. This means that, should you build the kit with the gear down, you should be able to achieve a good, strong fit at the first time of asking. If you wish to build the kit with the gear up, then you just need to cut them off. I really like this approach and I hope it works as well in practice as the instructions suggest. The landing gear legs themselves are well moulded and nicely detailed and the wheels have flat spots moulded in place. At this stage you are required to add the assembly for the Upkeep mine. If you paid attention and remembered to drill the required holes at the start of the build, then this should be straightforward. The mechanism itself is very nicely detailed, as is the large, drum-shaped mine. As mentioned above, there is a very nice loading trolley included. If you want to build the model as the centrepiece of a diorama, this feature will be a real boon. All that remains to do now is add a few small parts such as the DF loop and elevator actuators, the propellers and the transparent parts. Airfix have suggested that you assemble the turrets last of all, but you could just as easily build them at the outset and set them to one side. The frame lines on the transparent parts are clearly marked and there are some spare turrets included which hint at future options. A choice of two schemes is provided on the decal sheet: Avro Lancaster B.III Special E0825/G, reserve aircraft flown by Flight Lieutenant Joseph Charles McCarthy DFC (Royal Canadian Air Force), No. 617 Squadron, Operation Chastise, Scampton, 16/17th May 1943; and Avro Lancaster B.III Special E0927, flown by Flight Lieutenant Robert Norman George Barlow DFC (Royal Australian Air Force), No. 617 Squadron, Operation Chastise, Scampton, 16/17th May 1943. This aircraft and the crew were lost in action. The decal sheet is nicely printed and includes a small selection of stencils, as well as a decal for the instrument panel and a rather nifty little map for the navigator's table. Conclusion Lancaster fans already have a reasonable choice of relatively modern kits from Hasegawa and Revell. Although neither kit is flawless, both are pretty good. In light of this, some may be surprised that Airfix have chosen to go to the expense of tooling yet another new Lancaster. They shouldn't. Airfix sell kits of Lancasters like Ford sell cars; it's simply what they do and a decent Lancaster is essential to their continued success. Happily, this kit looks to be a real gem. It is nicely detailed, well moulded, cleverly designed and combines detail and buildability in a single, clever package. I can't wait to get stuck in! Review sample courtesy of4 points
-
2 points
-
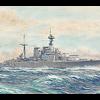
Decided i had to call time on this project, i've been working on this since 2007 and it was the first ship i ever started, looking back at the project ive learnt a whole lot, but made a load of silly mistakes (most notably attempting a major revision for my first ever ship!) almost right out off the bat some filler i had used managed to burn a hole through the hull at the bow which needed repairing, the cage antennas proved to be a bit beyond my skill and awnings really never looked as good as i hoped, then the seascape didnt work for me and the dock i originally planned to have her moored against just wasn't working ll that being said it holds a special place for me, I always liked Hood, she's my favorite ship and she looked her best in 1924 on the empire cruise, Learnt so much on Hood that when i did KGV in 2011 she was a far better ship that i would have been able to do when i started Hood Im currently collecting the 1/200 Hood magazine set, so i will revisit Hood again in a year or so, and might give another 1/350 a go sometime, but for now its time to call it done and move on to something else few pics for the meantime, enjoy, but dont judge too harshly2 points
-
Hey all added the final touches to my KGV so now its ready for inspection build thread is here This is the first ship I've ever completed (got another 2 on the go i started beforehand heh) its my first attempt at a sea base and a first go at rigging, all in all im happy with it, but theres a lot im not so pleased with, but eventually you just have to say ok its as good as it can get and move on, which is what im doing hope you like it thanks all till next time1 point
-
Hi. Here is my attempt at these excellent kits I got for a few pounds. Please let me know what you think. Thanks Ian1 point
-
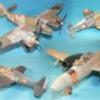
A couple more spitfires for my collection. Firstly a Mk.XVIII made from an Academy FR.XIVe and a Falcon vacform fuselage (thanks to my Dad for cutting and sanding the bits) Probably the most difficult model I have made. Getting the fuselage to the wing was fraught and involved lots of trimming, cutting and poor language. Finished in the markings of 60 Sqn RAF in Malaya. Decals from Aeromaster sheet 48-527. The decals for the nose stripes were a bit hopeless so I masked and painted them. Anyway, here it is. Next is an attempt at the new Airfix PR.XIX. An altogether easier build. Finished with Xtracrlyix and using Xtradecal deacls. I've added a full set on invasion stripes.The are a tad on the wide side but I used 10mm Tamiya tape and 18inch stripes in 1/48 scale turns out to be 9.5mm or something like that so I thought it would be near enough. Anyway, here it is.1 point
-
After a few days of scribing, sanding and gluing... this is where the project stands. This will be my 2nd Commando. Every side window in the kit has a dimple or an air bubble dead center. The wings are two different thicknesses. Note the 1/16" shim on the leading edge.1 point
-
Hello I'd like to show you the model I've recently finished. Short WIP. LaGG-3 series11, Cap. V. Mironow 609 IAP, Afriikanda airfield (Murmansk area), sammer 1942. Familiy: enjoy watching, comments welcome.1 point
-
Everyone, My latest effort is an Italeri Messerschmitt Me-210 in 1/72. This is my third model after a 20+ year break and it's taken me weeks and weeks of work to get this far. While working on this model I've discovered a number of modelling techniques and products along the way, which have included: 1) the use of Klear when brush painting 2) liquid green stuff 3) vallejo model color acrylics 3) micromesh 4) how to strip a model back to the bare plastic using flash bathroom cleaner 5) how not to use watercolours to do panel lines (and how they highlight paint blemishes and splits in your decals... 6) how to stretch a sprue to make wires (but not how to stop the things sagging, as you'll see in the photos) 7) that if I'm happy with a finish the worst thing I can do is try and improve it 8) how to do a mottled camo scheme with a citadel dry brush 9) that brush painting white is a thankless task and never comes out how you'd like it to 10) that britmodeller is the most useful resource I could have in taking up this hobby again. Anyway, here she is, in all her beauty. Let me know what you think. Richard1 point
-
This was built for the F-15 STGB but I got my dates wrong and missed the deadline. Hasegawa 1/48 F-15 with Caracal Models decals and Quickboost seat. Painted with Tamiya Acrylics and Alclad Flat Varnish. I originally intended to use Superscale decals but these turned out to be rubbish so they were removed and the Caracal ones used instead. There was a little bit of silvering, but that was my fault in trying to cut corners.1 point
-
Hello, Here you are my last built, this is the Hasegawa B26 C MARAUDER in french marking in 1945. I used super metallic gunze paint and decals from PT DECALS I hope you will like it You can see more on my web site http://aviapassionmaquette.free.fr/Aviapassion%20Maquette%20montage%20B26%20MARAUDER.html @bientôt Thierry1 point
-
I decided to give an overhaul to all my older kits within the next few weeks or so. I will be introducing them to you one by one always when I finish the overhaul. Next fighter on my maintenance line is Bristol Bulldog IIA, No. 23 Squadron, Kenley, 1932 - again one of my earlier builds. The 1/72 Airfix gem is complemented by Aeroclub Jupiter engine and propeller. Hand brushed with Revell and Humbrol enamel paints. Decals by Modeldecal. As usual - no rigging. Thank you for looking and for your comments. Patrik1 point
-
Hi Here is my Airfix 1/48 Jackal: Joined by the Airfix Land Rovers: My WiP is here. I really enjoyed this kit and look forward to building the Coyote very soon. Thanks for looking.1 point
-
Hi all, sorry for not posting much recently, you know how things go at things go at times! Here is a project that is nearing completion, well, hopefully finished for this Sunday for ModelKraft. Those who follow me on Facebook, Twitter or my blog will be familiar with the project. For those that don't here is a brief run down. I first built XH135 two years ago, had the idea then to build XH134 and XH131 to complete the trio of 39 Sqdn's Canberra PR9's, the last three Canberra's in RAF service. This became a reality earlier this year after the purchase of two more Airfix PR9's along with the Retirement Scheme decals for XH134. The aircraft are completed and now I am finishing off the base and figures for on the aircraft and ground crew. Fingers crossed that the base is finished for Sunday. So here is a few photos for you to see.1 point
-
This is the 1/48 Revell USA kit, straight out of the box. I used the kit markings for an aircraft from the 51st Fighter Interceptor Wing based on Formosa in 1955.1 point
-
She's a real beauty and an excellent paint scheme.1 point
-
Nice model, mate, i never got the prue stretching right, i now use human hair. With long haired ladies in the house there is abundant supply..1 point
-
Apostrophes re-inserted1 point
-
Then you'll need these: p.s. I've sent you a PM1 point
-
Thanks Duncan. It's not up to your very high standards, but every model is a learning experience. I've had a go at the drooping wire and managed to straighten it now. Makes a big big difference to the end result I think. Richard1 point
-
Well I think its a really good job and all the better as it was finished with a hairy stick. Duncan B1 point
-
There are quite a few variations in loads. I built two VMFA (AW)-533 hawks planes recently and searched around to see what is the "right build." MAW decals has a few references. s http://www.mawdecals.com/creightonsmodels/HornetsNest/Ordnance.html http://www.mawdecals.com/reference.html I also looked up in the DoD images and found a few photos of aircrafts with different loadouts. This was my two aircraft. the top one has an asymmetric load with AGM-65, GBU-16, AN/AAS-38, Centerline gas, wing gas, and the Lau-10X2 .1 point
-
Hi Richard, As a brush painter myself and having an Me-210 in the to-do pile... Cheers, Niki P.S.: very thin fishing line can also be used for making aerials1 point
-
I like that, and you have done well to get such a nice mottle with a brush. I think a lot of people will be with you about brushing white too, it is hard work even with an airbrush. I have gone over from stretching sprue to make aerials and I now use use stretched cotton bud after seeing it done here on Britmodeller. It can be stretched incredibly thin, thinner than hair, and it is slightly elastic. You could attach a long piece to the fin and get a bit of tension on it to attach to the mast. Once the glue has dried (cyano and a bit of activator will have it done in an instant) you could carefully cut off the excess leaving a reasonably tight aerial wire. Others may have their own methods, that one is mine.1 point
-
If the a/c you're building is 164694/WK-01 circa January 2005, then yes this airframe took part on OIF. A typical loadout would be a single GBU 12 under the starboard wing, an AGM65E under the port, LITENING pod on the central fuselage station, AIM9M's on the wing tips and standard gas bags on the inner wing pylons1 point
-
Getting close to having her all sealed up. Here are the rockets and pigtails. I really need to get a decent lighting setup!1 point
-
Very nice, Derek! the 18 may have been fraught, but she turned out very nicely, indeed!1 point
-
As the turd was a modded BOZ pod then I assume its a safe bet it's turned too!1 point
-
Slightly better pic of the exhaust...............1 point
-
A few more images.1 point
-
Another one done! This is another kit mainly assembled by jaw but acquired by me to finish. One thing that struck me was how restrained the panel lines are compared to the current Airfix products (but lets not go there as things are improving!) Airfix supplied a few missing bits and pieces to get the job done and I scratchbuild a headrest bracket having not realised the kit bit was missing. Xtracolor enamels for main colour scheme, matt varnish is Xtracolour XDFF ( - which I love) and a very impressive decal sheet from Aurfix. Only one annoying thing was a bit of silvering under the fuel tank stencil applied on top of the anti glare decal! Otherwise superb decals. Some weathering applied with acrylic Paynes Grey but photo of actual aircraft included to show no visible signs of exhaust staining - which was a first for me! Model now safely in display cabinet because folded wings only clinging on by fingertips! Definately needs a couple of bits of metal to reinforce. One useful tip - small hole drilled in each of folded wing ribs enabled wing to be held on a cocktail stick for varnishing - glad I thought of that one! Next on the blocks is to finish off a Heritage JP4, also care of jaw! This is the new and improved Photobucket so I'm not sure how to make the pictures larger but at least I've managed to get them here!! Thanks Simon1 point
-
I'm not too sure if its an actual aircraft in real life or not. But the grey one on the box is actually from The Expendables 2 film. Saw it last night actually, was thinking about making it for the movie GB, now I know it has all the decals. Just gotta scratch an 5cm howitzer in the nose. Cool model tho, will be watching this Kind Regards Dazz1 point
-
I do believe the dimples/bubbles are supposed to be in the centre of the fuselage windows. On wartime C-46's, the centres of the windows could be opened, allowing any firearms inside to be used in defence of the aircraft. Douglas C-47's had the same type of windows. A close look at wartime photos will show the faint circles in these windows. Chris1 point
-
I like that a lot but isn`t it a bit petty that they won`t apply 72 Sqns old RN code letters because they think that Joe Public will get confused and think that it is a Royal Navy aircraft?? It is a bit of a slur against the blokes who fought and died flying 72 Sqns Spits that bore those codes during the war and if they were good enough then they should be good enough now! The RAF could have applied them in Red with a White outline to break them up a bit if they were worried about stark white `RN' codes. The RAF definitely has a weird aversion to RN titles, after all they wouldn`t let 800 NAS apply `Royal Navy' codes to their Harriers using some petty reason that they wouldn`t fit when there was obviously enough room for the temporary`100 years of Naval Aviation `Fly Navy titles and that they were `Joint Force Harrier' property and only on loan to the naval unit, plus I wonder whether the Merlin `Junglies' will ever wear `Royal Navy' titles when they eventually replace the Sea King HC.4,......somehow I think that they will suddenly become `Joint Helicopter Force' assets and won`t be allowed to wear naval titles,...just like the Harriers! Anyway, sorry for the outburst,.....I love the scheme but hate the codes, Cheers Tony O1 point
-
Well pretty much calling this good, couple of bits here and there need cleaning up, but shes pretty much done Proper photos will be in RFI in the next few days, now im going to bed1 point
-
FAA, that's brilliant, I grew up next to HMS GANNET when I was a kid and we used to have school trips there, one day our guide pointed out a pilot and called him a WAFU and one of my classmates asked what it meant and he actually used the wet and useless term in front of us! Fair play to our teacher Mrs Simpson, she tore such a strip off him I bet he can still feel it today! I had forgotten all about that, so thanks for bringing back a great memory, cheers! Jock1 point
-
Glad you're all enjoying the pics! Carlos: The Kbely museum in Prague opens sometime next month. If they have a Meta Sokol there I'll see what I can do in regards to pictures.1 point
-
Thank You, Jockney! As for me the rigging was a pleasure - at first I made 0.3mm rings from copper wire by winding it around another wire. Then I clued them on the model, stretch the spandex wire and superclued it. In winterising we, Russians, had one big trick - Vodka :-) It really works But seriosly speaking i think that WW2 was won by simple young, very young people( much younger than most of us) with tha great will to defeat fascism and when I build my kits I always keep it in mind1 point
-
Managed to get the fuselage buttoned up this week although it took two attempts ! (Fit wasn't brilliant) Glued nose cone on (Fit wasn't brilliant) Glued nose undercarriage doors in (Fit wasn't brilliant) Started work on extending the rudder (Fit was brilliant but the part was too short by a couple of mm) Couldn't resist the temptation to jump the gun and see what I'm aiming for, by putting the pieces together temporarily : Still a long way to go but I'm closer today than I was yesterday !1 point
-
Bit more done turrets and props and undercarrige onhttp://1 point
-
Thanks ! and , yes , i hate masking some advances : finished mask with tamiya tape and transparent vinyl glue. I gave him a hand rlm 02, for printing. I have to add putty in several places1 point
-
Good point. How about with an earlier Vickers bomber (albeit it in trainer form), illustrating the rate of development in less than twenty years:1 point
-
Hi guys, sorry about the long absence, Few problems but now im sorted. Heres my MK1 spit now virtually finished.im not totally happy with it, but ive learned a good few lessons from the build....... Neil1 point
-
Not 2 minutes ago, there was a (loud!) knock on the door..... A small box was handed to me...... It looked unopened...... Could it be.....?? THE GLUE GOT THRU!!!! WOO-HOO!!!!! Along with the 3 REALLY WELL wrapped bottles of Extra Thin, was my Veteran Models RAM launchers, also well wrapped. So, what have we learned? 1st, Glue gets thru! This, I feel, is quite important & was the whole point of the exercise. 2nd, Whats all the fuss about?!?! I don't recall a single air disaster that was found to be caused by TETC! Nor postal vans suddenly detonating as 40ml of TETC reached critical mass! 3rd, Stimpy & his merry men in their wagons are totally oblivious to what their hauling.... 4th, My "Mystery Supplier" ( +*+ BIG REVEAL!+*+ Luckymodel.com) are able to safely & securely supply TETC with no apparent risk to either global aviation traffic nor RM/ParcelFarce. So, in a nutshell: I`m happy, A small business in Hong Kong is slightly richer & the law is an bottom!1 point
-
Next, I finished up the bulkhead at the rear of the nose compartment - again, I had to consider everything that I had to attach before the nose section is glued on permanently - the oxy hoses are glued firmly in place with the requisite sag and angles (they are hooked up to the ceiling on the real plane) - once the nose is on, I'll have to carefully reach in with the tweezers and glue the top bits to the ceiling. Now, finally, we can get to the meat of this update, which is the nose interior. I am happy that it is 99% completed - as I alluded to earlier, debate rages on as to whether it would be natural metal, or bronze green. I did some research, and actual veterans have confirmed that in some aircraft, the nose was green, in some it was natural metal. As I'd already painted the whole thing green by the time I found this information, I decided to leave it! Everything that should be in place, is in place - I had no choice but to glue all of this stuff in permanently as it would be impossible to do it after the nose is on... OK enough chat, here's some pics: Some things to note... the wooden walkways in the real plane were made of plywood - I've used thin mahogany veneer, simply because that's what I had to hand, so it's probably a little too dark to be totally realistic, but I'm happy with how it looks. You should be able to see the wire & pulley system hooked up to the guns - I knew all along that it would be nearly impossible to glue it all in place after the nose was on, so I compromised - I attached the front (ie nose opening) ends and the pulleys that are on the ceiling, and the rear ends I cut notches in the fuselage rim and pulled the wire taut, like this: I then cut off the excess, sacrificing the rearmost pulleys in the process. Fortunately, when looking rearward through the front opening, you can barely see this. Also - the astrodome (kindly supplied by Tom Probert - thanks Tom!) was way too crude for my tastes - full of little air bubbles and quite opaque. I decided to leave it off - on the real plane, it could be removed completely (and at airshows you'll often see a crew member popping his head out to wave at the crowd as the plane taxis down the runway!) - I scratched the details - mount for the navigators compass to the rear, and locking handles. As far as I know this is accurate - please let me know if the locking handles are actually attached to the astrodme's mounting ring, in which case I'll remove them... The hole which the omission of the astrodome leaves also provides another much needed way to view the interior, most of which is very hard to see once the nose is attached to the fuselage... In the previous photo you'll also see that I have taken an important step forwards and begun to 'skin' the aircraft - this was done with pewter sheet and a simple riveting tool. Mine is made by Trumpeter, and I picked it up at Telford last time for less than a tenner. It does the job perfectly well, and comes with several different sizes of riveting wheel. I think the effect is good, and will look really nice under a coat of paint. Here's me measuring up some panels - it was sometimes necessary to make individual panels, other times to cover large areas at once.1 point
-
*update 14/04/13* Hey everyone, here's my latest update. I've been working away at the nose interior & it's 99% completed. First up, here's some random bits I needed to make - oxygen hoses, instrument panel coaming and the pulley / wire tension system that keep the 0.50 cals in position when not in use. Oxy hoses are made from the usual method of winding smaller gauge fuse wire around slightly larger gauge, with plastic accoutrements. Here's the instrument panel coaming - there's a big gap when the nose / fuselage halves are joined, and this slips into the gap. There's some more stuff to add to it, but it's important to consider which bits must be added before I join the nose to the fuselage and this is one of them: I also decided to tackle the system of pulleys and wires that keep the cheek guns in place. Although not strictly necessary (they are barely visible once the nose is on) it bugged me and I just had to make them... You can see the right hand side one on a real Fortress here - it starts with a coiled spring... then develops into a system of wires and pulleys - here's the left hand one: To make mine I started out with an ancient set of Verlinden metal radio antenna mounts (essentially they are guitar strings of the appropriate size and I could have easily used these instead) and added the wires and pulleys - here's the right hand one: Next up I made the glide and climb data plate, located in the right hand side of the nose next to the bomber's seat. Here's the real one (top image - from the Wings & Wheels book): To make mine I made a composite of bits from a Verlinden 1/35 Map set - there's a couple that are very similar to what I needed:1 point
-
John, at the risk of reopening old wounds, here are some comments I made when posting piccies of a J back in November; "Now, the bit I've really got the hump about is the rear fuselage, where the jet pipes fit. Every time I've seen this model finished I've been surprised to see a relatively large gap between the pipes and the fuselage, which shouldn't be there. No problem, I thought, the Aires pipes will rectify that. However, they didn't. At first, I thought that Aires had just based their pipes on the "inaccurate" Tamiya ones so, intrigued, I reached for the most accurate plans I have (FGR2) and overlaid the upper fuselage. Doing this, I have established that Tamiya and Aires have got the jet pipe diameter about right, but Tamiya seems to have got the rear fuselage wrong, as the width of this part of the fuselage is - wait for it - the same as a British Phantom. Oo-er, Missus. The bad thing with that is that you either have to narrow the fuselage at that point, or alter the construction method to push the pipes outboard and hope that no-one notices (I chose the latter, easiest option!). I think I got away with it Pike. The good news is that it makes my planned FGR2 conversion ALOT easier!! "I got involved in a thread some time ago about converting the kit to an FGR2, where I mentioned that I'd scaled up Richard Caruana's 1/72nd drawings (with his permission), which turned out to be something like 2mm out in length and about 1.5mm out in wingspan, after scaling up. That was way closer than anyone else's plans, which were miles out, even after scaling up from 1/48th. I need a jolly down to Tangmere to take some measurements of my own. "The wierd bit is that Tamiya's rear fuselage (not immediately adjacent to the jet pipes, but 8-10mm forward of that point) is exactly the same width as Richard's drawing, then the fuselage kicks in a bit where it (should!) meet the pipes. But, and this is the wierd bit, the depth of the fuselage at that point is correct for a J79 engined cab. Spooky. "There'd still be some work required to the bottom end, but not as much as I first thought. I'd like to know where Frank Mitchell got his measurements / plans from, because it's confusing the crap out of me! (not difficult). I'm pretty convinced I'm right though. "Of course, all of this doesn't detract from the fact that there will still be some not inconsiderable work to be carried out at the other end, as in intakes, cockpit (particularly rear - you'd get away with the front) and, of course, the jet pipes themselves." Now, I've still not been down to Tangmere to measure up their jet yet, but I am still convinced I'm right. What's wierd, is that where I mentioned the fuselage, at a point 8-10 mm forward of the jetpipes, is the same as a Brit Phantom, then it kicks in to meet (alledgedly!) the pipes, this shouldn't be the case. On any Phantom, the fuselage begins to flare outboard from the area-ruled coke-bottle bit, then runs in a straight line to the jetpipe oriffi. The fuselage does not curve in to meet the pipes. Also, if you were to hold the model at eye level, looking into the fuselage from aft, the fuselage (where the jetpipes fit) follows a constant (well, almost) curve to a point just below the level of the wing, and then makes a relatively sharp turn inboard to the keel, making the lower fuselage at this point almost flat. Inaccurate - jetpipes are round and so, therefore, should be their recepticle. Hang on; let me try to copy and paste a picture of mine. Hmm; doesn't show it as well as I'd hoped. Sorry. You CAN see, however, how thick the plastic is around the jetpipes. Bearing in mind that I pushed the jetpipes outboard to lose the gap around them; had I thinned the plastic to a more scale thickness, it would have left an even bigger gap, which, I think, adds more weight to my argument. Anyway, I WILL get down to Tangmere soon, armed with a couple of spirit levels, a long tape measure, and a couple of extra pairs of hands. I'll report my findings as soon as I can. Cheers all. Stewart1 point
-
I'm here, and watching, and admiring Jonners efforts.......BUT I still wouldn't touch that Trumpeter thing with a 15' barge pole!! And then again....how many modellers do you want to do what Jonners is doing? There's only one Jonners and he's doing fine!!1 point
-
1 point


This leaderboard is set to London/GMT+01:00