
Leaderboard


Popular Content
Showing content with the highest reputation on 15/02/13 in all areas
-
This is a kit I have had kicking about for a long time, and I finally decided to bit the bullet and build it. I have not settled for sure on the exact subject yet, but it will be a pre-war example operating 'East o' Suez', and my preference is for one assigned to 30 Sqdn in Iraq, the first colonial unit to receive the type. I am still trying to nail down some information on that unit's markings at that time. I had intended this to be a simple build, in large part a vehicle for practicing scribing and taking a shot at seeing what I could do using spray paint for basic color. However, in looking about recently for accounts of building this kit, I learned of an error, one of the sort of which the kitty speaks.... It is a small thing, but the sort of thing which draws the eye. At the lower rear of the glazing on the port side, by the leading edge of the wing at its root, the kit has the corner clipped, rather than square. With the distinctive nose glazing being a chief focus of an early Blenhaim model, the error is hard to overlook. Unfortunately, it is not a simple thing to fix, owing to the deep 'well' set into the fuselage halves to receive the wing roots. I got stuck pretty deep into this over last weekend, and here is the result so far.... First, I assembled the wings, smoothed off the raised panel lines, blocked the front of the nacelles, and boxed in the wheel wells. I modeled these on the resin pieces of the Classic Airframes Blenheim kit; if that is right, I am right, but in any case it looks fairly busy and structural. I do not do too many retracting gear types, and this is a new bit of modeling for me. By the way, if anyone knows what the proper color for the wheel wells is I would appreciate advice; I have always assumed they would be grey-green, but lately have read of use of aluminum in wheel wells during the pre-war years. The first order of business for addressing 'the corner' was filling in the root wells in the fuselage halves. I took a rubbing from one to guide cutting plugs of 1.5mm sheet, and with a bit of filing got these to fit in well enough. I made sure they extended above the surface of the fuselage halves a little, so only sanding down was required for a level surface. I then cut away the front portion of the wells projecting into the cockpit area. At this point I cut the proper squared corner into the port rear, and then cut out slots in the well plugs to receive the tabs on the assembled wings. I then cut off the rear of the port side glazing (along a frame line so the seam will be hidden) and replaced this with a square-cornered rectangle of 1mm clear sheet (about the thickness of the kit piece). The final step in was adjusting the chord of the wing at the root, so the leading edge would be in proper relation to the lower corner of the port-side glazing. To do this, I sanded away a bit from the leading edge inboard of the engine nacelles, and trimmed about a millimeter and a half from the fillet at the trailing edge of the wing root (which required a little re-profiling of the curve there). Here is what it looks like with the port wing tacked in place temporarily: I cannot speak to whether the chord at the wing root is now the right length, but in terms of visual reference points, it gives a correct appearance, with the leading edge curving beneath the corner of the glazing, and the still substantial trailing edge fillet coming to the mid-point of the turret. (The pictures of the wings above were taken after adjustment of the chord at the root.) Next order of business will be some cockpit construction, and something for the rear position (I expect I will use a Falcon turret, but these sets are now so expensive home vacu-forming is starting to seem worth looking into...)....3 points
-
Because I just don't have the nerve and patience for rigging. Annoying as hell. Revell's rebox of a well known Eduard 1:48 kit with some basic PE. Not a very smart choice for a first big biplane. I should havet started with their Fokker dreidecker instead. I should at least get that prop repainted because it's wrong... Josip3 points
-
Hey everyone! Here’s the latest off the bench, Revell’s 1/35 SPz Puma. This is a nice kit of a purposeful looking vehicle and as such, makes for a cool project. It’s a pity that this one was so jinxed! Having almost completed it, a few errors on the paintwork forced me to completely strip the model and repaint it from the ground up, the model you see here being the second version completed. As this is still a prototype vehicle (I believe that there are only two of them) I kept the weathering light and in-keeping with what will no-doubt be, a well looked after machine. The story of this one will appear in TMMI issue 210, which is the March 2013 edition. I hope you like it. Spence2 points
-
Hi All, Tamiya's 1/48 scale "Corsair" Brian2 points
-
Built for a GB elsewhere, this is Revell's Spitfire Mk.I. Finished with Xtracrylix and a brush. Flat coated with Tamiya spray Flat coat. The markings of 603 Sqn are from the Southern Expo Battle of Britain Part 2 decal sheet.2 points
-
Next one of the bench this year is the Special Hobby 1/48 Spitfire Vc; OOB. The markings are for 601 squadron based at Luca, Malta in 1942. A lot has been said and written about the colours and markings of these Spitfires. I just went with what was in the box. Much comment has been made about this kit. It's not shake and bake. This one nearly took to the air several times and has had several names attributed to it during the build !!!! Now finished at last. Hope you like. Please feel free to comment in any way that you like. Thanks for looking.2 points
-
OK folks, Peter Hall has finished the design--2 large frets with 139 named items, and many of those are multiples, so this is one very detailed set: The set, designed for the Tamiya kits, will build Mikuma or Mogami in the original light cruiser fit, as all-gun heavy cruisers after their rebuild, or Mogami in her ultimate aircraft cruiser hybrid fit. Price is £62.65 including VAT (£52.21 ex-VAT), and we should have it in hand in about 4 weeks. Order now, as pre-orders have priority.2 points
-
Okay, I'll start the rumours going. I hear it has 3 tailbooms. Sits back & waits for the bang..... Pete2 points
-
I scanned one of these a few weeks ago so I thought I may as well scan the others from this display at Fairford, 1997:1 point
-
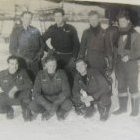
This build was started back in December but I've been unable to write about it on Britmodeller until now, so here goes with a slightly mammoth catch-up! This build is the first in a long term project I've been researching for some time now - the title of the project is "The planes my Dad fixed!". Let me explain... My father was in the RAF during WWII. He was an electrician and joined up in 1941 and remained in the RAF until demob at the end of 1945. Sadly he died in 1979 when I was 18 so I never got to be able to talk to him as a proper adult. I did, however get him to tell me some stories of what he did during the war. Whenever the atlas or the globe came out it'd be "Dad, show me where you went?" He'd point to Algeria, Tunisia, Sicily, Egypt India and Burma. When my mother died eralier this year, my brother and I went thorugh all her effects and found a load of stuff about our Dad, including an Xmas dinner menu from December 1943, with 81 Squadron inviting him for Xmas. This piqued my interest so I applied to the RAF to get a copy of his war record. This is quite easy to do - you just need a death certificate (if the subject is deceased) and you need to be next of kin. Thankfully in his effcts we also foudn his demob card which had his service number on so it was very easy to provide identity details to the RAF. It also costs £30 admin fee - well worth it as it turned out! 3 months later I got a large envelope through the post which has a copy of both sides of the paper war record that details his time in the services. From this I was able to see which squadrons he was attached to at various times and from that was able to deduce what aircraft he worked on. Essentially he was in training school until Feb 42 and was then stationed at South Detling, during which time 280 Sqn was present, flying Avro Ansons. From there he was attached to 122 Sqn during 42, 122 Sqn was at that time equipped with Spitfire Vb and Vc, then in October was transferred to 81 Sqn who were at that time in Gib, supporting Operation Torch, the invasion of NW Africa. So that accounted for his travels through Algeria, Tunisia and then eventually to Sicily in later 1943. 81 Sqn was at that time flying Spitfire Vc (trop) and Spitifre IX. Then in November 43, we was transferred to 5 Sqn, then based in India. By sheer coincidence, 81 Sqn itslef was posted to India and ended up just down the road from where 5 Sqn was based at that time (Sampam), which explains the Christmas menu invitation! He was then with 5 Sqn for the rest of the war, initially operating Hurrican IIc and IId in a ground attack role. In early 45, they converted to Thunderbolts. In the training section of my Dad's record is also notations for Mosquito and Lancaster, but I can see no evidence in the record that he ever really worked on them. So that gives me a very interesting selection to choose from. Well to start with I want to do a diorama which includes my Dad at work! In the photo album we have several of him his bush hat and shorts in Burma, so this seems a natural place to start, so here we go with the Hurricane IIc from Revell. I was lucky enough to pick up at the Telford Kitswap as the basis: Its not a terribly complex kit - its major downfall being that it has raised panel lines and it is the Revell bodge job of taking a Hurricane I kit, slappipng a couple of blisters on the upper wing, replacing the machine gun insert with cannon mounts and thats it. The panel lines on the wing are all wrong, the nose is wrong, the tailwheel is wrong... and so it goes on! So to improve the build itself, I invested heavily in aftermarket gear at Telford, picking up several items from Grey Matter Figures such as the cockpit and wheelbay enhancements. here is all the aftermarket stuff I aim to be using: Moving in a clockwise direction: on the black page you can see the cockpit set in the top left and the wheelbays in the bottom right. Next to that is a set of decals for the lettering in the right colours and size for 5 Sqn in India. Below that is a vacform canopy and next is a set of replacement exhausts, then replacement cannons and finally some masks for the canopy. In this one we have replacement radiator, main wheels, tail wheel and undercarriage doors. The next photo shows the main part of this set, the resin replacement nose Of course this is the build that I want to make diorama out of, featuring my dad doing his job as an electrician. So here are the final extras that will be used to create the diorama. In the family photo album, we've got several pictures of my dad from this period and in all of them he's wearing a bush hat, open shirt and shorts. So to get that combination I've got this little lot: Clockwise from the left: Airfix 8th Ary Multipose figures - this will be useful for the lower body, Airfix 1-32 Australian infantry - this will be great for the bush hat and open shirt torso. Next is the 1:32 Aber hand tools set - you'll have seen the 1:48 version of this in my Mohawk build, I suspect that this set will be easier to put together - not so eye-straining! Finally, I will toss in the 1:32 resin accumulator trolly from Iconair. Now I think this will need to have a compressor motor scratch built on the top, but lets cross that bridge when we come to it! So let us begin with the build. One of the first things I noticed was the elevators are cast as one complete piece. Well thats no good if I'm build a parked up machine undergoing maintenance! So I assembled them and then the razor saw came out and they were cut up. The notch that exposes the hinge was cut in and some plastic rod added. Two brackets were also added in the appropriate places to provide the attachment points for later. I also started opening up the fuselage to expose the electrics that my dad would have been working on: which also shows the elevators in an earlier stage of construction. Since the plastic of the fuselage is quite thick I chamfered the edges to thin the visible skin: I've been researching the internal layout of the fuselage so I can scratch build what will be visible behind these panels. Follow this link to the IWM collections to see the sort of thing I will be aiming to achieve, although not with the wellies!1 point
-
Hi, from the in progress build: http://www.britmodeller.com/forums/index.php?/topic/234929019-austrian-eurofighter-148-j-10-parallel-build-decaled/ it is now kind of ready for some photos, and as the weather was nice today.... here you are: Austrian Airforce Patches from 1st & 2nd Staffel, they share 15 Eurofighter Tranche 1 between them. Decals are mainly Revell, national insignia are from IPMS Austria and Decalfactory. some magic hand removal: Hope you like it!1 point
-
Eventually finished the Tamiya 1/48 Dambuster. After starting this back in November, it's been a lot of work....... Decided to make it AJ-J in the end, using Xtradecal instead to get the right size wing roundels. More pictures to follow, good old Photobucket has just crashed! Again....1 point
-
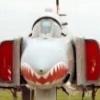
Sweedish Draken reconnaissance version in Danish markings. Added Aires cockpit and brassin AIM-L.1 point
-
This is the last of my recenlyt built models. In fact I built the two Starfires and T-Bird simultaenously in an assembly line fashion owing to the similarity of the model .1 point
-
Finished yesterday, had a few fitting problems and I messed with decals a bit but am still pleased with the result. Regards1 point
-
Built this a few days ago and along the build I learnt a big lesson: never use spray varnish with the canopy on and not masked. Here we go: Regards Update: Canopy kinda fixed with nail block thing...1 point
-
At last the new 747 SCA + Discovery are now finished: 747SCA: 747SCA + Discovery Shuttle After all this time and effort, i'm unfortunately going to have part with these two magnificent aircraft due to space. So if anyone is interested in purchasing them both, as a display piece? Please PM me and let me know. Thanks for looking.1 point
-
If like me you have model paints numbering in the 100s rather than 10s then you may also find it is difficult to keep track of what you have and to compare them - e.g. who's RLM 71 looks best (to me that is) type of thing. Some time ago at work they started issuing us with business cards which were about as much use to me as a chocolate tea pot - but I immediately saw the potential in these pre-cut mini sheets of card. I simply have them to hand whenever I open a tin of paint these day - write the description underneath and keep them grouped by colour - greens, greys, browns etc, in an old Ferrero Rocher box. Some need a couple of coats (as you will see in the picture), and some require duplicates or even triplicates - do olive drabs go best with the greens, browns, or grey - I just put one in each. Here is a (poor) photo of a few of the many greens that I have. Cheers Al.1 point
-
Hi all, I've been fighting this kit for the last 6 weeks or so, after a nice start it just turned into a struggle, bad fit, bad flash, mistakes made, and I lost my mojo a bit. But I finally got it all done and wanted to share it, just so I can prove it's finally off my bench! I won't go into all the mistakes I can see in it; I always find it hard not to focus on them. But please feel free to share any advice/criticism you have, it'd be much appreicated. Thanks! J. Kit: Eduard 1:48 Bf 110G-4 Scale: 1:48 Paint & Weathering: Brush painted with Revell Aqua Colour & Tamiya Acrylics, Promodeller Wash, Citadel Nuln Oil Shade, Tamiya Weathering Kit Extras: None1 point
-
I'm really just not as good at all you fellow Britmodellers when it comes to bashing out those really excellent, accurate, detailed builds so I try to bluff my way through with these dioramas instead. I didn't manage to finished this one in time for the CBK SIG display at Telford in 2012, but she will just about be dry in time for Huddersfield this Sunday. A really enjoyable build and I loved painting the backdrop - they are so easy to do. Even last night I thought the colours were still a bit vivid in the bottom left area and the box art suggested more smoke, so I just put a small blob of Vallejo Matt White and another of Matt Black on a pallet (scrap plastic CD case), got an old 1&1/2 inch decorating paintbrush very wet, and just dipped it in both colours and mixed it on the "canvas" as I went - a very loose wash basically - and then dabbed it off again with a J-Cloth (which the wife is still looking for - oops) = smoke effect achieved! Once again I used eBay to souce an Altaya die-cast 1/144 model for the forced perspective as I did on my Sunderland/Fw.200 diorama for Telford. These die-casts are superb, especially as the Invader "Stinky" comes in the correct colour scheme, although I had to remove the nose art as it doesn't match the box picture. The two planes are both attached to bent metal tent pegs (20 for a £1.00 from Pound-Land/Stretcher/World or whatever) with the ends hacksawed off and filed and de-burred and forced into holes drilled in the MDF backscene. For the 1/72 one I have drilled right through the engine nacelle and into the cockpit side to support the weight - which isn't much. You can barely see it, so that worked out well. The die-cast one already had a hole in the bottom so I opened it up to accomodate the metal pole after bending it by hand in a vice to the correct angle. A bit more obvious from the front but again gets lost if viewed from the side and slightly above. I hope you guys like it. I'm chuffed to bits with this one. Now, what to do next?! Cheers Al.1 point
-
Last year i finshed my BAe Nimrod from the 1/72 Airfix kit. I built a base to display it on but due to its size i didnt really have anywhere to put it. A few weeks ago my 3 year old daughter was messing about and threw a ball which hit the plane and snapped off the front landing gear and 4 rear landing gear wheels. She got the telling off of her life But that gave me a idea..........so i run off to my LHS and purchased some evergreen sheet and ordered a ground power unit and RAF diorama set from flightpath. The idea was that the Nimrod had some under carriage issues that needed fixing before she could fly. These were noticed on a small airfield so hanger space was limited as the repairs had to be carried out on the ramp (not likely to happen i know). I went through my 1/72 groundcrew and picked out the needed models and set about painting them. Then i made a stand from spur and evergreen. Next was to get to grips with etched parts as i had never used them before and i made the power unit (not that good if im honest), a tow bar, a wire bin and the airfield warning sign. Put them altogether and cam up with this............................. Hive of activity I like the bloke sitting on the tow Reporting his findings Thought this looked good Beavering away Inspecting for unseen damage I'd love to hear what you all think good or bad let me have it Thanks1 point
-
This is a Revell easy kit on sale for half price due to a crushed box. I would love to say it went together easy but it didn't. Since all the parts were pre-painted great care was taken trying to "snap-fit" pose-able joints. Paint had to be carefully scrubbed off in most places and I finally gave up the chase and went for a full re-paint. All the open socket/joints were filled with milliput and smoothed over, an allen key was pressed into the centres just to tart them up a bit. The pilot is some kind of vinyl with some noticable seams, could'nt do much about it, even with brand new blades, so a new paint job was as much as I could do. The base was from an old toilet roll holder and a bit of polyfilla and a very light blue wash. I also added a little bit of scenics water resin.1 point
-
Well that is a unusual piece of art work..your build is excellent.1 point
-
Superb job and great to see the results that can be achieved with hand painting, I was feeling under pressure to have to learn how to airbrush but not now ! Like lots of posters on here I have an unbuilt one of these it will be interesting to see how many people you will inspire to finally building it now that we can see what we have been missing. For a storage idea how about fitting LEDs under it like landing lights and using it as the light fitting in the room, move over Grand Designs.1 point
-
Yeah when he told me I did think omg! But look at most of the current ones and they are about 110-120 euros. Can you remember what was in the kit.1 point
-
Its nice but would they be leaving vapour trails above a stratus cloud layer with altostratos and cirrus above?1 point
-
That's great, I can get two and use the spares to fix a dodgy CA Vamp! bob1 point
-
March (ish) I was told this morning. We'll be Johnny-on-the-spot with the review and subsequent build, mainly cos I love Viggens1 point
-
More photos.1 point
-
Here is a quick outdated update of where I am with this project. The fuselage and wings have been added and a lot of sanding has been carried out. Since these photos have been taken the fins, airbrake, Fwd main U/C doors and wing pylons have been added. I also had a slight accident with one of the fins when sanding its joint line when I knocked off the top of fin balance weight. Luckily as this was the thinner one of the two there is a spare fin in the kit, so I removed it from that and added it to this model. Hopefully I will have some more up to date photos soon. Also having looked at the Verlinden exhuast instructions, I have decided to go with the kit ones, but using some of the detail parts from the Verlinden stuff.1 point
-
I started to paint.1 point
-
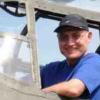
Modeller in "finding desktop" scandal!1 point
-
I've got the Airwaves set too, but as I understand it they're only designed to be used in the open position. So I've two thoughts, one is to cut out a shallow well, & then fill it with putty like Miliput, so that when you press the airbrake in said putty (when still wet!) should ooze out.Quickly cleaning it up should give you the airbrake with the internal openings closed up as I understand they were on the real thing when closed. But I'm guessing this could end up as a messy disaster!! Second idea is to use the etched airbrake as a scribing template...!! I'm also interested in what John's solution will be - it's bound to be more elegant than either of my 'thoughts'...!! Keef1 point
-
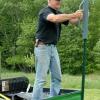
Hi Don, welcome to the dark side (1:144 my favourite scale )! I've just got back off vacation in the US, where I was able find a few old 1:40th rocket kits: Nike-Ajax SAM; Little John; plus a US Army Dart. I like to reverse-engineer these kits down to 1:144 as this is my preferred scale. I like the look of your A-9, and I can see what you mean about the 'Saturn V' lineage. That space probe on the nose has a hint of the Dyno-saur craft project which would have been launched on a Martin-Boeing launch vehicle. Don, I've been away for three weeks - did it take you all that time to make that little bit of desk space?? Mike1 point
-
Hi I have just finished this great little kit of the Airfix RWMIK+. You can find the story behind the Re-life upgrade here. The kit falls together really well, but when you look at Parabat's excellent reference shots, you realise that the vehicle needs a lot of accessorising to give it that "in-service" look. I therefore searched unsuccessfully for an appropriate 1/48 accessory set. The next best thing was the Tamiya WW2 Jerry Can Set, which comes with a selection of jerry cans, packs, bedrolls and drums. I bought this for a very reasonable £5.99 from a company I had never used before called Affinity Models who offered a friendly and very fast service. The only other aditions were various straps, the seat belts and tow strop from Tamiya tape, the bonnet-mounted stowage bin was fabricated from some scrap 1/35 scale parts, as was the towing eye and shovel. I used PVA-soaked kitchen paper to create the desert DPM Bergen covers which covered the side-mounted Bergens as well as the GPMG and .50 cal. I also used kitchen paper to create the sand bag covers for the front and rear lights. I used Humbrol #237 and #93 to paint the Bergen covers. The final additions were the two stretched sprue antennae. I painted one wing green and went for a peeled-paint effect on the bonnet, which is barely visible under the weathering and stowage. The rest of the vehicle was sprayed Humbrol #237 followed by a Raw Umber wash and a liberal dusting of MIG Gulf War Sand. I am really pleased with the result and look forward to making the Coyote and Jackal. All feedback welcome. And a few shots with the Snatch from the same set:1 point
-
I wonder how may lives have been spared for the loss of those 450 UAVs of various sizes and types? Probably very good value.1 point
-
this is the vietnam tsr21 point
-
Great start! I am a big fan of bringing these older kits up to modern standards. Martin1 point
-
Hi All, Only managed a bit of work on these since the last post, so here are a few photos. Most of the work i have done is to the Gladiator and the Fury.1 point
-
Truely fantastic work, paint job just puts it into real Competition Class. Wonderful paintwork and I agree with the others, it looks bigger than 1:72nd. 10 out of 10 and thanks David1 point
-
Thank-you Ladies & Gents & Christian having seen some of your builds I think you will have no problem producing another masterpiece, the finish on your 72' was just sublime, the best gloss black finish I have ever seen! Mac1 point
-
Awesome Thunderbolt !! can`t believe it`s 72nd too !1 point
-
My entry http://www.welshmodels.co.uk/EJP72-11.html1 point
-
WIP phantom 17° Sqn http://www.flickr.com/photos/92879412@N06/sets/72157632748312744/ tks1 point
-
I don't see a problem anyway. If it wasn't the Javelin it would be some other kit "just in time for the nationals". And even if it is a deliberate marketing ploy to earn a few bob, isn't releasing the Dambuster Lanc in March "just in time for the 70th anniversay" a marketing ploy. I say good luck to Airfix, they have to capitalise on the market however they can. It's sound business sense. Cheers1 point
-
Sell your cad drawings to Airfix, then at least we can get an accurate kit, anyway Airfix needs a new 1/72 scale Mossie1 point
-
I will be using the markings on the sheets pictured, the Siskin and Gladiator are from the ModelDecal Sheet and the Fury is from RAF decs. th1 point
-
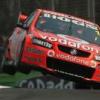
Mac, A very IMPECCABLE,DELECTABLE, IMMACULATE, STUNNING, GORGEOUS, FLAWLESS detailed, NEATLY finished, IMPRESSIVE, SHINY, BEAUTIFULLY Mastered Lotus...1 point
-
Given your avatar, I knew this was just a matter of time.1 point
-
Rich, I think the top turret solution looks great, adds a bit more visual drama to it all. The interior shots. . .blimey, it's hard to tell the aircraft from the model. Great work.1 point


.thumb.jpg.76f12b87ce9ca9929c9aabdcf8f9d2dd.jpg)


.thumb.jpg.d17ff607fc7e89ed057e63fcb6f2a888.jpg)


This leaderboard is set to London/GMT+01:00