
Leaderboard


Popular Content
Showing content with the highest reputation on 05/11/12 in all areas
-
Finally got round to starting this after illness and work kept getting in the way. All parts have been cleaned in soapy water, with the metal and resin parts cleaned of any flash and injection points.1 point
-
Here is my last assembly. I added the cokpit in resin from Pavla. Always so much pleasure to build the novelties Airfix. Thank you for your remarks or observations. Docjojo1 point
-
This is my first build in this STGB. It is also a very special build for me. I will be using the Revell 1/48 Bf109G-10 kit. This kit has been in my stash since 1979, the year of its release. That is more than half of my life! I remember when the kit was released and modelling magazines raved about it. They all said how accurate it was and how the engraved panel lines set the standard for the future. I was a little overawed by the superb standard of this kit and so I didn't build it immediately. I always told myself that I would just hone my skills a teensy bit more, to make sure I did the kit justice. In the three decades since, I never quite got round to building the kit. However, all that time sat in The Stash has meant that the kit has become a dear friend, much loved and much fondled! Finally, I believe that I can build it... However, the kit lacks the details that a modern kit would have - although in my opinion the standard of surface detail would give the likes of Tamiya and Eduard a good run for their money even today. So, I will augment the interior with some leftover resin and etch which were intended for other kits. The decals will be from Eagle Cals sheet EC72-16. The subject is White 3 of I/JG52 in May 1945. This aircraft was crashlanded behind American lines by its pilot who wished to prevent his capture by Soviet forces. The Eagle Cal instruction sheet claims that this aircraft was finished in the standard 74/75/75 scheme. However... this is where I may be a little controversial. The Eagle Cal instruction sheet includes a colour photo of the aircraft lying on its belly in a field. To me, the colour scheme looks for all the world like 75/83 uppersurfaces with that weird late-war version of RLM 76 that Bf109s carried on the undersurfaces. It isn't a light blue-grey; more of a pale tan. Now I know that Jerry Crandall did the research for this sheet. And I know that there are all sorts of odd things that can happen with colour photographs - how many times have we seen P-51D Lou IV represented with blue uppersurfaces? But there is just something so compelling to me about my interpretation of this scheme. So that's what I am going to do. The wing undersurfaces will be natural metal, with standard RLM 76 on the flying control and tailplane undersurfaces. I know! Outrageous, eh? Anyroads, here are the bits and pieces. The kit parts: And the resin bits. These are leftover parts from an MDC set used on a Hasegawa G-10 about six years ago. Now that I have finally started to build this model, I'm going to find another one to replace it and sit in The Stash for the next 33 years. Let's just hope I survive to 2045 so I can build it then.1 point
-
Finished some time ago, after a very long and exhausting build! Academy Su-27 UB Flanker Quickboost nosecone!!! Neomega cockpit, Linden Hill decals "Flankers on Patrol", various missiles, Modified Dream Model + Aires exhausts Here you are: Cool and realisticly looking exhausts.... (Aries are too small, Dream Model too big... so I ,odified both sets to make one pair of nozzles) Hope you like it! One last photo: Cheers, Werner1 point
-
This is Kinetic's very first kit. The 1/48 scale F-84F Thunderstreak. Can't say much more than I love this kit! Hope you enjoy looking as much as I enjoyed building.1 point
-
Hi! This is the last one Who left my workbench. Academy kit, Eduard Photo-Etched Set and FCM decals. What did I like? The cockpit. I think I reached what I have in mind. What I didn’t like? I am a little bit lazy. I could have more patience to do a better job in the decals on the wings. Cheers! Paul.1 point
-
Afternoon everyone, This was my entry to the F-104 STGB, the Hasegawa F-104C US Air Force boxing. A few firsts for me, my first Starfighter (not to be my last) my first proper all over NMF and my first time using Hasegawa decals! All in all it's a very nice kit, I only added a metal pitot and PJ Productions pilot. As always I'm not 100% happy with it, I had a few issues with the Alcad finish, there's the odd finger print...the decals behaved quite well, some are from an eagle strike sheet. I found that micro sol was ok in moderation even on the high shine finish. Anyway here's the pics Thanks to Giorgio for running the GB it's been fun! Any comments and criticisms are welcome, especially tips on NMF as I've got the bug now! Phil1 point
-
This is the Welsh Models 1/144 Vacform of the Hawker Siddeley HS748 in the livery of Dan Air, the red and blue stripes had to be masked and sprayed, this took my forever to get them equal and the thin white stripe was a swine to do with tape. This is about the 20th vacform I have done and can build them as easily as plastic kits now, I really enjoy doing these. There are more finished aircraft on my website www.pro-modelling.co.uk1 point
-
Hi All Here are some finished shots of my C-130 built for the 75th Anniversary of the RNZAF next week at Telford . Clearly the start point was the Italeri Kit but I did use the Flightpath detail set. All markings are painted and the decals were printed at home. The building thread is here in the WIP directory. Hope you like it. Cheers Colin W1 point
-
F-GBYO definitely has the wire antenna http://www.airliners.net/photo/Air-France/Boeing-737-228-Adv/2039338/L/&sid=8e23932921253c67cc256be17d5fcbdc1 point
-
Not this one1 point
-
Great to see another one of these being tackled! Very neat scribing, that jobs putting me off doing mine... Here's some light reading for all the fixes! http://harriersig.org.uk/models/gr3buildnotesv2.pdf1 point
-
Great start. I'll be watching this with interest. Hopefully I'll pick up some tips for my second Harrier GR3. /Bosse1 point
-
Rick, sorry for this late reply, however the S did not all have the gun removed. The S version came in 2 subversions, CI and CB. The CI (caccia intercettore, fighter interceptor) had no gun as the room was required for the equipment related to the Sparrow The CB (caccia bombardiere, fighter bomber) retained the gun and had no sparrow capability. These aircrafts were used mainly for strike and ground attack although a few were used as fighters (for example those of the 37 Stormo in Trapani). Several of Italian Air Force "Stormo" (wings) had 2 "Squadriglia! (squadron) and usually one of them was tasked with interception and the other with GA, so the same Stormo often had both versions. Stormo insignia was on the tail while the Squadriglia insignia was usually on the air intakes. Some wings had a single squadron though.1 point
-
Thanks for your help Pin. My Ukrainian is very bad You might pass along that none of those a/c should have the HF wire antenna on them, nor the red intake warning stripe and placards on the nacelles. J1 point
-
Very nice work on this aircraft !! Fine finish !!1 point
-
I can only echo what others say here about your very nice build. The one glaring error that Kinetic have done is to make the intake 'hole' too rounded. It should have flatter sides. No doubt the Italeri kit has the same fault, though I beleive someone, Pavla Ithink, has done a correction for it.1 point
-
Here is a set of etched rudder peddles with working straps i made --------------> . . <-----------------1 point
-
Italeri makes a Skyfall-branded Merlin set specifically.1 point
-
I wonder if her husband knows where it is now?1 point
-
Well most of today went down the pan trying to scratch build throttle and pitch levers. The main throttles have round wooden knobs the rest have coloured plates screwed in from both sides. After a lot of messing about I think I have cracked it. Also scratch built the oxygen system - cannister with blue cable under the pilot's seat. I have the new squadron walkaround book now. The problem with that is I now know exactly what a load of missing stuff looks like so I am of course making it. I also really need to dust the rest of the model! it only shows up with my macro lens honest ! Nick1 point
-
Duncan, that just looks superb, I can't fault it. The paint finish and weathering looks spot on, something i'd say is even harder to get right in 1/72? If you're not proud of that you may as well give up modelling. Tim.1 point
-
Holy cow what the hell is that!!??!! I have committed to a 104 now but i wlil look into thw B-58 as i luv mental stuff and going by that pic with that mahoosive tank slung underneath its gotta be worth a look1 point
-
I want to elaborate more about the nozzle /cans of the Su-27 Al-31 engine: here a comparison with Trumpeters J-10 nozzle, which "should" be the same size... more detail, unfortunatly some are quite horribly painted... but you an see the Aires petal detail to be more rounded. size problem I found withe the aires cans: and now finally my adapted dream model version on the Su-27, probably just too big, compared to the other offerings: I am really looking forward to the new offering from Dream Model, which is announced for some time now and should not need this adaptation measures... and there is also a new offering from Northstar Models http://www.britmodeller.com/forums/index.php?showtopic=234928068&hl= Thanks for looking, exdraken1 point
-
Hi John, The Academy kit is a TBM-1 so engine cowling is not the same, the Airfix kit is not so bad once you de-rivet it(!), but to be honest I have not tried to fit it. The Hasegawa kit has just been re-issued at around the £35 mark for a twin set (TBM-1C/TBM-3) which is actually quite good value, if you shop around at the show I'm sure you will find one cheaper to. I also have an Avenger AEW conversion due soon, which could be used with the other kit (the -1C) as it will have a TBM-3 intake ring in resin. This is the High Planes plastic parts with new (Dutch + others) decals, only trouble is I have not done any decals yet! Colin1 point
-
Those 1950:s jets have a wonderful, quirky character all of their own. Your model captures it admirably – clean, colourful and with a whiff of Flash Gordon. Great build! Kind regards, Joachim1 point
-
Finally, a quick glimpse of what it'll look like buttoned up & with top turret in place - crowded! At least there will be a big hole in the fuselage side so you can see some details... That's it for this update, sorry it's such a big one. Any comments or questions welcomed thanks Rich1 point
-
Hi Vitor, Gorgeous lines on this one with your weathering and paintwork. Another beauty and really exceptional. Thank you for sharing. Karen1 point
-
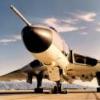
I'm not going to be able to arm-up this model as quickly as I'd like. But to keep your whistles whetted - today she met the original TSR-2 prototype:1 point
-
Well, the paints didn't arrive today, so got on with building the etched masts.1 point
-
Presuming that the original request refers to the Airfix Seafire XVII kit , then at least one of the kit schemes requires Dark Slate Grey and Extra Dark Sea Grey. Andrew1 point
-
Scratch built the first 'powerpack' which I assume are batteries? Nick1 point
-
Bit more done. Boot topping and hull grey painted, along with the speparate parts and the etch. Just have to wait for my delivery from WEM for the Deck Green paint. I could have sworn I had some, but it seems to have disappeared.1 point
-
Thanks everyone, esp Mick for bringing the subject up. The Wasp will be due out some time first half of next year. I would try to get it out earlier, but I don't particularly want to compromise and do a half-hearted job (I have exams in January, so I really need to pass these or I'll be in trouble). What I can say is that the Wasp we had on show was a second generation mock-up, currently without engine and rotors AND most importantly, totally free of any Airfix bits. We plan on doing an initial release of both a Wasp and Scout in some very special Falklands anniversary schemes, followed by 'standard' RN versions and 'overseas' users. I have been working on this for over two years and have spent a huge amount of time measuring two of the real things. We plan on having full interior, along with some special bits and bobs you wouldn't find in your average kit. I'll keep you informed as much as possible, but can tell you now, it will be worth the wait. Cheers Jon1 point


.thumb.JPG.3498f40362ff13ebfc4b2e45abbd545e.JPG)


This leaderboard is set to London/GMT+01:00