
Leaderboard


Popular Content
Showing content with the highest reputation on 27/10/12 in all areas
-
Finished this morning with the last little bits. Hasegawa F-4E kit with Sky decals, painted with Gunze Aqueous and Alclad. Used a Quickboost Skyhawk refuelling probe and some plastic tubing to make the refuelling probe. Good fun, apart from the stencil hell. The build thread is available here Peter3 points
-
Hello gentlemans! Thank you for yours kind words. I have new modeller at home... 16 days old, so next progress maybe sometime in future....2 points
-
Ok, sorry for the delay (Will! ) the minis have been done for days, but I just can't seem to get the bases or the photography right. The plan was dark bases, maybe a little mud/dust to tie the models in. Didn't look at all right. Neither did light ones. And to top it all off, when I finally got around to uploading the photos my lad strolls in and says 'not painting the skulls on their helmets, then, dad?' I hadn't even noticed them- twice! So, I'll be tackling that tomorrow... The minis themselves are an absolute delight. Tons of detail- these are the plain ones!- crisp mouldings and the arm doesn't have to be fixed until after painting. I can't think of a single complaint. Mad Steve might not like the colour, but the fluff says Dark Angels have bone coloured armour. Well, Britain's basically a rocky peat bog anchored in the North Atlantic and that's the exact shade of every bone I've ever come across outside of a butcher's display... I went for a higher contrast on the second mini- brighter highlights and deeper base colours. I fretted a little about doing it, but I quite like the way he turned out. Both of them, really. I was worried they'd look too cartoony, all black and white, like a Miller frame, but it looks quite subtle to me. But then I'm well aware of how biased painters are! Go on fellas. What's the verdict? (On the painting- I already know the photography sucks! ) It's amazing how the illusion falls apart when you change viewing angle...1 point
-
Finished some time ago, after a very long and exhausting build! Academy Su-27 UB Flanker Quickboost nosecone!!! Neomega cockpit, Linden Hill decals "Flankers on Patrol", various missiles, Modified Dream Model + Aires exhausts Here you are: Cool and realisticly looking exhausts.... (Aries are too small, Dream Model too big... so I ,odified both sets to make one pair of nozzles) Hope you like it! One last photo: Cheers, Werner1 point
-
Hi, Here is another figure, this one I finished a while ago. Figure is from Imperial Gallery part of their 1/16 scale series. Enjoy... Comments as always very welcome. Cheers Richard1 point
-
Here's my latest completed build. Third this year; must be on a roll. A good chunk of work was done on it back in 2010 though. It's Trumpeter's dog of kit of the Sukhoi Su-15TM Flagon-F. For full details and a long list of what I could find wrong with it, as well as more photos, go to http://www.jonbryon.com/Su15TM.html (text not finalised but good enough for the moment!). I added a Quickboost resin nose, resin fuselage air intakes (not the main intakes) and nose pitot. Wing pitot is brass tube and wire. Nose gear has been lengthened with sprue. Decals are from the first Begemot set. Paint is Alclad Duraluminum with some Aluminium panels; other colours are all Mr Color. Comments welcome. Jon1 point
-
Cap´n Jack Dore and his shipmates Close ups HERE1 point
-
Picked this little beauty up at the Farnborough Modelfest and couldn't wait to get started! Its a nice change from tanks, planes and spacecraft! I think I can honestly say its the prettiest thing on the display shelf - well apart from the photo of my Girlfriend that is It still has a couple of minor things I want to do with it, eg add a better representation of the coal and perhaps dirty it up a bit more, but I'm going to say its now finished. The kit is not all that good - there are no locator tabs or pins for a lot of the pieces and for some of the larger ones this makes locating things difficult. I added plastic strips to a lot of things to provide a good mating surface. There were lots and lots of ejector pin marks - some in the most visible places, plus the kit is in coloured plastic so it all had to be primed and over painted to get a good finish, however the decals were superb - thank goodness as there were a LOT of them1 point
-
really nice - well done! cheers Rick1 point
-
This is the superb Hasegawa 1:72 Grumman Wildcat finished as a Royal Navy Martlet in desert colours. Finished with Gunze and Tamiya acrylics and Mig Productions dark wash. Decals were cobbled together from the spares box. It was a really nice kit to build and presented no problems whatsoever.1 point
-
Excellent job1 point
-
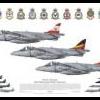
That's Vulcan fantastic!!!! Your panel work is crackin'1 point
-
After following this one through uts build I must say that it really came out very well. I hope that mu one turns out half as good as this one. Again well done.1 point
-
Hi this has gone on the back burner for the meantime, I've had a problem with the decals and now I'm looking for an alternative airline or a solution to the problem I have. I may paint the Emirates emblem on the tail but I'm going to try the large Emirates decal that goes on the fuzz first, if that cracks up then I'm going to have to do another airline and chuck the Fdcal decals in the bin. Mark do you operate from Gatwick as that would be the place I would of fuelled your bird, as before I worked at Heathrow for eight years. Clive Happy Haloween everyone1 point
-
Heres my Airfix 1/24 Mosquito finished at last. This model was trashed by Parcelforce , but thanks to the Airfix spares dept , who were fantastic , its all repaired now.1 point
-
Ruddy 'ell! She's stunning................1 point
-
Beautiful, that scribing and subtle weathering has really added life to it1 point
-
Excellent, I like the weathering and chipping on the kit . Tom1 point
-
She's a stunner.1 point
-
Whoa! you've nailed it with that one! The camouflage, pattern and colours looks spot on and your photographs really show it off to perfection! Brilliant stuff....Brian.1 point
-
As per usual,straight from the box, brush painted using Humbrol enamels. Paint scheme taken from a picture found on the net. Didn't have all the paints for the three tone scheme, so this one was chosen instead. Original decals from Hasegawa were dried up very badly, so the decal bank was used again. Star of Davids from a Airfix Phantom, warning markers come from an Airfix Mirage kit and insignia from God knows, they were just there. Altogether a nice build, with an Italeri Kfir in the stash and all paints in the drawers, so it will be partnered up soon with a three tone version. All comments welcome Sean1 point
-
Wow! Brilliant mate! Gotta love the old Vulcans! <3 Robin1 point
-
Great looking vulcan build, I like how you have weathered and highlighted the panel lines.1 point
-
Very nice1 point
-
Picked up in hobby craft for £2.50!! It's an old kit (1958 I think!!!) But goes together beautifully. Not sure if molds have been fettled since'58. Straight from box. Rather hurried I am afraid. Hence dihedral on tail that shouldn't be there and obscure wheel angles, wrong numbers etc. Etc. And colours kinda "made up" too!! So criticism expected and welcome. Teach me to take my time and make the most of my £2.50!!!!1 point
-
Excellent job, such detail and brilliant weathering Gregg1 point
-
Great job, I love to see a working boat, not one straight out of the builders yard. Brilliant weathering Gregg1 point
-
Smart looking Kfir ! Andy1 point
-
After around 2 months of a break from modelling I built 3 models last week, here is one of them. Not a masterpiece but I'm satisfied. Well before anyone notes that I wanna say that the men aboard are not German marines but RAF Ground crew and Pilots by Revell. They are the only ones I could find and just painted and added them for fun. Pictures a of low quality and sorry for that. Regards...1 point
-
Hello guys My last job as a personal tribute to mu club the Sport Lisboa e Benfica This was mu 2nd what if plane Hope you enjoy it1 point
-
Very,very nice collection !! Great Job !!! Peter1 point
-
Nice builds but my goodness that Seamew's one ugly aircraft! It looks like it's been put together with bits from a spares box. (The original, not your model I hasten to add!)1 point
-
nice kfir you did it justice regards Glenn.....1 point
-
Done a bit more decalling tonight. Nothing that special, but its getting there Robin1 point
-
An excellent build of this true modern classic fighter. She looks very purposeful loaded up with weapons like that and the final in-flight image is outstanding ! Mike1 point
-
Wasn't it speculated that there might have been a quantum singularity or some other weird irregularity in the Kuwait area in the early 90's.1 point
-
Nice one.1 point
-
C'mon Dave, dig it out....... I've applied the acrylic medium and it's dried quite nicely, so far!!.. Also had a go at the spinning props using my compass cutter, not sure if it works or not....... Smudge1 point
-
Steady Andy. I already have one of those. Or is it two? No its actually six Steve1 point
-
well worth the effort, simply great looking jaguar!1 point
-
Wonderful build and finish !! Great Job !!!1 point
-
Spell it how you like, Concorde, Concord, or that fast white pointy thing1 point
-
what an interesting aircraft - and very well built... like it a lot1 point
-
Just a quick update,the Olimp typhoon brits over tripoly set is out,hanants have them,they had 5 ,i ordered one set so get them while you can........Neil1 point
-
The sooner the better... but that's all I know1 point
-
This was the first model I built when I got back into modelling and I must say, I wish it was half as good as yours Mike.1 point
-
Very nice indeed! Mike.1 point
-
Have made some more progress on this fascinating little a/c...especially the bit I was dreading - the rotor! I knew from placing the IP decal that they were very temperamental - prone to breaking up and with a thick white glue residue once ready to place. I treated them all with Decal Fix. I had a go with one of the long rotor decals but that was a disaster as it broke in several places...so back to the drawing board. I had a stash of Miroscale strip decals and therefore measured out and used lengths of 1/16" strips to replicate the black 'spine'. It's thicker than it should be but...what the heck? I then hand-painted the curved border to the red tips to match At the rotor-head end of each blade on the upper surface there are some transverse markings, like ribs, and these were formed from 1/32" decal strip And here are all four blades, decalled top and bottom The next problem was how to fix them together as part of a plausible rotor head. The kit gives a very rudimentary 'plate' which looks like a breakfast waffle. I tidied this up with files and scalpel to get it square and then trimmed the end of the rotors such that the locating tongue matched the waffle in depth. I had looked all sorts of other methods but it all defeated me. I therefore started glueing To get a 'droop' on them I placed a piece of cocktail stick through the waffle to raise it off the bench. I CA'd all four rotors and geot them reasonably square The next problem was that the rotor 'post' was WAY too small...so I fashioned a replacement from stretched sprue This was then glued into place on top of the waffle. I cut two small pieces of 2.5mm plastic tube into halves and glued these on top of the waffle/rotor joint for both some added strength and also to simulate the universal swivel joint. I also CA'd fishing line from the pre-drilled holes as rigging up to the rotor post and some bracing/rigging to that too As I let that all set, I tackled the decals on the main fuselage. Two coats of Alclad Gloss were sprayed in prep and after a lot of cussing, the Decal Fix and copious amounts of solvent got them to settle down and removed the glue off them. They were sealed with a final coat of Alclad Gloss. I've also started the rigging (N/S rod) and control wires (fishing line painted silver). I can see the finishing line now - thanks for looking1 point
-
Blimey, "rapide" progress or what!!!! I reckon my Rapide/Dominie will be at this stage, if I'm lucky, around the end of October! It's looking good Pabbi, though the props look much less "needle-like" than the ones in my 1/48th kit. Max1 point
-
I have a couple not sure if they are Blue Rider or Phoenix . Putnam 3 views always look decidedly odd when I print them out to say 1/72 scale .1 point


This leaderboard is set to London/GMT+01:00