
Leaderboard


Popular Content
Showing content with the highest reputation on 14/10/12 in all areas
-
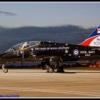
Awful! I'd sooner see the Vulcan kept in a fast taxi condition than painted in a Red Bull scheme!2 points
-
Hello all. I wanted to do something quick and easy while my Stranraer rested a while, so I chose this. I had done one of these in the original guise way way long ago (pre July 1967 if I remember ok) then did the updated version in the early '80s and thought it was okay, and was rather refined in comparison to the previous kit. Well, I had read in various places that this was not a good kit, so I decided to see if I had been remembering with rose tinted glasses. I got the starter kit, and the first thing I found was that the transfers were not as good as recent Airfix kits, the roundels were quite badly out of register, especially the yellow bordered ones for the fuselage. I had thought originally to add the Airwaves etch set to this kit, but Hannants were out of stock, so that is when I decided to go back to basics, and just do an OOB build. I succeeded reasonably well, only having three or four (or maybe 5) additions/replacements to the box contents. I put tape seat harness on, added some plastic card to cover the seam lines in the intakes at the front of the wings near the fuselage, replaced the aerial pylon with metal rod (should have done it a bit better), used EZ-Line for the first time with the aerials, and chose a different colour scheme, courtesy of the Special Hobby Whirlwind I got in May from our club show. The replacement fuselage roundels came from a Revell Hurricane, underwing roundels from Modeldecal, codes and serials from Special Hobby and the rest were from the kit sheet. I also used the new formula Pledge as a medium for setting the transfers onto the kit, and it worked well on all four types of transfer. I was very pleased with the EZ-Line, I found that using a small spot of medium CA put where the line was to touch the model, then dabbing the line into CA accelerator gave an instantaneous bond with little mess. Thin CA was not quite as good. The area I had greatest difficulty with was masking the canopy, so maybe I could have some advice? I used Tamiya and Aizu tape, and a scalpel fresh out of its packaging, but found it very difficult to trim the tape. It kept sliding on the canopy. I had buffed it down with a cocktail stick, and was trying to keep my finger on the tape as I cut. Any ideas to help me improve? Overall, I was happy with the kit except for the transfers. If I do it again, I have found a few areas that can be improved (using the Special Hobby model as a guide). I did need filler especially around the cowlings, both at the front and the rear of them, and I think I would try to re-scribe the panel lines. I need practice on that though! Anyway, thanks for looking, and any comments will be appreciated. Kind regards, Ray1 point
-
Well, I've finally managed to finish one! This is the excellent new-tool P-51D mustang from Airfix. I built the kit with a few scratchbuilt parts such as harnesses, wiring and gun barrels. The decals are by Kits-world with Stencil markings and insignias from the kit sheet. For less than the price of two pints this kit has provided me with hours of entertainment, and with so many decal options available I can't wait to build more! I hope you like it. Sean1 point
-
This is the F4Models 1960s Heavy Flight Deck Tractor operated by the Royal Navy. I came across this from Homebee’s post in Rumourmonger section of BM here: http://www.britmodel...topic=234923203 So bought one directly from Phantom models and got to work on it straight away… This is what it looks like finished next to its shipping box: To get to this stage only took a few hours work, I did add some additional detail, fire extinguishers, gear stick on the steering column, the instrument dash and a few other lumps that are present on the Fleet Arm Museums example… Here she is finished And on deck with some aircraft of a similar period…1 point
-
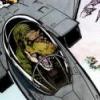
First crack at a Tonka and indeed a 1:144 scale kit. Kit is rather excellent and look forward to giving it a desert storm sand blasting New seat sides added to beef them out a bit. Head rest boxes built up and piping, framework added. Ejector handles drilled into right panel and added to left. Centre screen added with tamiya clear green. Throttle quadrant added to pilots pit along with sundry controls. Completed seats with straps, painted eject handles etc. And added to the tub, fire extinguisher, parachute firing tubes.....1 point
-
G'day All, Well this is another recovery from the Shelf of Doom. Finished it today. It's the Hasegawa 1/48 kit, not an easy build,( no wonder it sat on the shelf of doom for a couple of years.) OOB except for the flare decal and external tank, which came from an academy MH-60G. The markings are for AH-64D 95102 from the 1st Battalion (Attack), 3rd Aviation Regiment, 3 ID. Cheers, Devo1 point
-
This kit has been around a long while from PM models. It makes quickly and easily into an attractive kit and still only about £4-5.1 point
-
Yes, the flap hydraulic jack has a shuttle valve within it's body, thIs valve shifts to allow high 3000psi pressure nitrogen into the down side of the jack when the emergency flap down 'blowdown' is operated, if the flaps are left up they tend to droop when hyd pressure is removed or someone leans on the flap surface, & this can unseat the shuttle valve which can allow hyd fluid to creep down the pipework to the 'blowdown' valve & the fluid starts to drip from the valve drain pipe or body, causing us engineers more work that can be avoided by staying to the operating procedures.1 point
-
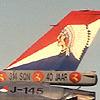
Not in bridge order - no wonder us fairies always beat the heavies, it was almost as bad when playing heavies at uckers, two dice with six sides, I thought some of them would expire trying to count that high! No wonder the rules of the game were always on the bottom of the table, it gave them the excuse to upend the table whilst taking their shoes and socks off!! Wez1 point
-
I think you'll find that's hearts, clubs, diamonds and spades.1 point
-
A great looking example.1 point
-
Very nice Tigre! Well done.1 point
-
nice work..... regards Glenn.....1 point
-
nice scheme.now lets have one at fairford please. glyn1 point
-
LOVELY Sean1 point
-
Glad this one is back, it was one of my favorite threads. Martin1 point
-
Nice colours on that. Looks great !!1 point
-
Lots of good work gone into that, well done mate...1 point
-
Very impressive finish, the weathering and general 'usedness' is excellent. Many congrats.1 point
-
There is a whole series of photos taken at the same time as this one, and in many of them you can see the puddles on the ground. I suspect it had just stopped raining, or in fact it may still have been raining when the photos were taken. I know that's difficult to imagine, the photos being taken in the UK and all, but I'm told by a fairly reliable source that it does in fact rain on rare occasions in the fair British Isles. It's always been severely sunny and pleasant when I've been there1 point
-
At last (I was quietly getting fed-up with that one). Hope you like it, Cheers, S.1 point
-
Vitor, Fabulous, Superb and Wonderful work. Thank you very much for sharing. Belle1 point
-
I don't usually show my models, please be kind1 point
-
Italeri kit in 1/48 painted all with vallejo... Great kit... for all recomendation Cheers Roman1 point
-
Well, perhaps a bit earlier than tomorrow then I'm experimenting with a method of doing rivets/screws by hand - only really viable because there aren't too many alterations I'm making. Anyways: The dots were done using the tip of a cocktail stick. From images, the rivets aren't always perfectly evenly spaced along the edge of the panel. To ensure I get the correct distance from the edge of the panel, I'll run a line of masking tape across and will use that in conjunction with the dots to get (hopefully) well positioned rivets. Modelling track for the day is - a suitably hellish track that brightens up painstaking work no end Tim1 point
-
Vulcan is The only aircraft my wife gets worked up about it's been brilliant to see it flying around for the past six years ( we should count our selves lucky that someone thought it was a good idea went and did it) it's a shame but maybe it's right to retire it now. Now if only EADS could be persuaded to put Filton's Concorde back in the air1 point
-
A Top job on a nice model of the best tank of the early WW2 period. Whats not to like??? Hats & Hussar! Jonners1 point
-
You sure the Leccies weren't chasing the RAFP Alsations, or is that a story for another Website................1 point
-
That's a stunner. Good tip for the tracks. Pete1 point
-
Thanks for the kind comments, i was inspired to build it by AndyC's build in the close air support group build, will have to crank up the compressor and blow some exhaust stains on when i can summon up the courage1 point
-
Wonderful Krazyness My Friend: Nice and clean those three builds, my favourite one is the Finnish example, but the other two are nice. I was wondering is you have made also the old Heller model and how it compares with this one. Thank you very much for sharing.1 point
-
I am constantly amazed at the work of ship modellers. I build 1/35th armour where I can hide my lack of skill under weld seems and mud, and the parts are all big enough for me to feel between my geriatric fingers. Your Nelson is just beautiful and the scene so realistic.1 point
-
Hi A friend of mine have just finished this 1/48 SR-71: http://www.master194.com/forum/viewtopic.php?f=4&t=68877&start=175 Patrick1 point
-
AMAZING!!1 point
-
Tanks are'nt my thing, but that's a gorgeous build, and the figures make the whole stand out lovely job Sean1 point
-
My God....that is incredible.....gorgeus work. Congratulations1 point
-
Just fantastic...1 point
-
WAOUH! great job I like it very much1 point
-
Beautiful, outstanding models - the kind I aspire to building: intricate and perfectly built and finished.1 point
-
Fantastic work, a real inspiration!1 point
-
Freaking amazing detail there Vitor1 point
-
Bloody amazing, thankyou very much for sharing1 point
-
Hi Laurent: yes, i have been change the nose.1 point
-
Really nice, especially in this small scale!1 point
-
Hi Vitor, very very nice indeed, I sepecially like your treatment of the engines, which is quite difficult to capture in this small scale. Congratulations and thanks for sharing you pics and build thread. Colin on the Africa Station1 point
-
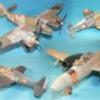
Wow, those are REALLY good builds, well done. Your doors look so delicate and well detailed. I have a load of these kits (11 of them). I plan to build some examples as used by the SAAF, the Rhodesian Air Force and also by the Portuguese Air Force when they flew them in Mozambique. I fell in love with the gunship version of the Alouette when two RhAF Alouette gunships flew over us while we were on holiday in Rhodesia. I remember jumping up and down excitedly waving my arms wildly as they flew over and this hand poking out next to the what seemed like a HUGE gun barrel and giving a calm wave in return.1 point
-
* Christian, it also after one Maceda show (a few years ago) that I decide to build the Alouette III * Alex, the Heller kit it's a bit poor but with the Extratech PE and some pacience you can build a nice 1/72 helicopter See the step-by-step and any doubt just ask1 point
-
Hi Vitor, They look amazing. So delicate and yet made from a 'robust' Heller model original. Well done! I was looking at one of these at the Maceda show last weekend and thinking how to go about building one. Now I know! Cheers, Christian the Married1 point
-
I've used the new "Pledge" Klear for a while. It works fine as a decal sealant and varnish. I can't really comment too much re: dipping canopies, I have used it for this, but tbh I never used the old original "clear" Klear, so I have no benchmark. But the canopies I have tried it on are nice and clear and show no signs of any yellowing... Yet.1 point

.thumb.jpg.ba34a9f6ddce411193946dbdcc7b5fe8.jpg)


.thumb.jpg.0cb281983c298f55509ab7d9a06994bd.jpg)


This leaderboard is set to London/GMT+01:00