
Leaderboard


Popular Content
Showing content with the highest reputation on 12/10/12 in all areas
-
Hello guys, This is my effort with the new 1/48th Italeri Wessex HU5. built as a Falklands war veteran. The references for this actual bird seem to be slim pickings and the Italeri research is questionable. Nevertheless the kit builds nicely and I added a few touches of my own. The main cabin received pipework & cabling as well as seatbelts and some gear to make it look busier. The aerials, tie down rings & hoses were added where I thought necessary and I scratchbuilt something that looks like a cargo sling. The twin aerial lines are EZYline elastic. I hope you like her. Cheers. Andrew1 point
-
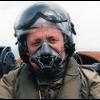
Tamiya's Buffalo B-339 from VS-201 USS "Long Island" 1941. Added small Eduard PE in the cockpit and resin QB engine.1 point
-
Hi mates, This started out as an Out-of-the Box build to take a break and not get too carried away. But then I found myself adding very small diameter solder to represent tubing and lines in the cockpit, etc. So much for the OOB idea! This is, of course, the nice new Airfix kit of the A6M2b in the one true scale. Best $7.50 I ever spent! A prerequisite to building any Japanese aircraft model is to spend several hours studying the wealth of information on the web and trying to figure out what colour it should be painted! What a Pandora's Box that is! Yikes! I found what I needed on Nick Millman's blog. I can highly recommend picking up a copy of his "Painting The Early Zero" guide. This model will use the Airfix decals, but the paint scheme will need to be changed slightly. The aircraft represented by the transfers was actually used in training, so the undersides will be yellow-orange, not gray as Airfix states. That should make for an interesting combination with the IJN Dark Green on the top. But first, here's the obligatory shot of the carton: The cockpit is quite well detailed for 1:72 scale, as I'm sure you've read in the reviews. The rear bulkhead has a couple of ejector pin marks that need to be filled and the Euro buck gives you an idea of how small this thing is: The seat has the lightening holes moulded in, but I think they'll look better if they are drilled out. I used Gunze H303 FS34102 for the cockpit green as applied to Mitsubishi-built Zeroes. I added some small wire and solder to represent some piping in the cockpit, and I think it looks busy enough. The kit decals for the instrument panel are quite convincing. I used some 30-year old True Details "generic" Japanese seat harnesses and rudder pedals. Airfix provides a nice way for you to model the Zero with the wingtips folded, Just cut the outer sections away along a panel line, and replace with separate wingtips that have a hinge moulded in. I think that will add some interest, so off with the wingtips! I decided not to do any detailing on the engine, so I assembled it and gave it a quick paint job and wash. The moulding is nice, and there's quite a bit of detail considering it's only three pieces: Once the fuselage was assembled, I sprayed the undersides white, in preparation for the yellow-orange colour. My first thought was to use Gunze H24 Orange-Yellow, so I quickly applied a coat or two. But you know what? It's too orange. I went back to Nick's blog, and found some samples of the C1 through C4 colour chips and a nice photo of a canvas section from a trainer. You can view these at http://britmodeller....showtopic=66239 So now I needed to mix a colour that batter matched that sample. I used 50% Gunze H24 Orange-Yellow and 50% H34 Gunze Cream Yellow. I like this a lot better! To my eye, this is a good match for C2. Straight Gunze H24 is more like C1. I then used Gunze H59 Dark IJN Green on the top side. The number of "scallops" on the yellow-green demarcation line matches a photo of the actual plane, and not the Airfix box art. The cowling is black-blue, which I mixed from Model Master Black and Model Master Bright Blue. After I took the following picture, I decided to extend the black-blue from the cowling over the guns and to the instrument panel. I can't tell if the real plane was like that, but I've seen quite a few pictures of trainers that were. On the bottom, I then applied a lighter version of the yellow-orange on the panels to create some post-shading. Not so easy to see in the photo, but it's easy to see with your eye. I figure I'll give the panel lines a wash too. Next, I wanted to do the same on the top as well. So I sprayed lighter shades of the dark green and the blue-black. Next I'll have to do some clean-up on the wing folds, and spray that area aotake. Rather than use one of the pre-mixed versions of this "colour" (which tend to look like metallic custom car colours) I'll create the aotake by applying a base of Alclad aluminum and overspray with very light mists of Gunze Clear Blue and Gunze Clear Green. I've never done that before, so I guess I should experiment first! That's it for now. This is really a sweet little kit, and it's a far cry from the original Airfix Zero I built about forty years ago. Cheers, Bill1 point
-
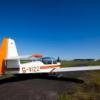
Hello all. I wanted to do something quick and easy while my Stranraer rested a while, so I chose this. I had done one of these in the original guise way way long ago (pre July 1967 if I remember ok) then did the updated version in the early '80s and thought it was okay, and was rather refined in comparison to the previous kit. Well, I had read in various places that this was not a good kit, so I decided to see if I had been remembering with rose tinted glasses. I got the starter kit, and the first thing I found was that the transfers were not as good as recent Airfix kits, the roundels were quite badly out of register, especially the yellow bordered ones for the fuselage. I had thought originally to add the Airwaves etch set to this kit, but Hannants were out of stock, so that is when I decided to go back to basics, and just do an OOB build. I succeeded reasonably well, only having three or four (or maybe 5) additions/replacements to the box contents. I put tape seat harness on, added some plastic card to cover the seam lines in the intakes at the front of the wings near the fuselage, replaced the aerial pylon with metal rod (should have done it a bit better), used EZ-Line for the first time with the aerials, and chose a different colour scheme, courtesy of the Special Hobby Whirlwind I got in May from our club show. The replacement fuselage roundels came from a Revell Hurricane, underwing roundels from Modeldecal, codes and serials from Special Hobby and the rest were from the kit sheet. I also used the new formula Pledge as a medium for setting the transfers onto the kit, and it worked well on all four types of transfer. I was very pleased with the EZ-Line, I found that using a small spot of medium CA put where the line was to touch the model, then dabbing the line into CA accelerator gave an instantaneous bond with little mess. Thin CA was not quite as good. The area I had greatest difficulty with was masking the canopy, so maybe I could have some advice? I used Tamiya and Aizu tape, and a scalpel fresh out of its packaging, but found it very difficult to trim the tape. It kept sliding on the canopy. I had buffed it down with a cocktail stick, and was trying to keep my finger on the tape as I cut. Any ideas to help me improve? Overall, I was happy with the kit except for the transfers. If I do it again, I have found a few areas that can be improved (using the Special Hobby model as a guide). I did need filler especially around the cowlings, both at the front and the rear of them, and I think I would try to re-scribe the panel lines. I need practice on that though! Anyway, thanks for looking, and any comments will be appreciated. Kind regards, Ray1 point
-
This is my take on the kit.....Enjoyed the build a lot. I used Eduards detail and IFF panel sets on it. and it's painted with Revell sand as I think it is close to the actual colour.......As with most of my models, it is weathered with Grumbacher pastels, scraped with a scalpel and applied with a brush... Smudge1 point
-
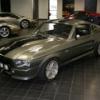
Well, I've finally managed to finish one! This is the excellent new-tool P-51D mustang from Airfix. I built the kit with a few scratchbuilt parts such as harnesses, wiring and gun barrels. The decals are by Kits-world with Stencil markings and insignias from the kit sheet. For less than the price of two pints this kit has provided me with hours of entertainment, and with so many decal options available I can't wait to build more! I hope you like it. Sean1 point
-
Thats it finished, HMS Nelson 1/700 Tamiya,PE by WEM ,Wooden deck by Hunter,plastic case Trumpeter,crew Flyhawk, plus brass barrels 16" and 6" and Niko 40 mm AA. Last one, back in her plastic bunker. build on this http://www.britmodel...topic=2349206541 point
-
This is a Hawker Siddeley Trident 1C, G-ARPR of British European Airways. On 10 June 1965, while operating Flight BE343 from Le Bourget to Heathrow, this aircraft made the first fully automated landing of a commercial airliner carrying paying passengers. However, my model will show the aircraft as it was in May 1968 with a natural metal rear fuselage. Like this! The kit is the venerable Airfix 1/144 kit, suitably modified. Decals are from the Two-Six sheet 44034 Taken from the mould and boxed long before the parts had cooled! No damage to the parts though. Okay, hold on tight, rider! Here we go, two, free, four...1 point
-
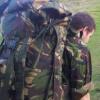
I read this site's content almost every day and I've even dipped my toes here a few times but I think the time is now right to try to contribute something properly. I will try to see this wip thread through to conclusion but updates may be sporadic and may even dry up altogether - please forgive me if I fall by the wayside..... I have here the Airfix 1/72 Bf110E trop and I intend to use to learn more about about modelling and to develop my very modest ablities. Ultimate accuracy is not my goal but I hope if I finish the build it will be a reasonable model. First impressions of the kit is that it looks fair enough but is not without issues. the first of these are the somewhat 'wholesome' panel lines. These have now mostly been filled. The second issue (which I only learned about from reading posts in this forum!) are the overly large engine nacelles on the upper wings. Other than those 2 things, the kit appears to but just fine for my purposes. I have read negative comments about the Airfix decals but I've played with some of the spare ones and I think I can work with them. The one-piede lower wing in my kit was very badly distorted but Airfix swiftly sent me a good replacement part on request. Hats of to them for great customer service. These first 2 photographs show one original upper wing and the other one which I have modified by filling the panel lines with epoxy putty and by re-shaping the nacelle. I think the rear end of it should be slimmer and more pointy but, quite frankly, it'll do for me. These next 2 photos show what I've done to the fuselage so far. Panel lines being filled (this time mostly with green tube putty) and the elevators removed so i can have them dropped. At this point I have a query that hopefully someone here can answer: How/where are the elevators hinged on the real aircraft? Also, what is the function of those tabs seen on moving surfaces that project into the fixed part of the structure? I've modelled these ones as hollow and I'm guessing that they have some kind of role to play in the actuation of the elevators but I honestly have no idea what would be correct. I hope someone can fill in these gaps in my knowledge! Right, that's it for now. I shall endeavour to press on with this build and add more to this thread. Jon.1 point
-
Hello guys, something new from me... again for fun :-)1 point
-
Right,I know we are looking at 2 scales here, but I fancy both Eduard's 1/48 & Roden's 1/ 32. Question is which one to choose? Admittedly, my usual scale is 1/48, but I'm becoming a bit of a fan of 1/32. So what do you fellows recommend please?1 point
-
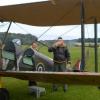
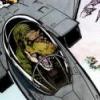
Here is my Wingnut Wings RNAS Sopwith Pup completed last night. Painted with Tamiya acrylics and rigged using E Z Line (fine black) for the control wires and fishing line (0.12mm Maxima Chameleon) for the structural rigging. All rigging was painted with Mr Metal Color - Stainless once in place. I hope you enjoy the pictures and I thought I would take the opportunity to put down a few thoughts of a Wingnut Wings novice to try and encourage others like myself who have a number of their kits in the stash but are having trouble building up the courage to start one. Sometimes there is a big fear factor in modeling especially with expensive kits that will need new techniques to be mastered if the modeler is to do them justice. WNW kits are to me classic examples of this. I have 10 (now 9) in the stash but had not made any because I was not sure that I would be able make a good enough job of rigging them. In the end I decided that there was no point in having the kits if I was never going to build them and if I started to build one then I would effectively force myself into having to rig it some how – once I have started a build then with very few exceptions it’s a Magnus Magnussen job with me (I have started so I’ll finish). Rather than dive in with the Fe2b though I thought I would start out with the Sopwith Pup with its much simpler rigging. I have built several bi-planes in the past in smaller scales (including the Roden Felixstowe) so I am not new to rigging but with these 1/32nd scale kits I wanted to try and use turnbuckles and brass microtubing to attach the rigging rather than drilling right through the wings as I have done in the smaller scales. There are some very good resources on the Internet about rigging WW1 aircraft in 1/32 particularly at http://ww1aircraftmo....com/index.html I made my own turnbuckles from 0.125mm copper wire and used 0.5mm copper tubing drilled out with a .4mm drill bit to make the sleeves to hold the rigging. As a novice to this method of rigging the “scary” parts were how to out the copper microtubing and then being able to thread the fishing line through it twice. In the event both of these proved surprisingly easy after a bit of practice. I found the microtubing easy to drill out before cutting of the short lengths needed and a new scalpel blade is perfectly capale for cutting with when used in a sawing motion after first anchoring the tubing along a precut saw slot in a small piece of wood. I think for my next kit I will use 0.14mm fishing line as the 0.12mm line looks rather thin for 1/32nd scale. Another new technique used for the first time by myself on this build was preshading of the wings and fuselage along the ribs. I wanted to try out this technique to replicate the effect seen on real fabric covered wings where light shines through outlining the ribs. Again I found this effect to be easier to do than anticipated and very effective. I think that the woodgrain effect I have ended up with is a little too indistinct and more waethering on the metal cowl and underneath would have been better but overall I am very pleased with how this build turned out. I have learned a couple of new techniques and although I will not be ditching everything else to build WNW kits exclusively (I am of course going to build everything in my stash of nearly 500 kits eventually!) I will try and build at least one of these kits a year from now on. I will probably not be building the Fe2b next but at least I now know that if I did then I would be able to make a reasonable job of it. I think the next WNW will be one of the German fighters to tackle some of those scary lozenge covered wings. Andrew1 point
-
Well, with the site down today, what better way to spend the afternoon than finish off this little gem Eduard's lovely little German Tourer - a fantastic little kit finished using Techmod's decals for D-IHDD, a Reich entry into the Isle of Man Air Rally in 1937. Finished in Xtracrylix paints (RLM 02 and 24) and with Eduard's own coloured etch inside. The decals are a little temperamental and really do need a VERY flat and glossy finish - mine wasn't quite up to scratch in places and I expended a lot of Sol/Set getting them to settle. I also owe a nod to Brett Green on Hyperscale for his own build notes as the cockpit/fuselage/wing joints are a bit tricky and for those that are interested the build thread is here...http://www.britmodel...topic=234926310 . Enjoy and thanks for looking.1 point
-
1 point
-
I don't usually show my models, please be kind1 point
-
Last of the trio in consideration for the club display at SMW Revell Sabre Dog Again from the box with cutting edge decals Alclad used for the NMF1 point
-
Thanks Mark. Got a layer of gloss on this evening and realised it's probably best to the decals on next, so I did. Sealed it and now to allow it to cure before I start with the weathering. This is as it stands this evening: Thanks for stopping by1 point
-
Just for you Kev1n here is an update(still have a small supply of food and water left from my enclave), i'll get some better pics for the next update. Bradley, couldn't agree more have Chatham for the 300 and 500 just wanted to be different and the rose was my favourite of the odd tales btw, this kit is really accurate, but seems to be fighting me a lot to get a good fit. Is it me or have others had similar issues with these kits (for what it is worth I don't mind this just surprised that the accuracy is really good and fit doesn't match it)1 point
-
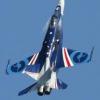
they posted this on their facebook page earlier today, http://www.tinyurl.com/558FAQ, seems she is due new main spars1 point
-
...but does this mean the funds freed up will be put into restoring an F-104 to flying conditions???1 point
-
Perhaps if they didnt pay Dr Pleming circa £80,000 per year salary then they might have more ££££ to fund the aircraft.1 point
-
Add to that the inboard trailing edges are not cambered properly and the fuselage diameter is too small. The Revell -310 is a case of "jack up the windscreen and replace everything else, then once you've done that find a replacement windscreen as well".1 point
-
Looks good mate - I may be tempted to pop along to next year's1 point
-
Actually, judging from photos this model does depict how the aircraft likely looked. There is a very sharp colour Kodachrome image of this particular aircraft, and it clearly shows the latter style of 4th Fighter Group marking sweeping under the cowl in precisely the manner that Sean portrayed here. In fact he absolutely nailed where the "MY" and the loop of the "A" of Achin' crossed from the red nose to the natural metal panels. Moving the serial number forward onto the vertical stab was a common practice in the 4th and shows in many photos. Unfortunately the photo I have in front of me (in the book The Debden Warbirds by Speer, Schiffer Military History Publications, pg. 215) doesn't show enough of the aircraft to confirm that or the red wingtips. I will look at home to see if any other reference has a better shot. There also seems to be some confusion about what the serial number was, so perhaps "OLE-III" was not the same aircraft? I don't have all my references to hand, so I might do some digging tonight at home. Regardless, Sean's model is an absolutely stunning build. He's taken an excellent kit and built something that is perfectly finished and weathered. Amazing job! Richard1 point
-
Hi Rad, love the black background, sets the pics off nicely as F-32 sats use the available space to punt your own pics. No point in having a site if you don't use it! fillit up. Colin on the Africa Station1 point
-
Got the first dark coat on - Revell Anthracite (36109) over black preshading. I'm pretty happy happy with the colour. Next comes a layer of Klear, followed by something I've never tried before - salt weathering with very thin white, followed again by a very thin layer of dark to blend it all in. I hope it works. More soon.1 point
-
Well decals on! I got hold of an Eagle Strike sheet for some and others were the kit ones. To dispell a couple of myths (to me at least) Hasegawa decals are ok with a dash of microsol and microsol is ok with high shine Alclad, at least in small amounts! Quite pleased with that! Wings are done too, varnish just drying, plus tip tanks, tail and rudder. Just needs all putting together now. End is in sight! Phil1 point
-
I like it Rad. My only suggestion would be to put somemore of your photo's on there and to use it as a show case as well as the fly ins.1 point
-
Very nice. I love the purity of the silver, you've managed to get the shading down without compromising the tone of the silver. Looks great1 point
-
Thank you guys. I reckon a deep sea salvage tug has to be the ultimate big boys toy! Not a trace of femininity or elegance. Just form meets function. Handsome.1 point
-
More... The real one... Cheers Pierre.1 point
-
OK, so where we we? Ah yes, according to a photo of this actual aircraft that I saw over on the Aviation of Japan website, the hinomarus on the bottom of the wing had a white surround to them. The kit decals are not like this, so I headed for the spares box - but no luck. I then decided to paint white circles on the bottom at the appropriate size, and put the red circle over that. If I did my measurements right, I should end up with a nice little white edge. I used an old drafting template to cut the correct size circle out of some wide Tamiya tape, which I used as a mask. After painting the white, I think she looks pretty good: Next, I mixed 75% Gunze Clear Blue and 25% Gunze Clear Green, and thinned it way down to make my "aotake." I used Alclad aluminum as a base, and then sprayed two very light misting coats of the Gunze mixture, and now we a nice representation of the aotake protective coating used by Japan: The pictures don't show the "clear" aspect of this paint so well, but the effect is there. I like the color, and I plan on doing a light wash as part of the final weathering. That's it for today! Cheers, Bill1 point
-
Ciao Ale, Che Bello! Penso Che sia splendido ! Ale, ..about your canopy, Come mi dispiace ! Che peccato!.... IT IS A GORGEOUS Warhawk.. Tanti saluti. HOUSTON1 point
-
Wonderful model you have achieved Bambino!!! Even tough the canopy troubke the whole model looks impressive!!!1 point
-
thanks so much! next step: no mistakes or mishaps! ciao Ale1 point
-
Well the light is at the end of the tunnel now. I've got most of the decals on, Only the upside down one on the door and the 'No Steps' came from the kit sheet, all the rest are home made. I've also added the aerial fit on top of the nose and underneath. To give them a fighting chance with all the extra handling needed to take the wings on and off I decided to drill holes for the aerials and the 2 black ones holding the wires I drilled out and inserted some .75mm wire to make a decent connection to the fuselage. The front crew door was quite a good fit but the addition of the brass support should give it a bit more strength. The ramps from the door to the ground are missing from the kit and completely wrong in the Flight Path set. I built and painted the flight path ones but they look so awful I've decided to make my own. I'll just tidy those bits up over the next few days and we'll be there. Colin1 point
-
Looks good after a quick scoot round1 point
-
I think that looks really excellent! Great build mate, and the mottling looks great too. Chris1 point
-
That looks challenging, I'm looking forward to the ready for inspection shots. Just an idea for painting the raised yellow detail on the wheel spokes, you could try pad printing with paint. Use a fairly dense foam block, dab it in some paint, wipe most of that off then gently press your foam pad against the spoke detail. Some of the paint will stick. It might take a few applications to get the desired density, but maybe worth a go.1 point
-
What a great choice of first aircraft! Top tip number 1, head over to SIG (special interest group) forum: http://z13.invisionfree.com/Tornado_SIG/index.php?act=idx Enjoy the Tonka Phil1 point
-
Thanks Jens, you're knowledge of the F-16 is much appreciated Cheers, Neil1 point
-
RBM turn the barrels for armorscale, however they sell them themselves cheaper by removing all their packaging and instructions. Very good, and cheap, buy from ebay mostly as cheaper p&p1 point
-
First thing to do was to fit all the windows and doors and then fill them with putty. This includes the door which was claimed straight away by the carpet monster! Damn him! I have chopped off the front of the fin bullet so I can extend it and make it a bit more pointy. I've also started to shave away the fuselage top ahead of the No 2 engine intake and the leading edge of the fin. The wing root fairings start off as plastic card shapes. This should (I say should ) ensure that there is a proper definition between the fairings and the fuselage once I have used Milliput to make the main part of the fairings.1 point
-
Hey guys. Thanks a lot for the good comments, work is going a little slowly as of late so it helps . Just a fwe more pictures. Im currently filling in the windows and working on the fibre optics for the warp nacelles. Firstly, the windows: What I did at first is the same as I did on my Enterprise with clear resin. The idea is to put tape on the outside, and fill from the inside. Then you can cut a clean hold in the tape on the outside with a fresh knife blade to let the air come out and make sure there is no inperfections in the window. However, this time i'm using Micro Kristal Klear rather than a clear resin. The only problem was when used this way is that it took about 72 hours to cure. I was using it wrongly (n00b time), so instead the method is taping it from the inside to keep the air in the window. Then by putting a small amount in the window, you can draw it in to create a small film which dries quickly and clearly, using the air inside to ensure the window doesnt seep into the main hull. For the fibre optics i filed the ends of a red and green superbright LED down flat, and polished them up with some 400 grit wet and dry. The 0.5mm fibre has been bent using a soldering iron as its pretty thick stuff. These were then bonded to the LEDs using epoxy resin. A resistor and some tin foil / tape later, and they look like this. Quite rough looking I know, but its the outside that matters, this is the starboard side light. Obviously these will protrude much too far from the nacelles, so after the ship is painted these will be cut down to size, shaped and polished Im away with the family for a few days now, so I wont have an update on here for a little bit, but keep checking back. All the best!1 point
-
This was going to be straight out of the box until the paint crept under the masking on the canopy and no amount of soaking in oven cleaner would shift it. Luckily I had a Falcon Clear Vax set with a T-28 canopy in it. It's made to fit the Monogram kit but a little persuading got it to fit the Roden.1 point
-
Last one, for size1 point
-
more photo,s1 point
-
All those masterworks are impressive, but the ones most liked by me are The B 17, the Shamrocks Phantom and the TA 152H , but really are are splendid works.1 point
-
I only managed to complete one build for 2008 despite starting several models this year. My new years resolution is to finish more of my part built models. This is Tamiya's Wildcat with some Eduard etch, a Squadron Canopy and Techmod decals thrown in. Hopefully there will be substantially more completed models in my 2009 Yearbook.1 point


.thumb.jpg.ba34a9f6ddce411193946dbdcc7b5fe8.jpg)


This leaderboard is set to London/GMT+01:00