
Leaderboard


Popular Content
Showing content with the highest reputation on 04/10/12 in all areas
-
Here's the subject of my latest Airfix Model World article which will appear in the November issue (on sale tomorrow). Belarusian markings are from Linden Hill's "The Rook - Global Su-25s Part 1" and finished with AKAN acrylic paints. Ordnance are Eduard rocket pods and AeroBonus (Aires) bombs and Aphid missiles. Cheers, Eric2 points
-
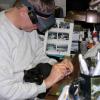
Hi to all. The Mosquito has flown... first flight at Ardmore airfield this morning. Had a problem with the ASI, and landed at Auckland International (which had been planned) where it was repaired (found to have an air leak in the system). Flown back to Ardmore in the afternoon, and a series of further test flights to be done tomorrow (weather dependant -a bit dicey) before a display on Saturday at Ardmore. Hopefully to be joined by the recently rebuilt Anson Mk.1 which is making it's way north for the weekend, Great stuff, two WWII twins flying .... Start-up. Taxiing to runway. Lift-off. On the way. One very happy owner, Jerry Yagen with Keith Skilling, one of the test pilots. Pictures were taken by Damon Edwards of IPMS Auckland. Hopefully more to join them from myself in the weekend. Cheers, Pete M. P.s. One more image via Kerry Carlyle (also IPMS Auckland). http://i1308.photobu...zpsf9b049aa.jpg1 point
-
I built the kit OOB, only cutting it down to water line, and adding a few figures from the spares box. I used fishing line for the rigging. Humbrol enamels were used to paint and weather her, with some Tamiya Smoke. Thanks for looking.1 point
-
Hi folks This is my attempt at 'the most famous Phantom of all time' (apparently) and my favourite US aircraft. Must get around to getting the UK variant at some time. Thanks for looking Regards JA1 point
-
Hi all, Hasegawas colourful Harrier of 20 ® Squadron RAF Wittering. Regards Brian1 point
-
Hi guys, Some pictures of my Mig-17 from AZModels. Cheers Pierre.1 point
-
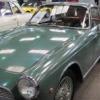
Hi All, A bit of a diversion from the norm here. As well as scale modelling I also enjoy 1/32 slot racing and recently started to build my own. It's an absorbing hobby and once you get into it you quickly find that there are untold tweeking options for chassis, motors, controllers, wheels, tyres...where to stop?! I've always had an unhealthy interest in MGCs and took the plunge by investing in the real thing a few years ago - as pictured in my avatar. The Sebring racer was an attempt by the factory to go racing but its career was cut short and never had the investment it needed to realise its potential. Regardless of the numerous replicas on the streets and tracks right now there are just two genuine articles in the world and my car funds don't stretch to six figures so slot racer it is! George Turner Models is run by...George Turner...and he has a truly fascinating history, with a career that started at Matchbox/Lesney. Take a look at http://www.georgeturnermodels.com/ I saw him at a slot show at Gaydon a couple of years ago and he had a lovely MGC Sebring on his stand that I had to have a go at. Here are my results and I hope you enjoy the pictures. The glazing is a little less clear than I'd like but the supplied part is pretty thin plastic that doesn't have the scope for sanding back and polishing. Might be lack of skill on my part of course! The registration number is an exercise in vanity on my part. It's my own car's number and goes on all the car models I build. The wheels are from a sllot car manufacturer called Slot.it and the resin Minilite inserts were made by a member of a slor car forum I belong to. Apologies for the side track from pure scale modelling but I hope you enjoy. Cheers, Roger1 point
-
Hi all, here is my next model, a OOB built Auto Union Typ C, Hans Stuck, Hill Climb 1937, REVIVAL 1/20th. I know the model and the background (Diorama) are not correct but it is not easy to get original photos from 1937, only the photos from a restored/rebuilt car are a little help. This is not my era of race cars but I like this car with the twin tires (which have been used only in hill climbs) and the 16 cylinder engine. I hope you like the model. John-w1 point
-
Last of my revell 1:72 trio.... For now.1 point
-
- Something really huge even in 1/721 point
-
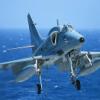
G'day All, I started this one as a Blue Angels bird around 2000. It went to the shelf of doom shortly there after. In February 2011 I decided to make it a RAAF Hornet......it went back to the shelf of doom half way through decal stage. (Nearly went through the garage wall as well.) Finally in August 2012, I decided it must get off the shelf of doom so I did the rest of the decals(I forgot a couple...but you get that!) Today I glued on a few remaining little bits, closed the canopy and thats it!! It ain't a show stopper thats for sure and apologies if it causes offence to any past and present Hornet guys. Home made RBF flags,'winder seeker cover and some intake plugs, Aussie Decals decals, an Aires bang seat and brush painted with Humbrol paints. Usual crappy pics with my $10 pawn shop camera! Cheers, Devo1 point
-
Looking good. I dont think the slots are for a missing part, I think there just poor representations of the cooling duct that open at low speed then close when airborne. I can't find any pics to show this, I'm sure there are more knowledgeable bods out there who can describe this better.1 point
-
Sounds good, don't know why the RAF haven't considered hawks for CAS on the front line now that the Harriers have gone.1 point
-
Here's another trick. Go to your LHS and pick up either the Airfix Spit I or PR.XIX. Both of them have a cockpit interior that can be cloned in plasticard and strip. When you build the I or PR.XIX,simply clone an interior for that too. That way you've always got a "factory" interior to copy for future Spit models1 point
-
I'll have one please. To be sold on ebay at a loss several months later1 point
-
build programme - clear path to bench clear bench build storage facility for cleared material tidy bench start building as build progresses, start to clutter up bench again complete build find you are trapped behind bench clutter and can't get out simples!1 point
-
My, aren't we "little rays of sunshine…?" (please note slight attempt at humor)1 point
-
I don't know about the accuracy of it and I know that you don't really care as you build purely for the pleasure of it ( "what references? I looked at the box art!" I think was your quote when I once asked you what you referred to ) but it is an amazing build and I just wish I could build,paint and weather my models like that. It is the transparency of the paint and the way you apply the various shades that I can't do, my colours always look too solid.1 point
-
Hi I've sent Mish a PM to clarify the start date, welcome aboard. All new names added to the list. Antony1 point
-
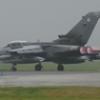
Count me in too - Got these to do..... C-121 Constellation Convair B-58 Hustler F-14 Tomcat F-20 Tigershark F-4E Hawker Hunter FGR9 MIG-21 Fishbed Mirage F1 TF-104G Starfighter Tornado I'll see what's left by the time the GB comes round - Or what's been added!1 point
-
I liked the Academy cockpit so much I dropped the bits into rubber and have used the resultant cloned bits to tart up cockpits ever since. The moulds need redoing though.1 point
-
I've been using an Iwata Neo (the green box gravity feed one with the .3mm tip) for the past year since I first got it almost two years ago. I can't compared it with the Harder and Steenback one as I haven't used one of those. Past brushes I've owned and used include a Paasche H series, some brief paint work with an Iwata Revolution, and the Aztek 470 I used for the past decade. The Iwata Neo also comes in a purple box with a bottle attachment and a .5mm tip. Personally I think the gravity feed is superior if you plan to use it for very fine line work. But it does have some minor drawbacks if you are doing LARGE models, given that you have to add paint more frequently. Anyway, I would say a big key to any brush you get will be if spare parts are plentiful and readily available (i.e. available locally if possible). The Iwata I got didn't have a local vendor carrying the tips, which meant I got another one to canibalize when I squished the tip and needed to get a project finished before a new one could be mailed to me. Thankfully, parts were available after another couple months, so I was able to get a new tip, put the second brush back together and get it returned for credit. Now my case was an extreme one, but you don't want to findout you need a part at the start of a paint session and have to mail order it and wait several days. So a local vendor that might carry the parts is not a bad thing to have if possible. Spray quality of the brush I really like. At first, the trigger felt a bit stiff, but I was able to loosen the spring tension by unscrewing the internal spring retainer a little bit. The two color cup size selection is a nice idea, but I typically just keep the big cup installed. The lid is a nice touch though, if you fill it past three quarters full with paint. I REALLY like the fact that I can unscrew the cup from the body though as it helps me to be able to see deeper into the brush when I am cleaning it. Given this is a precision instrument that will spray better when you clean it often, teardown and cleanup is important and the fact that it has a screw on tip instead of a floating tip like the Revolution or Eclipse is a minor hassle. The tip wrench I keep in the Neo's original box because it is kind of small and easy to lose. So I only pull it out of the box when I need it. It is a minor hassle, but I do like the fact that the tip is nicely anchored to the airbrush body. I just make sure when I clean it to detach it from my compressor hose as the reason why I bent it accidentally is because the hose dragged it off my workbench and onto the floor and the thing did a nice nosedive right into my compressor. It was a freak accident, but not something I want to repeat. Thankfully, the needle wasn't installed at the time either or it would have been bent as well. Now I've heard that the metal used to make the Neo's needles and tips is a slightly softer compound than the hardened metals used in the Revolution and Eclipse (because Neo is made FOR Iwata by another company as opposed to it being made BY Iwata). Personally though, I haven't run into any problems with any pitting on the airbrush body or the needle and tip. I try to make sure to keep the needle from getting bent and thus far, it has done the job I expect it to do. I have a backup needle at my side in case I need it, but I haven't had to pull it out of the package yet. As I said, keep it clean and it should work fine. When I am spraying, my average cleaning cycle when I don't do a teardown is to flush the old paint with thinner swished around with a cotton swab for at least one pass, followed by a second pass of thinner. Then I take the cotton swab with thinner on it and swish it around the front of the nozzle and tip (MAKING SURE that I have the needle retracted fully by pulling back on the trigger so I don't risk bending it). A pass or two of that and I am ready for my next color. Usually I can spray four or five colors that way (usually alternating between acrylics and enamels, although that isn't really a problem). BUT, if my NEXT color is white or my last one was red or bright yellow, then I ALWAYS do a teardown and thorough cleaning of the tip, needle and body, just in case. BTW, small pipe cleaners and/or Microbrushes work great for cleaning in those tight spots of the tip and the needle channel, since a little paint can always be found in there even after a good flush. I've sold a lot of brushes and tried a few of them over the years. IMHO, the Neo is a good quality brush for its price. Yes, there are better ones out there, but it will work as a good grunt brush IMHO and works fine for somebody looking to branch out into double action brushes. The gravity feed works best if you want to do fine line work as you always get paint flow even if your pressure is dialed way down and for my average sized projects, I don't mind pouring paint into the color cup. Sure, you can spend more and there are better brushes out there. But as I said, if you can easily get parts for this brush, it is worth looking at. Take care of this brush (that goes for ANY brush) and it will take care of you. The only thing I have not been able to successfully spray through it is Mr. Surfacer since I think the tip is too small for that stuff. But I still have my old Paasche single action I can use in a pinch if I want to airbrush on primer. Otherwise I use spraycan Tamiya primer for those jobs.1 point
-
1 point
-
Nice job. Looks like the decals were a little bit of a pain too with some silvering visible, but I reckon it doesn't take one bit away from the clean and tidy finish.1 point
-
Thorough indeed! saw her a couple of month ago... stunning, they worked even in the interior!! a complete work on the tail secction!! Congratulacions!! Not bad a all from 3000 milles away!1 point
-
<p> :Tasty: :Tasty:1 point
-
ARGOS and a very helpful wife, 1/32 scale storage and display.1 point
-
Some more...1 point
-
after resizing the pics to 1/72.... a quick un-scientific holding up of the airfix sprues to the pics appears to be very good news for the Airfix Mig and not very good news for the hobbyboss (or vice versa ! ) hope somebody does a comparison !1 point
-
Milan, it was beautiful. So small and so beautiful. I look forward to seeing you at our AZmodel complete LET L-410 and DHC-6 Twin Otter in 1/144, which are in preparation. I enthusiastically look at what you can from these models do.1 point
-
(sorry, but I could'nt put the post properly before, now it´s ok) Here some pictures I took of the real machine More step-by-step pictures here: http://www.forum.modelismo-na.net/viewtopic.php?f=109&t=20709&start=01 point
-
Another two pictures and… Why do I build in 1/72? And why helicopters? And why do I make them with open doors? … and here they are finished I hope you enjoyed Best Regards Vitor Sousa Next I'll try to build the SH-60B Seahawk if I can find this 1/72 Hasegawa kit If some on see it available in some on-line store please let me know1 point
-
Hi Jon, Great progress. Ok tips on painting the canopy/windscreen: The windscreen frame is a thin black line. The front screen uprights are actually steel tie-bars covered with a black rubber seal between the glass sheets. This was done to achieve an almost nearly frameless view forward. The top of the windscreen frame is a casting - this usually ended up the same colour as the main upper side colour (ie. grey NF21 or silver F20). The canopy frame is painted the same dark sea grey as the upper surfaces on the fuselage with some "cut here" dashed yellow lines painted along its lower and front part of the frame. Hope this helps,1 point
-
Potez 25 TOE (Paraguayan) Gran Chaco War, 1934. 1/72 HitKit kit The build thread is here: http://www.britmodeller.com/forums/index.php?showtopic=234921030 Cheers Cliff1 point
-
There is a photo etch interior available IF you can get hold of one, heres the details1 point
-
Hi Vitor: Its so nice to watch your nice jewels: your last effort with your nice full of memories first. I think that the things that surround old collection pieces like your first are the thing that makes those old models invaluable to each person, even tough for others maybe doesn't have any value and consider them candidates to the scrap pile because they don't feel and watch what kind and amount of histories each of these old pieces have inside and out. I have done in 1979 a Revell Tempest that was lost in a shelf accident, and a friend of mine gave me a very bad assembled to reconstruct, and really, even tough I have the nice Heller and Academy kits together with the Maquette/Frog kit, the value I give to the older Revell will make me to look for a new one too!! Thank you very much for sharing Vitor!!!1 point
-
Can't beat a Harrier - as the USMC still know - unlike our Government!1 point
-
I'll be interested to see that. The wing tip shape is certainly incorrectly tapered along the trailing edge, but I intend to reshape that with the wings built. The wings were completed with this fix in mind, so any other fixes will have to be addressed without major surgery, or otherwise studiously ignored........ The shapes overall aren't bad overall, yet I've needed to do quite a bit of adjustment around the cockpit and wing roots to get it looking right. I've not put it against plans, (which I rarely trust in any case), but there's constant reference to photos. Cheers, Bill.1 point


This leaderboard is set to London/GMT+01:00