
Leaderboard


Popular Content
Showing content with the highest reputation on 21/08/12 in all areas
-
- A quick survey of the work on the resin MPM Bv 138 -I hope these few photos will gives you an idea of the work required by this kind of kit2 points
-
Hi all During my trip to France I was asked to build a model of a 1666HCU Halifax to be used at the dedication of memorial to a crew lost on a training trip in 1944. The information I was given was that the pilot was the only Icelandic Bomber Pilot lost during WWII. I looked up the Aircrew Rememberance society website and found that the a/c, Halifax JD386 of 1666HCU took of at 12.10hrs on the 29th February 1944 from RAF Wombleton for a one day navigation exercise. It was reported that whilst Flying at height the pilot, P/O Johann Sigurdson RCAF, lost control possibly due to rudder stall. Eyewitnesses on the ground reported that the pilot tried to be bringing the a/c under control by using the throttles but that at about 800ft the bomber entered a spiral dive from which it didn't recover, hitting the ground at 17.10 hours nr Bridge Farn nr Broughton, 4 miles ESE of Scunthorpe, Lincolnshire. All the crew died. P/O J Sigurdson RCAF. Age 23 Sgt R Loughrin RAFVR Age 20 F/O G Muskett RCAF Age 31 F/O J Eaton RCAF Age 30 W/O1 J Healey RCAF Age 33 Sgt F Wilt RCAF Age 22 Sgt P Zayets RCAF Age 23 All are buried at Harrogate Stonefall Cemetry and I will be visiting to place crosses on there graves at the earliest oppertunity. As for the modelit is a straight from the box Matchbox kit. I was rather rushed to get it finished and rather than the usual three months or so it usually ttake me to finish anything I did it in four weeks. Kind of shows really, not my best build but it is destined for a family member who I hope will treasure it, Regards Paul1 point
-
How do chaps, Made a start on this beastie today... Not sure yet if i'll be going with the Multi-Bolters or the Heavy Flamers as weapons fit. I am going to be painting up the interior and leaving all hatches open so it can be seen, which is something i don't usually do. But, i like the whats on offer on the inside! All interior bits were undercoated in Chaos Black from a rattle can. Tamiya XF55 Deack Tan was then sprayed on over this. Pics are a bit rough due to a bit of a rush job with the camera! ones to follow will be better! Hopefully all the detail will 'jump out' when painted up I've been watching some videos on Youtube by a chap called www.BuyPainted.com His video tutorials on all things Warhammer are amazing! Check 'em out More to follow as work progresses. Regards, Steve1 point
-
My 1st build took about 4 weeks working evenings and weekends solid, so when I had completed that I wanted a little more of a challenge, I had planned this out whilst doing the 1st build. 9 weeks evenings and weekends some evenings went in to early morning, well strait in to the next day. But it was one I wish I hadn’t started, if you know what I mean,originally it was going to be 3 Messerschmitt’s but Eduard had only 2 in stock at the time, so the other Messerschmitt became a stuka, but I took this a little further, and I added a small motor in the stuka, just to be different. Building 2 aircraft together was a little over powering, as I had to repeat everything, so I built the stuka afterwards on its own. Any way enjoy the images, I have loaded them as before as they are very large files, and it will slow the server down when scrolling if these were just added to the site. includes two Eduard 1/48 scale profipack Messerschmitt 109s, painted using Vallejo model air paints, applied with an Aztek spray brush. It also includes sales packs of Eduard cockpit detail set, and super scale decals, which are applied using micro set and micro sol. The models feature true detail tyres, with masters metal guns. The Stuka is a Hasegawa 1/48 scale model, painted with Vallejo model air paints, applied with an Aztek spray brush. After sales components include an Eduard cockpit detail set, and super scale decals, which are applied using micro set and micro sol. The diorama boasts Verlinden ground crew, along with Dragon Luftwaffe ground crew, a Tamiya jerry can set, Verlinden bomb set, and a scratch built engine hoist. The farmhouse and wall are from local train set dealer. The base is MDF with a Verlinden air force runway set, and Tamiya diorama grass effect. http://s1240.photobucket.com/albums/gg487/chameleon20091/2nd%20Build/1 point
-
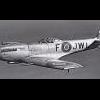
The saga is complete, not only have I run out of pieces to add to the models, but they have gotten very difficult to handle without breaking something! Here for your inspection are models of the two CASAs purchased by Spitfire Productions Ltd. from the Spanish air force in 1968, and flown to England for the filming of the movie 'The Battle of Britain'. Registered G-AWHA and G-AWHB, both aircraft survive today. One model, marked A4+CR, will be delivered to a dear friend I blame for instigating the entire BoB movie star build series. The other, 6J+CN will reside in my collection. Construction has been amply covered in the WIP thread so here are the finished products The antenna array with it's plethora of wire, insulators and vibration dampers flapping in the airstream was one of the most memorable images I had of the movie as a child so I spent a bit of time on this detail. The code letters needed to be changed easily for different scenes, so they were applied with stick-on appliques. On close inspection of photographs, a slight sheen can be seen on the area of the fuselage where the lettering was applied. I simulated this with a thin coat of Future. The letters themselves were cut from decals to provide a bit of thickness verses being painted with stencils. A couple of shots with the second CASA. One final shot with the first of the series, the Hispano 1112. My friend and I are planning a photo shoot with the entire BoB cast of Spits, Hurris, Hispanos and CASAs. There will be 8 models in all! Thank you all for your interest and kind support during the construction, I hope I was able to provide entertainment in return! Eric aka The Yankymodeler1 point
-
- This scene is supposed to have taken place somewhere in a Norvegian fjord in 1942. -The model is the MPM resin kit in 48 as usual for me and some Tamiya adding and some other things and figures1 point
-
This is the Revell re-boxing of the Hasegawa 1/48 JU87B-2 Stuka . Painted in the markings of an aircraft of 4 staffel/stukageschwader 2 "Immelmann" Libya 1941. Painted using Xtracrylix acrylics for the main RLM colours and a mixture of Revell and Tamiya for the bits and pieces. I applied a oil wash and some pastles for some weathering and finished off with some exhaust stains and a matt coat . thanks for looking Martin1 point
-
Winglets prevent vortexes at the wingtips - thereby reducing drag, and increase efficiency. The wing slope is called dihedral and is for stability. The lowest wing produces a greater vertical component of lift than the highest - which causes a self-stabilising effect. Thanks for posting the advert - classic stuff!1 point
-
De-duplicated. If you press Post and nothing appears to happen immediately, just wait a sec, or it'll double post of worse You could always use a razor saw, making successive cuts along the wing and then slicing the bits off with a very sharp knife, tidying up the cut-out with said knife and sanding sticks. Watch your fingers though, as applying a lot of pressure with a knife can lead to a nice sit down at A&E1 point
-
That looks just soooooooooooooooooo right !!!!!!!!!!!!!!!!! Not so much a what-iffer !!!!!!!!!!!!!!!!!! More a should-have-beener !!!!!!!!!!!!!!!!!! I once tried to paint the Bisset tartan !!!!!!!!!!!!!! I used a tin of Campbell and a tin of McDonald tartan !!!!!!! I got the impression that the two did not mix well !!!!!!!!!!!!!!! Got a bad reaction when the first was sprayed ,,,,,,,,,,,,,,,,,,, it was like they were fighting each other !!!!!!!!!!!!!! What do you reckon I should do ?????????? Nigel1 point
-
I got the Monogram -29 for my 13th birthday back in 19blah-de-blah, & it was colossal.... Would't mind another one, really! All i can say is good luck to the Carpet Monster, that's a hell of mouthful!!!!1 point
-
Great build (as always), it is amazing that the bus is so different yet still so recognisable as a Routmaster.1 point
-
Yes, Relish have done new props, and very nice they are too.1 point
-
Tartan paint? bit slow lol!1 point
-
HI Guys I just wanted to show my latest acquisition. I was fortunate enough to aquire these three shop glass display cabinets and they fitted the room perfectly with millimetres to spare. the cabinets stand 6 feet tall with 5 glass shelves and a bottom display area. they have overhead lighting and sliding doors. I won't tell you how little I paid for them but suffice to say i got a bargain. I had to decorate the room and lay a new carpet before putting them in. All of the main models are 1/32 so you can see the size of the display they are roughly 3 feet wide and 18 inches deep by 6 feet high. John1 point
-
Great job, maybe I'll start attacking the kit I bought at Cosford (much to the amusement of my fellow club members!). But first, SWMBO says that I should really try an finish the 10+ that are sitting on my shelves waiting for me to get back to them. My excuse is that it is more economical to paint in batches! Dave1 point
-
Nice job. Brings back memories of AEF flying at St. Moggie; the SC.9 was parked at the side of 404, with various patches from where the BDR team had played with it. Us ATC sprogs would stroll across and have a look at it, wondering why it had a funny nose on it. Them were the days...1 point
-
I have lots of customers who have actually built these models and turned them into some truely amazing models. Yes granted they are basic and this is their attraction for it means they are a blank canvas which you the modeller / Artist can do some magic. I make no excuse for the fact of their basic nature, they were all made by a few individuals who wanted one for themselves then made them available for others to buy and build. Plain and simple what pleases some may not be others idea of a modelling challenge. Regards John Tom I am going to watch this one closely too.1 point
-
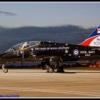
1. RAAF in Korea - maybe..... I have a similar, but not the same, thought......... 2. The Cavalier and Piper Mustangs are different to this one. The Heritage kit is 1/48 - we are thinking of bringing out a 1/48 Dart conversion, depending on whether anyone is interested. Back to the build........ We have made the belly panel a little long to cater for individual variations but it's easy to trim Unless you trim a little too much off then you are back to the filling we wanted to avoid Anyway it's easily done with a few thin strips of plasticard Once I have cleaned that up it's time to fit replacement flaps using a 50 degree template. Part of the gawky charm of this aircraft is the way the flaps just about sit on the drop tanks, hence the down position.1 point
-
Amazing build, very impressive camoflage pattern, I believe this is difficult to create in small scale. Hasegawa's Ju88/188 series are no easy and quick builds (I'm strugglin' with my Ju88A4 currently) with some glitches, not what one might expect from japanese high-tech-toolings. Let's wait if Revell Germany continue their 88 series, a 188 from them will propbably be less than half the price of the Hasegawa kit. In the meantime: one of the best 188 I've seen so far. Congratulations Rolf. Cheers from Vienna Austria Roman1 point
-
Hi Martin The 3Dparts, brass rod plus the etch set we are anticipating the cost to be under £10.00, Regards Robin1 point
-
At the moment, the 'Reference Notes' box is intended for links and book/magazine references. Obviously this doesn't allow sharing of references across kits. I have a separate References table planned for a future release. Tony: if you have already entered your data into the kits table, you will be able to transfer it into the References table via the Export/Import features, when the new table is available. RE: Decals For accessories that are not 'with kit', you can choose 'Accessory' (top left) on the Kit Record screen then choose an accessory type of Decals. If you have a Kit Type of 'Decals' and record them as kits this will distort your kit counts (statistics on the kit list and master screens). RE: Kit Type of 'Books' The only issue with this, is the kit counts will be out. You might be better off using an Accessory Type of 'Books' instead (as per decals above). The Kit Type can be filled out according to the referenced subject (e.g. Aircraft, if the reference is an aircraft). RE: Origin of Tooling You could add a custom field for this. Go into 'Tools / Custom Fields'. Click the help button on the 'Custom Fields' screen for more information. The help is also available online here: http://www.suisoft.c...rd.customfields Hope this helps. If you have any other questions, please let me know. Cheers, Gary1 point
-
I recently started using Mr Dissolved Putty instead of Mr Surfacer for deeper filling. At first I used the same method as previously, ie building up in layers, then getting the majority off with Mr Thinner and then sanding flat. I have found a slightly better way of using Dissolved Putty in that I put a good blob on where I want it then gently work it into the seam/panel line/rescribing mistake with a toothpick. As it cures/dries it becomes more putty like and workable. It does cure quicker than waiting for it, doesn't need building up in layers and can, therefore, be sanded sooner.1 point
-
got a good shine on the red paint, one monster of a bus, seats look great.1 point
-
you two! ha! all excuses... Adam1 point
-
Cheers Chaps! so thanks to a bit of indigestion I was up early this morning, so aftera final check that the UC leg asssemblies could be fitted through the wheel well openings ( one needed a tiny trim I found), I cemented the necelles onto the wings. Fit was Ok, and improved a bit more after some final fettling of the mating surfaces. Hot Plastic Weld did a good job of melting the joins together - meaning there was just a few gaps to fill- mainly at the rear, plus the pen nib rear nacelle tips have need a bit of filling, and a shim of card on one on the top to bring it level with the top wing surface. However when I did a tape assembly of the wings to fuselge, the tape I laid on the top wing to hold it all there did a suberb job of removing the filler in the wing panel lines, so tonight these have been re-filled with Mr Dissolved putty and put aside to harden. I'd used a Pentel liquid paper roller ball the first time - which worked great, but obvioulsy hadnt really stuck to the plastic. Next up is the fuselage cannon shell ejection ports. Onwards and upwards! Cheers Jonners1 point
-
That's really interesting and lifelike; how did you do the water? Is it a sheet of glass, and if so did you cut the kits down to the waterline? Very impressive anyway, and I'd like to pinch your idea for a Sunderland I'm going to build.1 point
-
Seeing this brings back memories of watching them when i was living in Suffolk. I've just picked up a cheap 48th 2 seater it may get built rather sooner than I planned. That's a nice build so far and very fast.1 point
-
I`ve seen it somewhere else but it`s still a great job and nice to marvel at !!1 point
-
Good work on your wheel bays and cockpit. I especially like the paintwork with your attention to detail. Belle1 point
-
Dave I hear you, I have been praying for HMS Tiger to be released and the God of plastic has heard me.1 point
-
The wing has been attached with cyano at the leading edge and clamped. Then I can do final fine adjustment at the trailing edge before clamping and attaching it also. It only took a very small amount of sanding (under those clamps). Now there is a bit of clean-up to do, then on with the tailplanes, flaps, canopy etc. I suppose a bit of research into what sort of "what-if" is in order also..... .1 point
-
Some very thin card is needed to cover the space where two parts have popped out of the wheel well - there are two pipes running through here and it's easy to just put the bits back in. The engine cowling is quite a good fit to the fuselage halves. I actually joined the rear fuselage halves, leaving the forward halves free so they would slip over the cowling attachment plug easily then joined the whole thing up with cyano and clamped it. There's a very small step to be filled with a little bit of Mr Surfacer on the upper rear part of the cowling and that's about it. I need to tidy up the wheel bay edges and insert a strip of card between front and rear edges of the wheel bay (bolt angle cover) and to touch up the radios which have got inadvertently weathered Then we can join the wing and fuselage. I will glue front and rear edges leaving the wing roots loose as they need spacers to overcome the Academy kit's inherent step there.- this is useful advice for anyone building the Academy kit as a conventional Mustang too.1 point
-
Looking good, i need to crack on with the Mudhen1 point
-
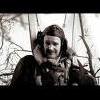
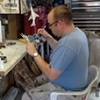
On the main interior now. First thing I wanted to tackle is the crew. All two of them.... a pilot & an engineer and identical twins apparently. The last figures I painted were Zvezda & Revell. The facial features seem to be lacking a bit with this kit, I tried a few times to do some shadows & highlights on the facial area but I could tell from the start that the detail isn't really there. Not overly concerned as from a distance you can't really tell but I've seen better figures! The best I could do is "robocop" on the left and a slightly bearded "Scott of the Antarctic" on the right!1 point
-
will be tracking this one, love the kit, although i love the box art just that little bit more!1 point
-
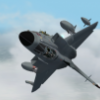
This is encouraging news, as Shane (Hi Shane) explains this will give the F-18F a life after F-35. However these 'kits' being made available, and Australia actually making perchace under our current militarily toxic budget are two different things........? IF the decision has been made for the Growler conversions, I would assume this reflects negitavly on our F-35 perchace overall . As F-35 has its own integral ECM ? -And that there is a SIGNIFICANT fiscal and continuant hopes for a SuperBug fleet. (but I wont get caught up in the F-35 debate.......again, too many invested US interests ?). -Incidently Ray Hamilton (here in Aus'), does a great 1/48 'Not a Growler' conversion !1 point
-
Right, I'm back. I've managed to survive two weeks in the Gulf, driving on the wrong side of the road, working on a naval base every day and living in a compound with a .50 cal on the gate. Trouble is, after a fortnight of constant 115F temperatures, now I'm back in the British summer, I'm cold! Onto the build I left a while back...I've decided against opening up the MLG bays completely, but have detailed the parts which are visible. This necessitated removing a large block in the front of the well which shouldn't be there, fabricating a new extended sidewall and roof for the well, and detailing it with rivets, wires, pipes etc. References for this came from the net, and inspiration came from Brooksy's excellent scratchbuilt wells on his build thread. Cheers, mate! Here's the starboard side: and here's the port side: Ignore the state of the airbrake wells, they're not finished yet, and the rough join at the top of the open wheel wells won't be visible as there's a small panel which fits on there. All in all, a few hours work for something that can hardly be seen when the oleo leg is in place. Still, it's all good fun and a good way to limber up after a couple of weeks off the build. Next up should be joining the fuselage halves...unless some more detailing work crops up! Cheers, Dean1 point


.thumb.jpg.d17ff607fc7e89ed057e63fcb6f2a888.jpg)


This leaderboard is set to London/GMT+01:00